Wednesday, October 18, 2023

Configure L5 Swagger and documention for GET and POST

Here, I will describe usage of Swagger, list the L5 Swagger basic configurations, provide templates to document POST and GET API (Application Programming Interface).

What does L5 Swagger provide?

For PHP developers, here in particular those using Laravel framework, L5 Swagger provide the means to document your API and have it presented in the form of a web page for quick browsing of available APIs and testing its results.

Currently here are good to know facts

  1. Its is developed as a wrapper on swagger-php and swagger-api specifically for Laravel framework.
  2. It supports OpenAPI (formerly known as Swagger), a specification for documentation of RESTful API irrespective of technology, like PHP, Java or .Net.
  3. L5-Swagger currently supports OpenAPI version 3.0 and 3.1. Its project page is https://github.com/DarkaOnLine/L5-Swagger
  4. It supports at least PHP version 7.2. PHP 8.1 introduces the use of attributes.
  5. An online swagger editor is available at swagger.io
My example hinges on PHP 7.4 with darkaonline/l5-swagger version 8.5.1. Will just dump example of code and configurations here. Details will be explained at another time. Good luck.

Quick notes to setup of Swagger in a ready Laravel version 7 or 10 project;

composer require "darkaonline/l5-swagger"
php artisan vendor:publish --provider "L5Swagger\L5SwaggerServiceProvider"
php artisan l5-swagger:generate

Customisation can be done by editing config/swagger.php, which can be continued in future articles.

Security

Security options are;
  • None - no security is set to access API
  • Basic Auth - Username and password is set for each request
  • API Key - A key is set for each request
  • OATH - An authorisation scheme for each request

Example 1 - API to login

Request 

Headers:
App-Key: SOmeVeryLongKey

Body form-data:
username: example@some.email.example
password: password

API returns with HTTP code 200

{
    "user_id": 4142,
    "token": "173892|HxOQJBfDgDgDgaqgCpSS1rh7UY7HWdurtanHhq7"
}

API returns with HTTP code 400

{
    "message": "These credentials do not match our records."
}

Example 2 - API to retrieve user profile

Request 

Headers:
App-Key: SOmeVeryLongKey

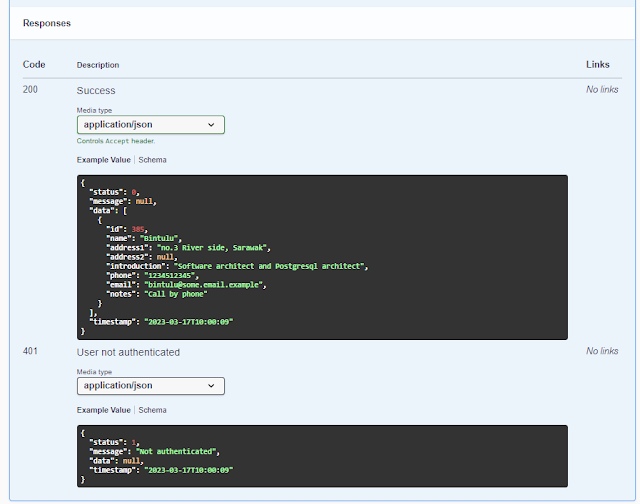
API returns with HTTP code 200

{
  "status": 0,
  "message": null,
  "data": [
    {
      "id": 385,
      "name": "Bintulu",
      "address1": "no.3 River side, Sarawak",
      "address2": null,
      "introduction": "Software architect and Postgresql architect",
      "phone": "1234512345",
      "email": "bintulu@some.email.example",
      "notes": "Call by phone"
    }
  ],
  "timestamp": "2023-03-17T10:00:09"
}

Swagger documentation

Swagger group for Login

Swagger group for login


Swagger for login

Added example to submit with multi/form-data (which is not necessary for login)


Swagger for user profile

Swagger user profile

Swagger user profile


The Code

Our example api.php and UserController.php

routes/api.php

Route::post('/login', 'API\UserController@login');
Route::get('/user/profile', 'API\UserController@login');

Function login in app/Http/Controllers/API/UserController.php

    /**
     * @OA\Post(
     *     path="/api/login",
     *      tags={"Login"},
     *      security={{"appkey":{}}},
     *      @OA\RequestBody( required=true, description="Login",
     *           @OA\MediaType(
     *             mediaType="multipart/form-data",
     *             @OA\Schema(
     *                 required={"username","password"},
     *                 @OA\Property(
     *                     property="username",
     *                     type="string",
     *                     description="user login id of type email"
     *                 ),
     *                 @OA\Property(
     *                     property="password",
     *                     type="password"
     *
     *                ),
     *             ),
     *          ),
     *
     *     ),
     *     @OA\Response(response="200", description="An example endpoint",
     *          @OA\JsonContent(
     *               @OA\Property(property="id", type="number", example="1957"),
     *               @OA\Property(property="token", type="string", example="173892|HxOQJBfDgDgDgaqgCpSS1rh7UY7HWdurtanHhq7"),
     *          ),
     *     ),
     *     @OA\Response(response="400", description="The id or password incorrect.",
     *           @OA\JsonContent(
     *               @OA\Property(property="message", type="string", example="These credentials do not match our records."),
     *           ),
     *     ),
     * )
     */

Function getUserProfile in app/Http/Controllers/API/UserController.php
    /**
     * @OA\Get(
     *     path="/api/user/profile",
     *     tags={"Login"},
     *     summary="Retrieve user profile",
     *     description="Retrieve user profile based on user auth detected. No parameters are required",
     *     operationId="getUserProfile",
     *     security={{"bearer_token":{}}},
     *      @OA\Parameter(
     *         name="App-Key",
     *         in="header",
     *         description="App-Key",
     *         example=L5_SWAGGER_APPKEY
     *      ),
     *
     *     @OA\Response(response=401, description="User not authenticated",
     *           @OA\JsonContent(
     *               @OA\Property(property="status", type="number", example="1"),
     *               @OA\Property(property="message", type="string", example="Not authenticated"),
     *               @OA\Property(property="data", type="string", example=null),
     *               @OA\Property(property="timestamp", type="string", example="2023-03-17T10:00:09"),
     *           ),
     *     ),
     *       @OA\Response(
     *         response=200,
     *         description="Success",
     *         @OA\JsonContent(
     *           @OA\Property(property="status", type="number"),
     *           @OA\Property(property="message", type="string", example=null),
     *           @OA\Property(property="data", type="array",
     *               @OA\Items(
     *                  @OA\Property(property="id", type="number", example=385),
     *                  @OA\Property(property="name", type="string", example="Bintulu"),
     *                  @OA\Property(property="address1", type="string", example="no.3 River side, Sarawak"),
     *                  @OA\Property(property="address2", type="string", example=null),
     *                  @OA\Property(property="introduction", type="string", example="Software architect and Postgresql architect"),
     *                  @OA\Property(property="phone", type="string", example="1234512345"),
     *                  @OA\Property(property="email", type="string", example="bintulu@some.email.example"),
     *                  @OA\Property(property="notes", type="string", example="Call by phone"),
     *              ),
     *           ),
     *           @OA\Property(property="timestamp", type="string", example="2023-03-17T10:00:09"),
     *         ),
     *       ),
     *  ),
     */


Tuesday, October 17, 2023

Laravel Helper class

Programming is made more systematic with a large number of helper classes in Laravel. Examples are the Arr::last, Arr::add, Arr::get, asset, route, secure_url, url, dd, collect, env)

Lots of documentations are available at Laravel (see Laravel 7). 

Example of usage

Helper url( )

Returns a fully qualified URL

$url = url('user/profile');

Creating your first helper class

The following illustrates a function named "courier" that will be available to all controllers. It typically returns data in a predefined format.

Step 1: Create a helper file in app/Helpers with the name myHelpers.php


/app/Helpers/myHelpers.php

Step 2: Create the function in the file myHelpers.php


<?php
use Carbon\Carbon;

if (! function_exists('courier')) {
function courier($status, $message, $data){
$now = carbon::now();
$status = $status??0;
$package = [
'status'=>$status,
'message'=>$message,
'data'=>$data,
'timestamp'=>$now,
];
return $package;
}
}

Step 3: Edit [autoload] in composer.json


"autoload": {
        "files": [
            "app/Helpers/myHelpers.php",
        ],

Step 4: Reload Laravel


composer dump-autoload

Usage of "courier" helper 

In any of the function in Controller classes, call the helper function. Example

public function getUsers( ){
$users = User::where('status','active')->get();
$status=0; // success
$message=null;
if(count($users)>0){
$status=1; // success but not users available
$message="None";
}
return response(courier($status, $message, $users), 200);
}


Thursday, October 12, 2023

Laravel 10 - User API authentication with Sanctum

Laravel 10 and User API authentication with sanctum

Laravel 10 is available to create restful API where it provides (1)process to issue API tokens to users AND (2)authentication of single page applications(SPA).

This tutorial requirements of system;

  • laravel/sanctum version 3.3.1
  • PHP version 8.2.11
  • Node version 18.12.1
  • Composer version 2.6.3
  • Npm version 8.19.2
  • PostgreSQL database version 15

Laravel application is successfully installed will all recommended PHP extensions.

Create the database and assign user hello assign to that database, which I name as demo. Use hello, or any other user you have created in the database.


create database demo;
grant all privileges on database demo to hello;
ALTER DATABASE demo OWNER TO hello;


Lets create the Laravel application and add sanctum support


composer create-project laravel/laravel demo
cd demo


Configure the .env file to access the database that was declared as demo.


DB_CONNECTION=pgsql
DB_HOST=127.0.0.1
DB_PORT=5432
DB_DATABASE=demo
DB_USERNAME=hello
DB_PASSWORD=

composer require laravel/sanctum
php artisan vendor:publish --provider="Laravel\Sanctum\SanctumServiceProvider"


Identify and inspect the following folders and files;


config/sanctum.php
database/migrations/2019_12_14_000001_create_personal_access_tokens_table.php


Create database for Sanctum and enable Sanctum


php artisan migrate


Edit app/Http/Kernel.php


'api' => [
    \Laravel\Sanctum\Http\Middleware\EnsureFrontendRequestsAreStateful::class,
    'throttle:api',
    \Illuminate\Routing\Middleware\SubstituteBindings::class,
],


Configure sanctum by editing model, service provider and auth config. Edit app/Models/User.php


use Laravel\Sanctum\HasApiTokens;
...
use HasApiTokens;


Add API to register and login


Edit routes/api.php


Route::controller(RegisterController::class)->group(function(){
    Route::post('register', 'register');
    Route::post('login', 'login');
});


php artisan make:controller BaseController
php artisan make:controller RegisterController


Edit RegisterController 


use App\Http\Controllers\BaseController as BaseController;
use App\Models\User;
use Illuminate\Support\Facades\Auth;
use Validator;
use Illuminate\Http\JsonResponse;


public function register(Request $request): JsonResponse
    {
        $validator = Validator::make($request->all(), [
            'name' => 'required',
            'email' => 'required|email',
            'password' => 'required',
            'c_password' => 'required|same:password',
        ]);
   
        if($validator->fails()){
            return $this->sendError('Validation Error.', $validator->errors());       
        }
   
        $input = $request->all();
        $input['password'] = bcrypt($input['password']);
        $user = User::create($input);
        $success['token'] =  $user->createToken('MyApp')->plainTextToken;
        $success['name'] =  $user->name;
   
        return $this->sendResponse($success, 'User register successfully.');
    }
   
    /**
     * Login api
     *
     * @return \Illuminate\Http\Response
     */
    public function login(Request $request): JsonResponse
    {
        if(Auth::attempt(['email' => $request->email, 'password' => $request->password])){ 
            $user = Auth::user(); 
            $success['token'] =  $user->createToken('MyApp')->plainTextToken; 
            $success['name'] =  $user->name;
   
            return $this->sendResponse($success, 'User login successfully.');
        } 
        else{ 
            return $this->sendError('Unauthorised.', ['error'=>'Unauthorised']);
        } 
    }


Retrieve the registration api 


{
    "success": true,
    "data": {
        "token": "1|R8qfygjItwjleo23QwdqqS5ZcVLZwaRH72iJjiEqd4d85583",
        "name": "admin@example.com"
    },
    "message": "User register successfully."
}


Retrieve login api


{
    "success": true,
    "data": {
        "token": "2|IyNnxOU0N1cc0s2bADqzASxzwc8kl7z5UbqZ2oARd68aa58b",
        "name": "admin@example.com"
    },
    "message": "User login successfully."
}


Ref: https://www.itsolutionstuff.com/post/laravel-10-rest-api-authentication-using-sanctum-tutorialexample.html#google_vignette

https://laravel.com/docs/10.x/sanctum#token-ability-middleware


Next, add a appkey token.

https://laravel.com/docs/10.x/middleware

Monday, October 2, 2023

MySQL group by unix timestamp

Drupal CMS includes a webform where each form has an ID. An example to retrieve number of user access of a Drupal database for a given node id. The column ws.created is stored with a unix timestamp (looks like many digits number). Use MySQL function from_unixtime to format into something like 2023-10-02. The node in this example have an ID=940.

select count(ufd.name) submissions, DATE_FORMAT(from_unixtime(ws.created), "%Y-%m-%d")
from webform_submission ws 
left join users_field_data ufd 
on ws.uid = ufd.uid
left join node_field_data nfd 
on ws.entity_id = nfd.nid
where ws.in_draft = 0
and ws.entity_type like 'node'
and ws.entity_id = 940
group by DATE_FORMAT(from_unixtime(ws.created), "%Y-%m-%d")

Here is a query to list all the associated users who accessed the webform

select ufd.name name, ufd.mail email, from_unixtime(ws.created) accepted_at, from_unixtime(ws.changed) changed_at, ws.remote_addr 
,nfd.title, ws.uri URL
from webform_submission ws 
left join users_field_data ufd 
on ws.uid = ufd.uid
left join node_field_data nfd 
on ws.entity_id = nfd.nid 
where ws.in_draft = 0
and ws.entity_type like 'node'
and ws.entity_id = 940

Tuesday, September 19, 2023

R language basics

The R programming language can be downloaded then installed from https://cran.r-project.org/index.html

Next download and install R Studio from https://posit.co/download/rstudio-desktop/

Install the R tutorial by opening R Studio, in a console install the package swirl and start the tutorial.

install.packages("swirl")

library(swirl)

swirl()

Following are the initial list of commands learnt from Swirl in lesson 1 to 4

skip(), play(), nxt(), bye(), main(), info()

c(), sqrt(), info()

help commands ?c , ?`:`

getwd(), ls(), list.files(), dir(), args(), getwd(), dir.create(), setwd(), file.create(mytest.R), file.exists(), file.info(), file.rename(from, to), file.path(),setwd(),unlink("testdir",recursive=TRUE)

seq(), seq(1,10, by=0.5), length(), rep(0, times=40),rep(c(0,1,2), times=10)

rep(c(0,1,2), each=10)


Happy R gramming!

Thursday, September 14, 2023

Centos 7 monitoring with cockpit

Monitor Centos Linux 7 servers through a web browser. On Centos Stream 8, Cockpit is installed by default on the most parts.

Steps to install cockpit and start the service

These require Linux Administrative user access at the command line.

sudo yum install cockpit cockpit-storaged

sudo systemctl enable --now cockpit.socket

sudo firewall-cmd --permanent --zone=public --add-service=cockpit

sudo firewall-cmd --reload

OR with iptables

sudo iptables -A INPUT -i eth0 -s 0/0 -p tcp --dport 9090 -j ACCEPT

sudo systemctl start cockpit

Access Cockpit

On web browser access URL http://<serverip>:9090

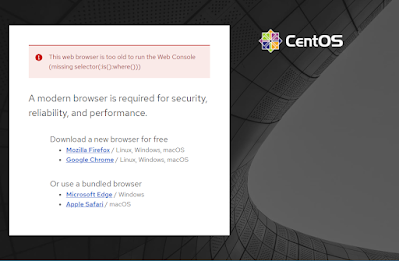
Cockpit layout


Wednesday, September 13, 2023

How to add remote MySQL user access.

Users created in MySQL should be for localhost access. In order for a user to be connected from a remote computer, the IP address must be mentioned in its user record. Removing a user access is a matter of deleting that user from the user record.

How to add remote user access

Example, user with login "developer" wants to access MySQL database at server 10.1.1.100 from a laptop at the IP address 10.1.2.23.

The network and database administrator received approval to allow any user to access remotely from the IP address 10.1.2.1 to 10.1.2.224 to the existing database name "tutorial". Here is how its done.

Step 1: Login as server administrator and ensure MySQL can accept connections from remote servers.

MySQL community , edit the file /etc/my.cnf

MariaDB community , edit the file /etc/my.cnf.d/server.cnf

Add the following line, save.

bind-address=0.0.0.0

Restart the MySQL server.

Ensure the server firewall allows access to MySQL port, where default is port 3306.

Example for Centos;

sudo firewall-cmd --new-zone=public --permanent

sudo firewall-cmd --reload

sudo firewall-cmd --permanent --zone=public --add-source=133.155.44.103

sudo firewall-cmd --permanent --zone=public --add-port=3306/tcp

sudo firewall-cmd --reload

sudo firewall-cmd --list-all-zones

sudo firewall-cmd --get-services


Step 2: Login to MySQL database as administrator. Add login for remote user and list users.

mysql -u root -p

> CREATE USER 'developer'@'10.2.%' IDENTIFIED BY 'password';

> SELECT user,host FROM mysql.user;


Step 3: Assign login to access database

> GRANT ALL PRIVILEGES ON 'tutorial'.* to 'developer'@'10.2.%';

> FLUSH PRIVILEGES;

> SHOW GRANTS FOR 'developer'@'10.2.%';


Step 4: Monitor connection;

> SELECT user,host, command FROM information_schema.processlist;


How to connect remotely

On the remote server, run the following client command 

mysql -u developer -p -h 10.1.1.100

The MySQL client, it should have the same configuration for SSL as the server to avoid SSL issues.


How to remove remote user access

Login as database administrator and delete login of user and its host as recorded in database;

> DELETE FROM mysql.user WHERE User='developer' AND Host NOT IN ('localhost', '127.0.0.1', '::1');

> FLUSH PRIVILEGES;

Blog Archive