Friday, April 5, 2024

RabbitMQ implementation in Laravel and Linux Centos 8

The use of multiple servers with dedicated functionality can communicate with each other through API and notifications. 

Overview

Example where a backend server that performs a task followed by notification to user via Email, while to another server through PUSH notification.

email and notifications
The push allows communication between 2 computer systems through an agreed protocol. RabbitMQ is a message-queueing software also known as a message broker or queue manager, that provides such a service, implementing protocols AMQP 1.0 and MQTT 5. It is can be used under the Apache License 2.0 and Mozilla Public License 2.

In a simple description on its usage;
  1. A producer: Sends a message to RabbitMQ with a specified exchange (direct, topic, or fanout) and queue(s) name.
  2. RabbitMQ: Places the message to the queue(s).
  3. A consumer: Configured to retrieve message from a queue.
  4. A consumer: Check and retrieve message from the queue.
  5. RabbitMQ: Remove message from the queue
Communication with RabbitMQ can be simplified through the library amqplib that implements the machinery needed to make clients for AMQP 0-9-1.
Messaging queue

Steps
  1. Install RabbitMQ
  2. Configure RabbitMQ
  3. Add RabbitMQ package in a Laravel project
  4. Create a service of Laravel jobs or other automated function
  5. Create Laravel controller to publish and consume messages
  6. Tinker to test Producer
  7. Tinker to test Consumer

Install RabbitMQ

Lets imagine following environment;
  1. RabbitMQ server: IP 10.1.1.101
  2. Producer server: IP 10.1.1.102
  3. Consumer server: IP 10.1.1.103
On RabbitMQ, ensure PHP is installed, including the package socket. On this example, SELINUX is enabled.

On RabbitMQ, install the server application. 

curl -s https://packagecloud.io/install/repositories/rabbitmq/rabbitmq-server/script.rpm.sh | sudo bash
curl -s https://packagecloud.io/install/repositories/rabbitmq/erlang/script.rpm.sh | sudo bash
sudo yum makecache -y --disablerepo='*' --enablerepo='rabbitmq_rabbitmq-server'
sudo yum -y --disablerepo='*' --enablerepo='rabbitmq_rabbitmq-server' --enablerepo='rabbitmq_erlang'  install rabbitmq-server
rpm -qi rabbitmq-server
Name        : rabbitmq-server
Version     : 3.13.0
Release     : 1.el8
Architecture: noarch

Configure the server

By default, RabbitMQ uses port 5672, and for the web administration port 15672. Update the server hosts file with its domain name and enable the web based management
echo "127.0.0.1 rabbitmq.demo" | sudo tee -a /etc/hosts
sudo systemctl enable --now rabbitmq-server.service
sudo rabbitmqctl status 
sudo rabbitmq-plugins enable rabbitmq_management
ss -tunelp | grep 15672
sudo firewall-cmd --add-port={5672,15672}/tcp --permanent
sudo firewall-cmd --reload
Verify access: Open URL http://rabbitmq.demo:15672 on a web browser. Then ensure tall feature flags are viewable.

rabbitmqctl list_feature_flags
rabbitmqctl enable_feature_flag all

Create users

Create the initial administrator user as admin and a password.

sudo rabbitmqctl add_user admin SECRETPASSWORD

sudo rabbitmqctl set_user_tags admin administrator
sudo yum -y  --disablerepo='pgdg*'  install mlocate 
sudo updatedb

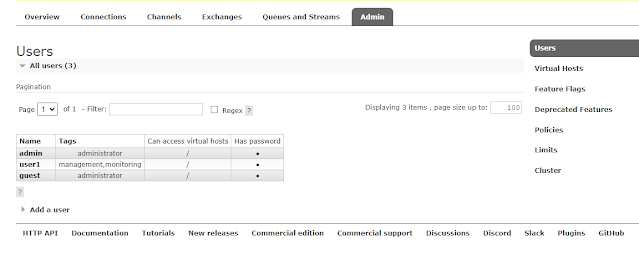
Create user to access from Producer and Consumer.
sudo rabbitmqctl add_user user1 SECRETPASSWORD
sudo rabbitmqctl set_user_tags user1 management,monitoring

Web console users
Create a virtual host, then click on username user1 and set permissions as required. Example, add to Topic permission with read/write regexp value as .*

Laravel support for rabbitmq

Create or use an existing laravel project.
composer require php-amqplib/php-amqplib
composer update
sudo semanage port -a -t http_port_t -p tcp 5672

Edit Laravel's .env file:
RABBITMQ_HOST=mem.hqcloak
RABBITMQ_IP=10.1.1.101
RABBITMQ_PORT=5672
RABBITMQ_VHOST="/"
RABBITMQ_LOGIN=user1
RABBITMQ_PASSWORD=SECRETPASSWORD
RABBITMQ_QUEUE="queue1"

Laravel rabbitmq service 

Create the file in app\Services\RabbitMQService.php . No examples is provided for usage of this service.
<?php
namespace App\Services;
use PhpAmqpLib\Connection\AMQPStreamConnection;
use PhpAmqpLib\Connection\AMQPSSLConnection;
use PhpAmqpLib\Message\AMQPMessage;
use PhpAmqpLib\Exchange\AMQPExchangeType;
use Illuminate\Support\Facades\Log;

class RabbitMQService
{
    protected $connection;
    protected $channel;
    protected $exchange = 'amq.topic';
    protected $queue = null;
    protected $routingKey = 'routing_key';
    protected $status = true;

    public function __construct()
    {
        $this->connection = new AMQPStreamConnection(
            env('RABBITMQ_HOST'),
            env('RABBITMQ_PORT'),
            env('RABBITMQ_LOGIN'),
            env('RABBITMQ_PASSWORD'),
            env('RABBITMQ_VHOST')
        );
        $this->channel = $this->connection->channel();
        /*
            name: $exchange
            type: direct
            passive: false // don't check if an exchange with the same name exists
            durable: false // the exchange will not survive server restarts
            auto_delete: true // the exchange will be deleted once the channel is closed.
        */
        $this->channel->exchange_declare($this->exchange, 'topic', false, true, false);
        /*
            name: $queue    // should be unique in fanout exchange. Let RabbitMQ create
                            // a queue name for us
            passive: false  // don't check if a queue with the same name exists
            durable: false  // the queue will not survive server restarts
            exclusive: true // the queue can not be accessed by other channels
            auto_delete: true // the queue will be deleted once the channel is closed.
        */
        $queue = env('RABBITMQ_QUEUE', 'queue1');
        $this->init($queue, 'routing_key');
    }

    public function init($queue, $routing)
    {
        $this->queue = $queue;
        $this->routingKey = $routing;
        $this->channel->queue_declare($this->queue, false, true, false, false);
        $this->channel->queue_bind($this->queue, $this->exchange, $this->routingKey);
    }

    /**
     * custom message format: code | value | extradata
     */
    public function publish($message)
    {
        if (null == $this->queue) {
            return;
        }
        $msg = new AMQPMessage($message);
        $this->channel->basic_publish($msg, $this->exchange, $this->routingKey);
    }

    public function stop()
    {
        $this->status = false;
    }

    public function consume($callback)
    {
        if (null == $this->queue) {
            return;
        }
        /*
            queue: Queue from where to get the messages
            consumer_tag: Consumer identifier
            no_local: Don't receive messages published by this consumer.
            no_ack: If set to true, automatic acknowledgement mode will be used by this consumer. See https://www.rabbitmq.com/confirms.html for details.
            exclusive: Request exclusive consumer access, meaning only this consumer can access the queue
            nowait: don't wait for a server response. In case of error the server will raise a channel
                    exception
            callback: A PHP Callback
        */
        $this->channel->basic_consume($this->queue, 'test', false, true, false, false, $callback);
        while ($this->channel->is_consuming()) {
            if (false == $this->status) {
                break;
            }
            $this->channel->wait();
        }
    }

    public function __destruct()
    {
        $this->channel->close();
        $this->connection->close();
    }

}


Create Laravel Controller

On the server Producer and Consumer create controller that can publish or consume, with the file app\Http\Controllers\RabbitMQController.php

<?php
namespace App\Http\Controllers;
use App\Services\RabbitMQService;
use Illuminate\Http\Request;
use Illuminate\Support\Facades\Log;

class RabbitMQController extends Controller
{
    public function publishMessage(Request $request)
    {
        $message = $request->message;
        $result = $this->publish($message);
        return response('Message published to RabbitMQ');
    }

    public function publish($message)
    {
        $rabbitMQService = new RabbitMQService();
        $rabbitMQService->publish($message);
        return response('Message published to RabbitMQ');
    }

    public function consumeMessage()
    {
        $rabbitMQService = new RabbitMQService();
        $callback = function ($msg) {
            echo "Received message: " . $msg->body . "\n";
        };
        $rabbitMQService->consume($callback);
    }

    public function consume()
    {
        $rabbitMQService = new RabbitMQService();
        $callback = function ($msg) {
            $data = $msg->body;
            echo "Received:".$data;
        };
        $rabbitMQService->consume($callback);
    }
}

Create a tinker to test Producer

On server Producer, create the file ./tinker-producer.php
$controller = app()->make('App\Http\Controllers\API\RabbitMQController');
$results = app()->call([$controller, 'publish'], ['message'=>'1001|ACTION|VALUE'] );
print( "$results");

Run tinker

more tinker-producer.php | php artisan tinker

On RabbitMQ web console, observer creation of the queue and the message.

Create a tinker to test Consumer

On server Consumer, create the file ./tinker-consumer.php
$controller = app()->make('App\Http\Controllers\RabbitMQController');
$results = app()->call([$controller, 'consume'],[] );
print( "$results");

Run tinker

more tinker-consumer.php | php artisan tinker

On RabbitMQ web console, observer queue and message consumed.


Thursday, March 21, 2024

Cockpit Login Error on Centos

Cockpit provides a web interface to manage Centos Linux servers. E.g. https://10.1.1.123:9090/ 

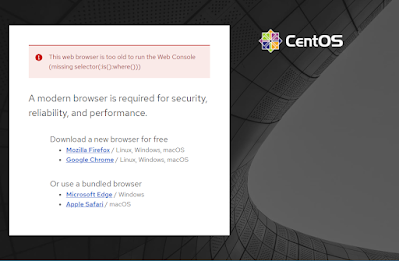
However, users have found login error on Centos that mentions 

This web browser is too old to run the Web Console (missing selector(:is():where()))

Cockpit login error

This is due to updates in the web browser engine. Following is a suggestion to fix;


Step 1: Update cockpit package to current version of above version 280.

    dnf update cockpit

Step 2: Replace the javascript code.

    sed -i 's/is():where()/is(*):where(*)/' /usr/share/cockpit/static/login.js


Reference: 

https://cockpit-project.org/blog/login-issues.html


Friday, January 26, 2024

Handling date and time with carbon

In PHP and Laravel, date and time can be managed using Carbon. Default PHP uses the Date object, which does not have as many flexibility as Carbon object. To start using Carbon on Laravel, add at top, along with other "use" statements. 

use Carbon\Carbon

Here are examples of its usage. Declare current date and time

$currentDateTime = Carbon::now();

The current value can be printed with 

print_r($currentDateTime);


Format to user specific output.

$now = Carbon::now()->format('d-m-Y'); // 1-1-2024

$now->toDateString(); // 2024-01-01

$now->toFormattedDateString(); // Jan 1, 2024

$now->toTimeString(); // 00:00:00

$now->toDateTimeString(); // 2024-01-01 00:00:00

$now->toDayDateTimeString(); // Mon, Jan 1, 2024 12:00 AM

$now->toCookieString(); // Monday, 01-Jan-2024 00:00:00 UTC

$now->toIso8601String(); // 2024-01-01T00:00:00+00:00


Other ways of creating a Carbon object

Carbon::parse('2023-03-10'); // Carbon instance for 2023-01-01 00:00:00

Carbon::parse('Monday of this week'); // Monday of this week

Carbon::parse('first day of January 2024'); // first day of January 2024

Carbon::parse('first day of this month'); // first day of this month

Carbon::parse('first day of next month'); // first day of next month

Carbon::parse('first day of last month'); // first day of last month

Carbon::parse('last day of last month'); // last day of last month


Retrieve values of a carbon in various formats;

$now->year; 

$now->month; 

$now->dayOfWeek; 

$now->englishDayOfWeek; 

$now->englishMonth; 

$now->tzName; 

$now->dst;


Subtract one hour

Carbon::now()->subHour();

Subtract more than 1 hour

Carbon::now()->subHours(2);


Add one hour

Carbon::now()->addHour();

Add more than 1 hour

Carbon::now()->addHours(2);


Add one day

Carbon::now()->addDay();

Add more than 1 day

Carbon::now()->addDays(2);


This can also be applied to subWeeks(), addWeeks().


Set to a specific date by altering day or month or year

$currentDateTime = $currentDateTime->setMonth(2);

$currentDateTime = $currentDateTime->setDay(18);

$currentDateTime = $currentDateTime->setYear(2025);

Example that applies a specific day and month.

$currentDateTime = $workDayStart->setDay($calcCreatedDate->format('d'))->setMonth($calcCreatedDate->format('m'))->setYear($calcCreatedDate->format('Y'));


Retrieve the difference between 2 Carbon dates $start and $now.

$start->diff($now); \\ returns DateInterval

$start->diffInMinutes($now); \\ returns difference in minutes

$start->diffInMinutes($now); \\ returns difference in

$start->diffForHumans($now);

Blog Archive