On the Sony Experia X10i, with Android 2.3.3 (Gingerbread) I am currently getting the message
"Phone storage space is getting low."
So, I did a backup (see HERE) then a factory reset to clear all data. Maybe some of the slowness issues on the X10i will be resolved.
Note: Free apps may not be automatically reinstalled. I have not figured out why.
Here are steps for the factory reset.
Step 1: Start the reset
On the X10i, Left click, and in menu choose "settings".
Choose "Factory data reset"
Do not choose "Erase SD card", because all my photos and backup is there.
Click "Reset phone"
Click "Erase everything"
The phone will power off (shut down)
Step 2: Start the x10i
The phone will restart, press the middle button and unlock the phone.
Choose Language,
Choose step 2/6 and change the date and time.
Choose step 5/6, set up the google, email account. What about Sony Ericsson sync (not working)?
Sony Ericsson sync was asking to select your country, but listed only 8 names and didn't list mine. It then says service is discontinued
Click in step 6/6 click "Finish".
Showing posts with label x10i. Show all posts
Showing posts with label x10i. Show all posts
Thursday, July 5, 2012
Backup X10i phone with Gingerbread
In cases where the X10i needs to be fully cleared, such as a fresh reinstall or upgrade, user data needs to be backup. If you are using contacts, calendar from google services, then it can be easily recovered anytime.
Several Android apps are available for backup of the Android 2.3.3 (Gingerbread) and this includes;
Several Android apps are available for backup of the Android 2.3.3 (Gingerbread) and this includes;
- Titanium Backup * root
- MyBackup pro (RERWARE, LLC), with free limited 30 trial
- SMS Backup & Restore (RITESH SAHU)
What to backup? Well there is the;
- Contact numbers,
- SMS,
- APN settings,
- SDCard data,
1. Contact numbers
Step 1: Start the dialer
On the X10i launch the phone dialer. Click LEFT button, choose Backup contacts, then Memory card.
This will prompt the name and location of the back up file, choose OO. E.g.
/sdcard/System/PIM/PIM000001.vcf
Step 2: Verify
Once the progress bar has completed saving all the address book, browse to the SDCard and copy the vcf file to your PC or USB disk.
2. SMS
Step 1: Install from Android Play Store the app, "SMS Backup & Restore"
This saves SMS in XML format.
Launch the app, click on the "Tools" icon at the top. Select the Backup folder which is by default
/mnt/sdcard/SMSBackupRestore/
For advanced users, explorer the other options. For basic needs, I find that there isn't any need to change the other configurations.
Step 2: Do the backup.
Read and accept the screen prompts.
Click "Backup" and enter the backup file name.
Click OK.
My 5,230 SMS was backup and verified in 45 seconds.
Click "Close"
Step 3: Donate
Oh...its optional and I have no idea who developed this app, but it does a pretty good basic backup of SMS. As for the Adds, its not too big to obstruct the buttons.
3. APN Settings
Step 1: Install from Android Play Store the app, "APN Backup & Restore"
This saves SMS in XML format.
^^^Launch the app, click on the "Tools" icon at the top. Select the Backup folder which is by default
/mnt/sdcard/SMSBackupRestore/
For advanced users, explorer the other options. For basic needs, I find that there isn't any need to change the other configurations.
Step 2: Do the backup.
Click "Backup APNs" and enter the backup file name. E.g. default filename is apns-.xml
Click "Close".
It doesn't say where its backup to, but search for it in /mnt/sdcard/ApnBackupRestore/
4. Backup SD Card
Firstly, if you already have a PC backup software, you can perform Step 1, then continue with that backup software.
Step 1: Plug the X10i USB cable.
The PC should be installed with the Sony PC Companion software. This will launch the windows explorer.
Step 2: Copy files to your PC
Using Windows Explorer, drag all files from the SD Card to your PC.
Develop Android 4 Apps with Eclipse
Before starting this article, it must be mentioned that the eclipse is preferable be on a 64-bit machine that has relatively big RAM, L2 cache, fast hard disk. This is because of the slowness and constant errors that I am encountering in the past few months with an old pc. This is why I have not been doing any development on android and it will most probably this way until I can get my hands on a better PC.
So, you want to start on Android Programming? Read on...
Pre-installation check list:
Steps
1. Eclipse Indigo
a) download and extract Eclipse
http://www.eclipse.org/downloads/download.php?
file=/eclipse/downloads/drops/R-3.7.2-201202080800/eclipse-SDK-
3.7.2-win32.zip
b) Move to the Program files folder
e.g. c:\Windows\Program Files\eclipse
2. Android SDK
a) download and run installer_r18-windows.exe
http://developer.android.com/sdk/index.html
Follow instructions from http://developer.android.com/sdk/installing/index.html
b) Run the Android SDK Manager
Currently target for API 10 (Android 2.3.3) and API 15 (Android 4.0.3).
Accepted all package to install but HTC OpenSense SDK.
3. Eclipse's ADT plugin
a) Start Eclipse and select Help-> Install New Software, click Add (top right)
b) At right of "Work with:", Click Add... and enter the ADT Plugin repository details
https://dl-ssl.google.com/android/eclipse/
c) In Available Software, check Developer Tools and install.
Accept all license agreement.
d) Restart Eclipse
e) Eclipse may have problem locating the Android SDK directory
Choose preferences and point to the Android SDK folder (see Section 2).
e.g. c:\Windows\Program Files\Android\android-sdk
4. Create your first App, see http://developer.android.com/training/basics/firstapp/index.html
So, you want to start on Android Programming? Read on...
Installing Eclipse Indigo for Android on MS Windows 7.
Pre-installation check list:
- Java JDK 1.6 or higher is installed
- PATH and CLASSPATH has been configured
Steps
1. Eclipse Indigo
a) download and extract Eclipse
http://www.eclipse.org/downloads/download.php?
file=/eclipse/downloads/drops/R-3.7.2-201202080800/eclipse-SDK-
3.7.2-win32.zip
b) Move to the Program files folder
e.g. c:\Windows\Program Files\eclipse
2. Android SDK
a) download and run installer_r18-windows.exe
http://developer.android.com/sdk/index.html
Follow instructions from http://developer.android.com/sdk/installing/index.html
b) Run the Android SDK Manager
Currently target for API 10 (Android 2.3.3) and API 15 (Android 4.0.3).
Accepted all package to install but HTC OpenSense SDK.
3. Eclipse's ADT plugin
a) Start Eclipse and select Help-> Install New Software, click Add (top right)
b) At right of "Work with:", Click Add... and enter the ADT Plugin repository details
https://dl-ssl.google.com/android/eclipse/
c) In Available Software, check Developer Tools and install.
Accept all license agreement.
d) Restart Eclipse
e) Eclipse may have problem locating the Android SDK directory
Choose preferences and point to the Android SDK folder (see Section 2).
e.g. c:\Windows\Program Files\Android\android-sdk
4. Create your first App, see http://developer.android.com/training/basics/firstapp/index.html
Monday, October 17, 2011
Camera on SE X10i (Android 2.3)
This is a howto on a Sony Ericsson (SE) X10i with Android 2.3.3.


Photos can be captured with a 4 inch capacitive touch screen, and 8.1 megapixel camera. It also comes with digital zoom of up to 16x, image stabiliser (due to small hand shakiness) and a flash. The updated Android provide a default camera apps that meet most requirements.
Step 1. Starting the camera
Method 1
At the Home screen, tap the Application icon, then tap Camera icon.
Method 2
On the X10i, press the Camera quick button.

Step 2. Select Camera (optional if already selected)
Tap the Camera icon.

Step 3. Snap the photo
There are several methods to do this, but I will note down just the Touch and Normal.
Method Touch
- Select Camera mode icon, and tap Touch capture. (optional if already selected)
- Point the camera to the person or object, press on the screen where is the desired focus.
- Release finger, to take the photo.
Method Normal
- Point the camera to the person or object.
- Half press the Camera button, to focus.
- Press Camera button down fully to take the photo.
Step 4. Preview photo
Press on the last taken photo at bottom of the screen, or tap the Filmstrip icon

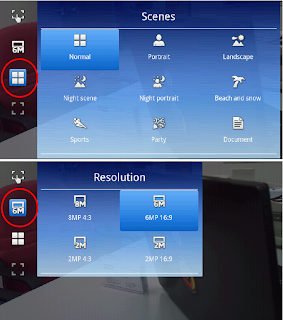
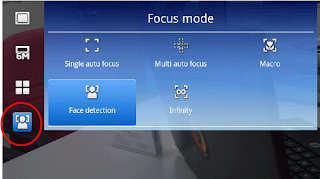
Other setting for the camera can be accessed by the on screen icons or by the Menu key.


Thursday, October 13, 2011
Call handling on SE X10i (Android 2.3)
This is a Howto on a Sony Ericsson (SE) X10i updated with the latest Android (in this case to version 2.3.3). So you've got the smart phone, many do not have the time to experiment, so here is the first share on some of the solutions to common things you might need.
After the update, Sony Ericcson did not provide an easy to find help document for the Help option in Android. It is a bit disappointing considering its SE, and the help is in the phones menu, but empty. At SE website, there is a download to “restore your user guide in your phone” (instructions are not good at this moment)
Make a call (yes, the phone can make calls)
Step 1. You will need to start the dialer.
From the home screen, tap the Phone button.
Step 2. There 3 methods to dial a number;
Method 1:
Enter the number using the screen Keypad, and tap Call.
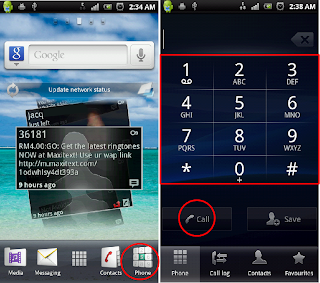
Method 2: Tap the Contacts button and choose the contact to call
Method 3: Tap the Favourites button and choose the contact to call

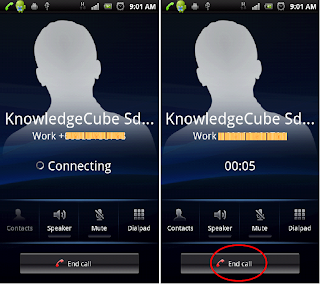
Step 3. During the call you have the options to
- Put call on loud speaker – tap the Speaker button
- Mute, so the other party cant hear you but you can listen – tap the Mute button
- Use the onscreen dialpad for automated transactions like Phone banking – tap the Dialpad
Step 4. When you want to end the call, tap End call button.
Decline a call (in a meeting and suddenly a call comes in, lets cancel that call)

Access to other applications during a call (Retrieve or to write a note. It is a smart phone)
You have 2 ways to do this;
1. Return to a previous running application (just before you were interrupted by the call)
Press the BACK key (left arrow sign)
2. Return to Home screen to select an application.
Press the HOME key (This is the key with a square sign) then tap on the application you wish to start

Subscribe to:
Comments (Atom)