Showing posts with label learning. Show all posts

Wednesday, November 1, 2017

Laravel non-existent script error

Recently updated to PHP 7.1 and all the existing PHP projects are working fine.

However, this error appeared when I am trying to create a new Laravel 5 project,

You made a reference to a non-existent script @php -r "file_exists('.env') || copy('.env.example', '.env');"
Loading composer repositories with package information
. . .

You made a reference to a non-existent script @php artisan key:generate

Lets fix this in one step;

Step 1: Update the composer,

$ composer self-update

Updating to version 1.5.2 (stable channel).
    Downloading: 100%
Use composer self-update --rollback to return to version 1.2.2

Run the command used to create the new project,

$ composer create-project laravel/laravel myapps

Thursday, October 6, 2016

Learning to code for kids

Here are 5 websites to start the young minds with coding. In no particular order;

Scratch 

Use of the famous programming blocks of different shape and colours to do coding. Adobe Flash is required for the web interface.

CodinGame

Use web interface to complete snippet of codes. This is not for the uninitiated. You have a choice of using the text editor Emacs, Vim or the standard IDE that supports several popular programming languages. This includes C, C++, Java, Go, Paskal, PHP, Python and Ruby. If you are looking to learn logics and algorithms, this is it.


Code Academy

Provides programming courses for free. Personal learning plan and quizzes with advisor are included in the paid subscription. Its starts off with learn to HTML and CSS.


Code.org

Place to learn coding with contribution from many difference sources. Some element of Scratch with specialised themes and gamification to learn coding. Lots of resources for lesson plans.
A sweet start would be Coding with Anna and Elsa.


Alice

Create 3D animations and learn programming for those familiar with the use of computers. This product of Carnegie Mellon University teaches C++, Java and C#.


Any of these made it to your your favourite sites?

Monday, December 7, 2015

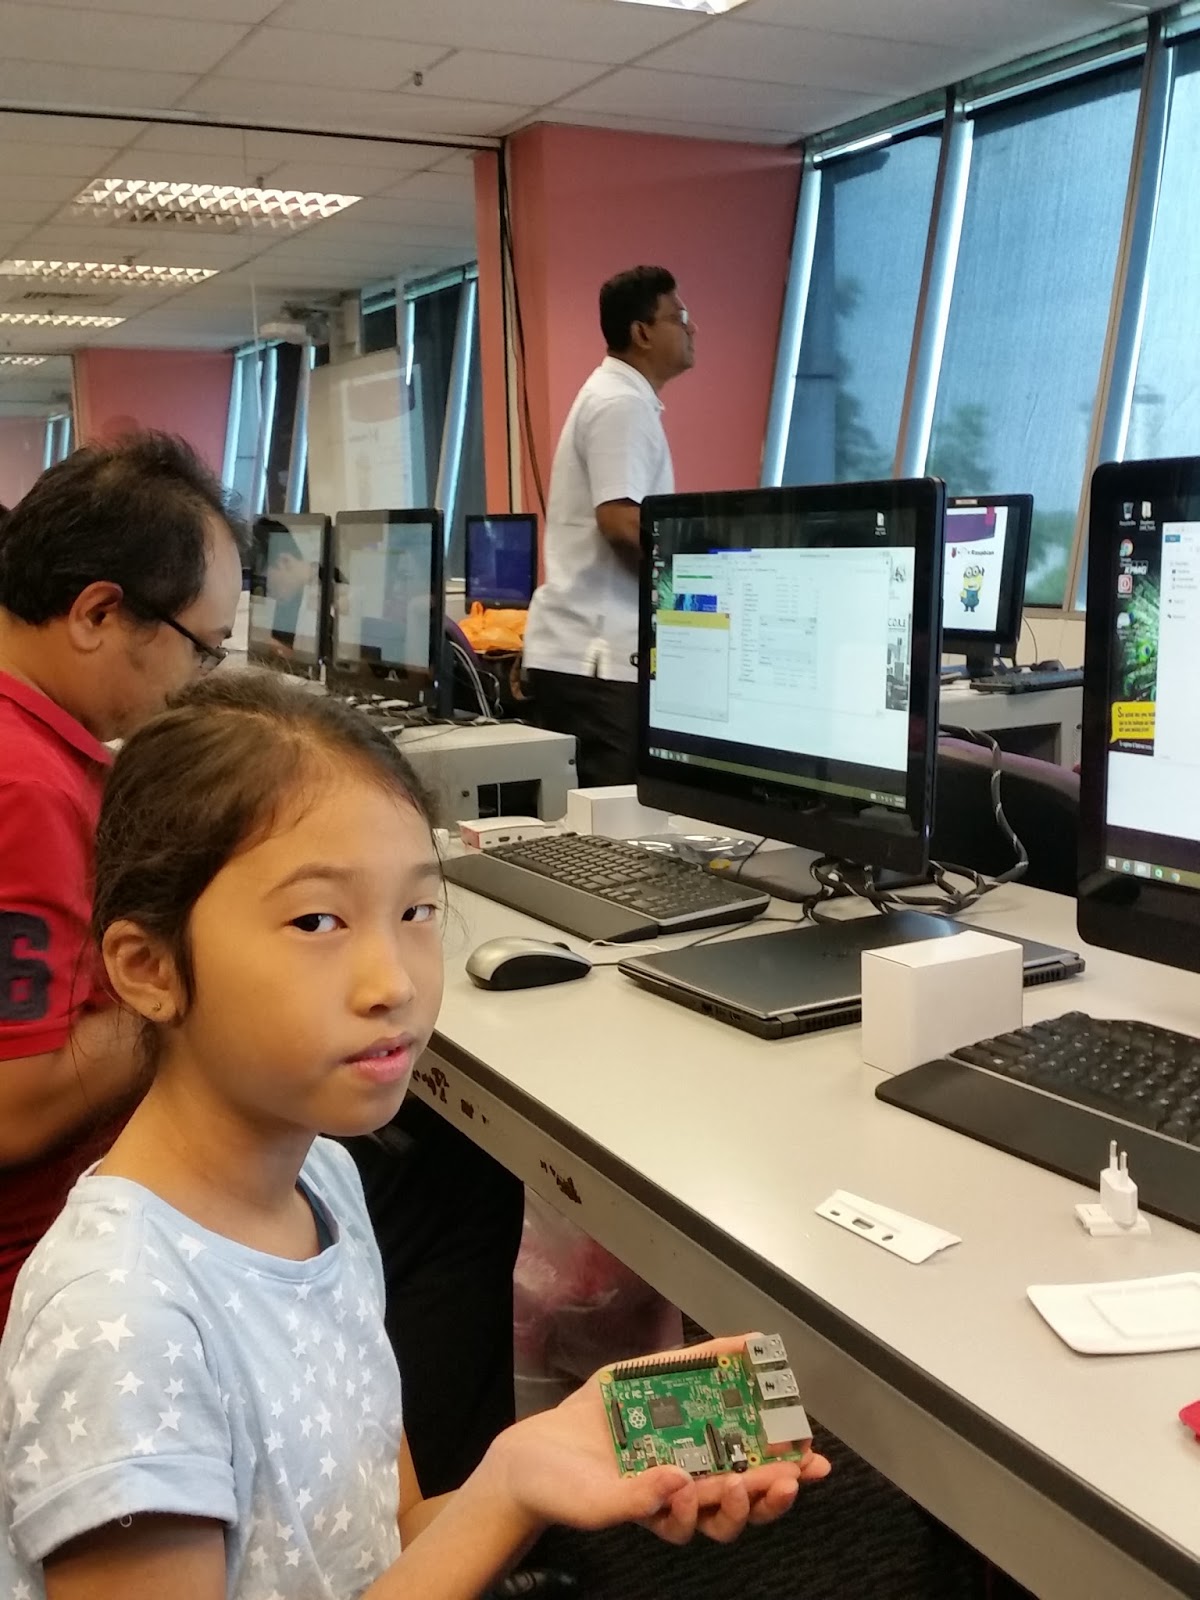
Raspberry Jam Kuala Lumpur 2015 - Kids at the Workshop

The Raspberry Jam Kuala Lumpur 2015 saw quite a huge turnout. This first Jam for Malaysia was on 5 Dec 2015 at Asia Pacific University (APU), Kuala Lumpur.

There were concurrent (parallel) sessions of free talks and hands-on workshop. Since the workshop was hands-on, participants who purchase/register for the workshop online included the price of hardware. This consist of;

Raspberry Pi 2 model B
Power adapter
Raspberry case (red & white)
Micro SD card (8GB)

There were ample parking along the road side as the huge parking lot was full. Probably due to a fun run being held at the same venue. A goody pack was given out during registration. At the first talk, the presenter from APU introduced a work in progress of a robot that uses raspberry pi (RP) and adruino.
Tele-presence and Tour Guide Robot using RP by APU
Its off to the workshop after that talk. The workshop title was "Getting your Raspberry Pi up and running and setting up for File sharing" and was conducted by Raspberry Pi Penang.

The number of participants was double the online registrations, as they allow walk-in registrations. There was another kid at the front row but Martha was nervous, not in a mood to talk to anyone. A quick check of our hardware and its found that the micro SD card doesn't come with an adapter. The laptops and PCs only had the standard SD card readers. Thanks to Fazli (I don't think he recognise me) for sharing his SD adapter.

Setting up the RP
Done fixing RP and casing


Following the instructions, she completed the installation of Raspbian (from MS Windows), updating and upgrading the Raspbian Jessie. Installed and configured Samba for file sharing. Didn't get a chance to test the file sharing as the instructor took more time than the allocated 1 hour session.


Martha updating Raspbian

While she was waiting for the others to complete the steps, Martha found Minecraft in the installed Rasbian. Tried to find the keys and explored Minecraft world. Its the first time for her to setup and she had an enjoyable learning experience.

Generally steps to create a file sharing server with the RP during the workshop;

Step 1: Install Raspbian

Download latest Rasbian image, currently its Jessie from www.raspberrypi.org and create the image on the SD card. Insert the blank SD card into the computer used to write the image. For MS Windows users, the software is called Win32DiskImager-0.9.5-binary and for Linux, the software is pre-installed called "dd".

Step 2: Update and Upgrade Raspbian

Take the SD card and install in the RP (make sure power is off). Plug-in all the cables (Monitor, keyboard, mouse, network) and turn on RP power. Watch the monitor screen as it boots.

Configure the settings from the "preferences" menu and reboot.

Open the terminal and type;
sudo apt-get update
sudo apt-get upgrade -y

Reboot.

Additionally I would suggest;
1. Change the default pi user password
2. Add additional tools, at the terminal type;
sudo apt-get install raspberrypi-ui-mods

Step 3: Install Samba

At the terminal type:

sudo apt-get install samba samba-common-bin

Assign access of the default pi user for file sharing. When prompted for password, enter the pi user password.

sudo smbpasswd -a pi

Restart samba

sudo /etc/init.d/samba restart

Done.

From a computer in the same network, use the network share tools to access the RP via IP address. You will need to enter the pi user password.

Example:

On a MS Windows, open the Windows Explorer and click on the network. type in the hostname of the Raspberry Pi. Select the option to Connect as a different credentials, since the Windows is likely to be logged in with a user other than the name "pi".


On MS Windows 8.1, the samba share needs to be map manually. Open a command prompt and type the following;

net use windowsdir shareserver\sharepath /USER:username thepassword

Example
net use Z:  \\10.1.1.103\pihome /USER:pi thepassword

Thursday, May 15, 2014

Writing Equations in Moodle - Part 2

This is a follow up post on enabling users to write equations in Moodle. In the previous post, the required tools were installed on Linux (Centos Linux) and we resume from there.

Step 1:

Login as administrator in Moodle. In the Administration menu, click on Plugins-> Filters-> Manage filters
Choose Filter for Tex notation and change Active? to On. If you click Settings it will bring you to the same screen as in the next step below.

In the Administration menu, click on Plugins-> Filters-> Tex notation
Verify that Path of Latex, dvips and convert binary all contain the linux tools that was created in Part 1 of this tutorial.

Latex = /usr/bin/latex
dvips = /usr/bin/dvips
convert = /usr/bin/convert

Change the convert output format to PNG.

Step 2:

Within a course, create a content and notice that the Insert equation button is visible in TinyMCE editor.

Tuesday, May 6, 2014

Writing Equations in Moodle - Part 1

Moodle leverages on MathML for users to enter Math equations. Moodle 2 comes with DragMath and this reduces the need for complicated installation of libraries. On Linux, equations can be displayed with Latex through the use of MimeTex (http://www.ctan.org/tex-archive/support/mimetex) and the newer MathTex.

Examples on the use of MathText can be found at http://www.forkosh.com/mimetex.html#examples

Inserting math equation on a Moodle require certain filters to be enabled but before doing this, the related linux tools need to be installed. End users will need to ensure Java's JRE is installed and enabled in their web browser.

The required Linux (Referring to Centos Linux) tools to be installed include packages mimetex, texlive, texlive-dvips, texlive-latex, ImageMagick and their dependencies. The important tools that should be working and that is needed by Moodle later includes;
/usr/bin/latex
/usr/bin/dvips
/usr/bin/convert

A good tip on enabling Java in web browsers can be found at the Java site. (https://www.java.com/en/download/help/java_blocked.xml)

Thursday, February 20, 2014

Italian God Fathers May Run Open Source

In the current economic challenges, many countries are looking at saving cost via ICT and Italy is not an exception. Umbria, a region in the centre of Italy that produces cheese, lentils, truffles and have a relatively large number of small industries. This 900,000 strong population region is home to an active GNU/Linux User Group Perugia.

In 2012, Umbria saw the start of a revolution to switch to LibreOffice, which is LGPL or open source software (OSS) licensed. LibreOffice provides office productivity tools that include a word processor (like MS Word), presentation (like MS Powerpoint), spreadsheet (like MS Excel) and more. Advantages of this software is that it is free to download and install for almost all computers as it supports MS Windows, Linux and Mac platforms. Most popular editable document formats can be open and edited and its interface is rather intuitive and easy to use. It comes with a portable version where users can install it on a USB drive and carry it around to run LibreOffice any where. A built in PDF converter allows any edited file to be frozen and to be distributed with read only access and consistent format.

MS Office have been introducing its OOXML format through the docx formats which will eventually required every organisation to purchase an upgrade license for MS Office and this will incur la high upgrade cost. LibreOffice by default save files in Open Document Format or ODF (International document standards ISO/IEC 26300:2006) and it also supports past versions of MS Word, Excel and Powerpoint.

Through LibreUmbria, schools were introduced to use LibreOffice as their primary document editing applications before it was expanded further further to other organisations. This also received the government's top innovation award for Italian Government Projects in 2012/2013. Will the rest of the Italian Government and private organisations follow suit?

Read up news on the region of Umbria to switch over from MS Office to LibreOffice.

Jan 16, 2014 from ZDNet
Sep 26, 2013 from LibreOffice
Jun 5, 2013 from Document Foundation Blog

List of open standards can be found at ISO Public site

Wednesday, October 16, 2013

Moodle support for Tin Can and SCORM 2004

If anyone have been said to implement SCORM 2004 engine, its never been highly compliant and Moodle is no exception. On Oct 2004, Moodle has officially abandoned further development of its SCORM 2004 engine. Details of its SCORM module can be found at
http://docs.moodle.org/24/en/SCORM_module

Surely lots of users will be in the lost or may drop SCORM development. Moodle News suggest the use of Tin Can SCORM for future development of learning objects. Moodle site suggest use of the SCORM cloud from Rustici Software where the SCORM Cloud plugin is free, but not the account.

The SCORM Cloud free trial account provides 100MB and 10 active registration (what does that mean?) at https://cloud.scorm.com/sc/user/PostSignUp

Following are helpful links to setup the SCORM Cloud

1. Getting the Moodle package
http://scorm.com/scorm-solved/scorm-cloud-features/app-integrations/moodle-integration/

2. Integrate with Moodle
http://support.scorm.com/entries/21366321-Installing-the-SCORM-Cloud-Moodle-Module

Tuesday, April 30, 2013

Tables in Moodle appear without border lines.

Tables in Moodle 2 will tend to have this issue where users just can't get the grid lines to appear. Another description for this, is the border lines appear during editing, but is not displayed when it is saved and viewed as a normal content page.

The misleading choice was to right click and edit using "Table properties". Did not work in what ever combination that was made.

Following are steps that can be taken when creating a standard table from scratch in Moodle.

Step 1: Right click on the existing table. Choose Cell ->Table cell properties.
It does look like we are changing one cell, but bear with me to get this applied to the whole table.


Step 2: Choose the Advanced tab. Click on the Border color's colour selection box.


Step 3: Choose a colour. Better still click on Palette or Named tabs to choose a standard colour. Click Apply. In this example, Black or #000000 is choosen as the border line colour.

Step 4: At the dropdown box choose "Update all cells in table", click "Update".

Step 5: Save changes to the page where the table is added and view the table with the border lines.

Wednesday, May 4, 2011

What are Perlis students going to do with Netbooks?

Its in NST that 700 students will receive netbooks.

Not reported how it will be usable to the students. Or if they have internet access.

Schools should prepare wifi so that these students can access education freely in school.

Saturday, May 22, 2010

Start programming with QT4

If you ever are into open source software, eventually contribution of codes becomes part of the cycle. Trolltech from Oslo, Norway popularised the QT, which is a set of programming libraries that is used to develop graphical applications. In Linux, there is the KDE desktop manager that uses the QT libraries. Other popular applications that use QT are Opera,

Here is a guide to get started with QT programming (qt4 in this case) on Kubuntu 9.10. You will need the demo and the Graphical development tool

A. Setting up the environment
Step 1: Install the libraries and compilers. This include libraries such as "QLabel" and QLayout from the QtGui
$ sudo apt-get install build-essential kdelibs4-dev libqt4-qt3support libqt4-assistant

Step 2: Install the demos
$ sudo apt-get install qt4-demos

Step 3: Configure Linux to compile with qt4 instead of the default qt3
$ sudo update-alternatives --config qmake

Step 4: # install the Graphical development tool
$ sudo apt-get install kdevelop


Step 5: Read info on QT4 through the manuals at /usr/share/qt4/doc/html/index.html
$ assistant-qt4

B. General programming setup of project, compiling and execute

Step 1: Create the source files. E.g. .cpp, .h, etc.
Just copy from the demo files in /usr/lib/qt4/examples. I will use files from the example tabdialogs.
$ cp -r /usr/lib/qt4/examples/dialogs/tabdialog/ ~
$ cd ~/tabdialog

Step 2: Create the project file. The project file (.pro) define headers, sources, form and other files which the application consists of.
$ qmake -project

Step 3: Compile
$ qmake
$ make

Step 4: Run the programmes.
$ ./tabdialog

Alternatively, use the KDevelop to manage the project. Start KDevelop and open to .pro file.
$ kdevelop

C. References
  1. http://zetcode.com/tutorials/qt4tutorial/
  2. http://sector.ynet.sk/qt4-tutorial/my-first-qt-gui-application.html
  3. http://qt-apps.org/
Wishing you all the best in QT4 programming!

Thursday, March 4, 2010

Linux driver in use

From a terminal window;

To view all device drivers and the module names
$ lspci -k

To view a specific device (e.g. 03:00)
$ lspci -vv -s 03:00

To view all the loaded modules (The letter 'K' is uppercase in Kernel)
$ lsmod
$ lspci -k |grep Kernel

Wednesday, May 20, 2009

Install Moodle on CentOS 5

Following are steps to install Moodle 1.9 on CentOS 5.

Step 1
Install mysql-server-5.0.45, mysql-5.0.45 and php-5.1.6

Install other PHP library php-mbstring-5.1.6, php-xmlrpc-5.1.6

Step 2
Add the user name "user1" and database "mymoodle" to MySQL with the correct privilege.

Step 3
Download the moodle and extract to /var/www/html/moodle
Create and assign the permission of the webserver to the data directory at /var/www/moodledata

Step 4
In a start the moodle installation via web browser, use the location
http://localhost/moodle

Copy the script into a file named config.php within the root directory of Moodle.

Follow the rest of the instruction to complete.

Step 5
Install lynx to activate the cron. Edit the crontab to run every 30 minutes.

$ crontab -e
*/30 * * * * wget -q -O /dev/null http://localhost/moodle/admin/cron.php


See http://docs.moodle.org/en/Installing_Moodle
http://docs.moodle.org/en/Administration_FAQ

Friday, April 17, 2009

Changes are hard to accept

Reading the drama from The Apple Cart by George Bernard Shaw gave light to how changes just cant be accepted. Pity the glass blower's earnings would be affected by improvement in technology that would reduce breakages of bulbs during transport. Can you imagine some businesses that strive on expected breakdowns and expect paying users to be their released software testers being in the same light?

King Magnus (like my little boy's name) in the play seems to entertain the request of power to be transfered to the ministers. Followup is the thought of a lady that she could replace the queen as she have much more to offer. The finese of Magnus manages so many different issues while maintaining a certain royalty charm.

In dealing with introducing the OpenOffice.org to agencies, some just cannot accept the positive side and to pave way for the future. Concern is just to get past living each day and each report or presentation to be submitted. Worst case is that some software company even comes over to tell the agencies off that their business will be effected. Maybe a little bit of King Magnus is needed.

If anyone have the time, the play is really something decent and naughty that can be enjoyed easily.

Saturday, January 3, 2009

Surviving an OSS migration in 2009

Over the past couple of years, numerous efforts have be undertaken to seek benefits of adopting open source software (OSS) from individuals, corporate to governments. There have been successful adoption and others who have had to rake out more cash to revert back to proprietary software. Based on such events, here are my predictions to survive an OSS migration in 2009.

  1. Lay out an OSS migration plan for all to see. This does not have to be in great detail but sufficient enough to know who will be affected.
  2. Keep information flowing on the progress of the implementation to management and those below. Don't you just want people to get involved? what is better than awareness!
  3. Recognise the OSS participation of individuals and groups. This means the management understands that their business secrets are protected as they know who is contributing what. Morale will increase as people strive to improve systems out of their own interest. Remind everyone of their targets, some may get too preoccupied in OSS and forget their business objectives.
  4. Be prepared to change how the business is carried out. This means knowing a different way of doing things to achieve equal or greater results.
  5. Maintain budget on ICT. Yes, OSS will reduce cost if proper expense on the migration is provided. You will see the savings! Get quotes for similiar systems and file them for comparison of the actual implementation. How elese would you know the exact savings?

OSS will be around for a long time. Proprietary systems will seek ways to leverage on OSS instead of fighting them. You will survive.

Sunday, June 29, 2008

My list of Linux commands

Listing of Linux commands.

Hardware related
dmidecode = display computer hardware information. E.g. dmidecode -s bios-version
ifconfig = display and configure the network interface. E.g. ifconfig -s eth1
lshw = display hardware
lspci = display the PCI buses in the computer. E.g. lspci -tv
xrandr = display and configure the available displays (output) connected to the computer.

File system
find = search in specified directory for files.
locate= search for files in the system as index by the locatedb database.

-

Thursday, January 10, 2008

PHP commands to connect with MySQL

PHP and MySQL class just end over a 3 day duration. The syllabus covers the basic PHP command structures. This included variable usage, loops, conditional, user defined functions, pre-defined functions and database connectivity. A quick way to learn connectivity with MySQL is to already be familiar with SQL and relational database.

What is there to know about the database? I have a checklist below for learners to use
  1. Database
    1. Creating
    2. Deleting
    3. Selecting/Using a database
  2. Field types and their use
    1. Numerical - int, float
    2. Strings - char, varchar, text
    3. Time - date, timestamp
  3. Tables
    1. Creating
    2. Deleting
    3. Altering tables
  4. Records
    1. Inserting records
    2. Deleting records
    3. Editing records
    4. Retrieving records

Once the SQL syntax is known, the next step is to use PHP to execute the SQL commands on the MySQL database server. Among the basic commands that can be use is listed below:

  1. mysql_connect( ) - Open connection to a MySQL database server
    1. Description: returns FALSE if fail
      resource mysql_connect ([ string $server [, string $username [, string $password [, bool $new_link [, int $client_flags ]]]]] )
  2. mysql_query( ) - Send SQL commands to MySQL database server
    1. Description: returns FALSE on error
      resource mysql_query ( string $query [, resource $link_identifier ] )
  3. mysql_select_db( ) - Determine which database name to use on the MySQL database server
    1. Description: returns TRUE or FALSE
      bool mysql_select_db ( string $database_name [, resource $link_identifier ] )
  4. mysql_fetch_array( ) - Retrieve a record as an array
    1. Description: returns FALSE if no more records
      array mysql_fetch_array ( resource $result [, int $result_type ] )
  5. mysql_close( ) - Close a MySQL database connection
    1. Description: returns TRUE of FALSE
      bool mysql_close ([ resource $link_identifier ] )

That is all for now. I will write more in coming postings on PHP use with MySQL.

Blog Archive