Listing of Linux commands.
Hardware related
dmidecode = display computer hardware information. E.g. dmidecode -s bios-version
ifconfig = display and configure the network interface. E.g. ifconfig -s eth1
lshw = display hardware
lspci = display the PCI buses in the computer. E.g. lspci -tv
xrandr = display and configure the available displays (output) connected to the computer.
File system
find = search in specified directory for files.
locate= search for files in the system as index by the locatedb database.
-
Looking at alternative computer software solutions for a variety of reasons. This includes price, computer security, virus prevention and reliability. Here are my notes and great that if it helps you, otherwise please understand what you are doing and not follow blindly. All works expressed are my own and does not necessarily express the products or organisations mentioned here.
Sunday, June 29, 2008
Thursday, June 26, 2008
R60 and wireless
The default Centos 5.1 does not detect the wireless on the Thinkpad R60. It seems to detect perfectly well using Ubuntu 7.10.
Go to CentOS page and install the RPMForge plugin.
yum install dkms-ipw3945
lsmod |grep ipw
Done..the wireless card is detected but still cant seem to get the wireless network. After some more digging, found that the ipw3945 project has been deprecated and superseded by Iwlwifi at http://intellinuxwireless.org
Below are notes to try, but I have yet to find the apps that is talk to the wifi daemon that connects to the wireless network.
The ATRpms repository contains Iwlwifi. Plugin to the wired network. Edit the repo file with
Install the drivers
yum install iwlwifi iwlwifi-kmdl-`uname -r`
Go to CentOS page and install the RPMForge plugin.
yum install dkms-ipw3945
lsmod |grep ipw
Done..the wireless card is detected but still cant seem to get the wireless network. After some more digging, found that the ipw3945 project has been deprecated and superseded by Iwlwifi at http://intellinuxwireless.org
Below are notes to try, but I have yet to find the apps that is talk to the wifi daemon that connects to the wireless network.
The ATRpms repository contains Iwlwifi. Plugin to the wired network. Edit the repo file with
[atrpms]
name=EL $releasever - $basearch - ATrpms
baseurl=http://dl.atrpms.net/el$releasever-$basearch/atrpms/stable
gpgkey=http://ATrpms.net/RPM-GPG-KEY.atrpms
gpgcheck=1
enabled=1
exclude=*kmdl*i586*
includepkgs=*iwlwifi* *mac80211*
Since gpgcheck is enabled, run the command
rpm --import http://ATrpms.net/RPM-GPG-KEY.atrpms
Install the drivers
yum install iwlwifi iwlwifi-kmdl-`uname -r`
Friday, June 20, 2008
Cases on why we need to be open sourced
Listed here will be cases that can bring back reasons to why we need to be open sourced in many cases.
- Klien from AT&T - 2007 case on findings of the NSA, USA using the telco line to tap into calls. See "Spying on the home front".
- Online Voting - such software must require that no funny stuff happens in the background and exploits can be exposed soonest for a resolution.
Viewing the network
The Nessus tool provides information on your network. This means installing a Nessusd server, then data can be continuously collected. Using a Nessus client, the information can then be made into more manageable form.
After installing Nessus
Get the updates of plugins from nessus (http://www.nessus.org/register)
Check your email for the registration code (Example XXXX-11A0-B9A4-A2DD-xxxx)
On the Linux:
sudo /usr/bin/nessus-fetch --register
After installing Nessus
Get the updates of plugins from nessus (http://www.nessus.org/register)
Check your email for the registration code (Example XXXX-11A0-B9A4-A2DD-xxxx)
On the Linux:
sudo /usr/bin/nessus-fetch --register
Wednesday, June 18, 2008
Problems with FTP
Traditionally, electronic files such as scripts, graphics, documents and spreadsheet was transfered between computers with FTP (File Transfer Protocol). The files could be placed in public places for anyone to access with a login name or as anonymous.
However, the alternative to FTP is sFTP (secure File Transfer Protocol). What is the problem with FTP? Why stop using FTP?
sFTP is a completly different protocol (method) of network file transfer.
However, the alternative to FTP is sFTP (secure File Transfer Protocol). What is the problem with FTP? Why stop using FTP?
- FTP sends the login username and password across the network as clear text.
- Typical network firewall needs to be altered to open up min 2 ports for FTP.
- FTP communication talks too much. A typical connection goes like this, you contact the server, do handshake, you the get a banner, you then send your name to the server and wait for the server to acknowledge. Then you send your password (in plain clear view for everyone to see) and wait for the server to acknowledge, then you send the type of inquiry (how you want the server to respond). This isnt even anywhere near the actual transfer of the file.
- FTP does synchronous communications.
- Complex firewall configuration for FTP servers and FTP clients. FTP servers prefer active transfer while opening inbound port 21, outbound port 22. FTP client firewalls prefer passive transfer while opening outbound from any port to port 21, inbound any port to any permitted (ephemeral) port.
sFTP is a completly different protocol (method) of network file transfer.
Monday, June 16, 2008
Multiple X servers - Xephyr and Xnest
To run several X servers that are different, I can switch to other virtual screens (F7-F12) or use an X server tool like Xephyr and Xnest. Xephyr is considerably newer than the well known Xnest.
Using Xnest
(On CentOS 5.1)
yum install xorg-x11-server-Xnest
Xnest -audit 0 -name Xnest :1 & export DISPLAY=:1
Using Xephyr
(on Ubuntu 7.10)
sudo apt-get install xserver-xephyr
Xephyr -ac -screen 1024x768 -reset :1 & export DISPLAY=:1
Running X on the X server
Test X applications like xterm and xeyes.
xterm
xeyes
If there is a need to send an application via the chroot/server use SSH. Example below is to start and xterm on the X server
ssh -XfC -c blowfish nicholas@nicholas-server.lan xterm
If you dont understand stuff here, dont worry. It means you need to move on to other stuffs.
Installing KDE on Ubuntu (Kubuntu)
Ubuntu 7.10 (Gutsy) by default installs the GNOME desktop (2.20.0). To install the KDE desktop (reasons are many) many more applications can then be accessed by the Linux system. This at the same time make the Ubuntu transform into Kubuntu!
Simple installation
Simple installation
- Connect to the Internet
- Run the command
- sudo aptitude update && sudo aptitude install kubuntu-desktop
- Reboot the system. At the bottom left of the login swcreen change the login option to KDE.
- Configuration of the default desktop can be done by editing the file /etc/X11/default-display-manager to either KDE or GNOME
- /usr/bin/kdm
- /usr/bin/gdm
- To remove KDE, if you found that it was a big mistake be glad that you used aptitude. Run command
- sudo aptitude remove kubuntu-desktop
- Edit sources.list to include the KDE4 resources
- deb http://ppa.launchpad.net/kubuntu-members-kde4/ubuntu gutsy main
- Update aptitude
- sudo aptitude update
- Install KDE4
- sudo aptitude remove kdelibs5 kde4base-data kde4libs-data
- sudo aptitude install kde4-core
- Reboot, at the login screen select the option for KDE 4.
Friday, June 13, 2008
CentOS kernel
The Linux kernel can be reconfigured directly or through the use of modules.
I found the following link useful for CentOS;
1. http://wiki.centos.org/HowTos/BuildingKernelModules
2. I need to build a custom kernel
I found the following link useful for CentOS;
1. http://wiki.centos.org/HowTos/BuildingKernelModules
2. I need to build a custom kernel
Thursday, June 12, 2008
OSS Seminar 08 - Miri
The OSS Seminar on 9th Jun 08 really was an opener for most of the participants from Sabah, Sarawak and Labuan Public Sector.

See OSCC MAMPU website for the details.
 Apart from presenting a paper on Building OSS Competency, I am mainly taking care of the AV. I'd like to point out an instance where the overhead projector could only flicker the Linux screen intermittent. The video projector model was Sanyo XtraX and was mounted on the ceiling as shown below.

After changing over 2 different VGA cables and checking the connections, nothing improved. Some put it to the Linux being the problem, as other functions were said to have ran smoothly. The AV man finally came and brought a VGA switch with built-in booster, this managed to put the display on the large screen. When another two more projectors were used with a splitter, there were lines scrolling vertically. This was for the projector screens at the sides. This showed that there is not enough power supplied to the projectors.

See OSCC MAMPU website for the details.
 Apart from presenting a paper on Building OSS Competency, I am mainly taking care of the AV. I'd like to point out an instance where the overhead projector could only flicker the Linux screen intermittent. The video projector model was Sanyo XtraX and was mounted on the ceiling as shown below.
After changing over 2 different VGA cables and checking the connections, nothing improved. Some put it to the Linux being the problem, as other functions were said to have ran smoothly. The AV man finally came and brought a VGA switch with built-in booster, this managed to put the display on the large screen. When another two more projectors were used with a splitter, there were lines scrolling vertically. This was for the projector screens at the sides. This showed that there is not enough power supplied to the projectors.
Wednesday, June 11, 2008
Mobile phone tools
Listing
Wammu
Wammu is a tool to connect with mobile phones and uses Gammu and Phyton. Phones that support open standards like OBEX and IrMC can be easily accessed by OSS tools like Gammu. For a list of phones supported by Gammu see Chihar.com.
Lets install Wammu!
Installation of Wammu takes about about 15.1Mb disk space. Current version for Ubuntu 7.10 is 0.22-1. Those who are using IMAP server access with the phone need to update to Wammu 0.27 or newer.
sudo apt-get install wammu
sudo apt-get install gammu python-gammu-doc wx2.6-doc wx2.6-examples
Plugin the USB cable to the PC/Laptop and phone.
Choose Applications ->Accessories ->Wammu
Note: btctl is needed for Bluetooth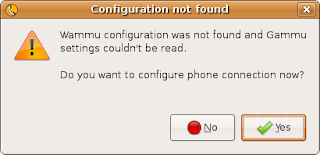
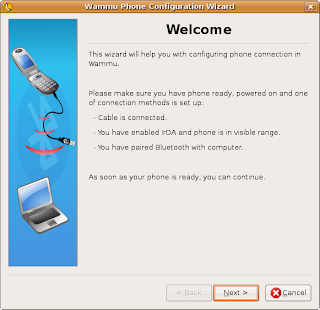
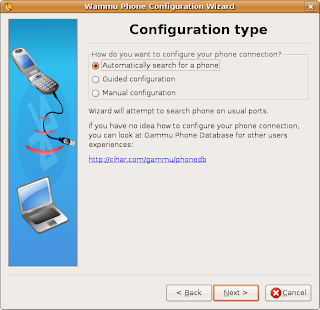
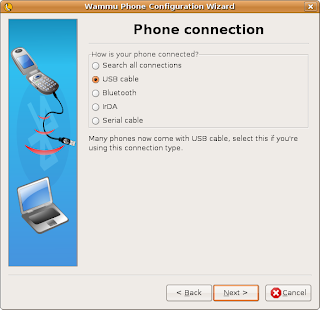
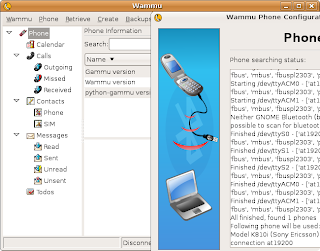
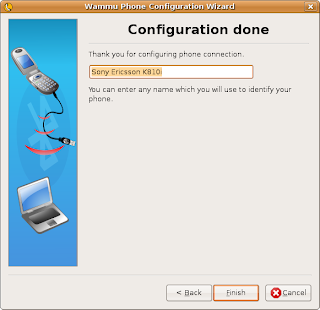
Choose Phone ->Connect
To get the contents of the phone choose Retrieve then selected any of the sub items below;
Mobile Media Converter - Converting AMR and 3GP to MP3 and MPEG
The SE K810i and most other mobile phone that supports audio recording, stores the sound in AMR format. The Mobile Media Converter can be used to convert following files:
Audio: AMR files to MP3, WAV, WMA format
Movie: 3GP files to MPEG
(Tested on Ubuntu 7.10)
Step 1: Download Mobile Media Converter from http://miksoft.net/mobileMediaConverter.htm
Step 2: Extract the file mmc-lin.tar.gz and you get the directory mmc-lin
Step 3: Change into the directory mmc-lin and run the programme
Mobile Media Converter
Note: There is a FFMPEG that have been compiled to support AMR and 3GP
- Wammu
- Mobile Media Converter
Wammu
Wammu is a tool to connect with mobile phones and uses Gammu and Phyton. Phones that support open standards like OBEX and IrMC can be easily accessed by OSS tools like Gammu. For a list of phones supported by Gammu see Chihar.com.
Lets install Wammu!
Installation of Wammu takes about about 15.1Mb disk space. Current version for Ubuntu 7.10 is 0.22-1. Those who are using IMAP server access with the phone need to update to Wammu 0.27 or newer.
sudo apt-get install wammu
sudo apt-get install gammu python-gammu-doc wx2.6-doc wx2.6-examples
Plugin the USB cable to the PC/Laptop and phone.
Choose Applications ->Accessories ->Wammu
Note: btctl is needed for Bluetooth


Choose Phone ->Connect
To get the contents of the phone choose Retrieve then selected any of the sub items below;
- Contact
- Calls
- Messages
- Todos
- Calendars
Mobile Media Converter - Converting AMR and 3GP to MP3 and MPEG
The SE K810i and most other mobile phone that supports audio recording, stores the sound in AMR format. The Mobile Media Converter can be used to convert following files:
Audio: AMR files to MP3, WAV, WMA format
Movie: 3GP files to MPEG
(Tested on Ubuntu 7.10)
Step 1: Download Mobile Media Converter from http://miksoft.net/mobileMediaConverter.htm
Step 2: Extract the file mmc-lin.tar.gz and you get the directory mmc-lin
Step 3: Change into the directory mmc-lin and run the programme
Mobile Media Converter
Note: There is a FFMPEG that have been compiled to support AMR and 3GP
OpenOffice.org Document Recovery screen
After using OOo 2.4 for sometime some of the following can happen:
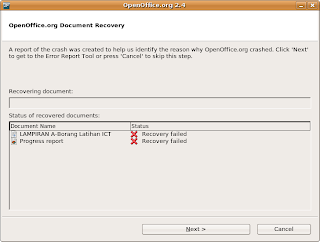
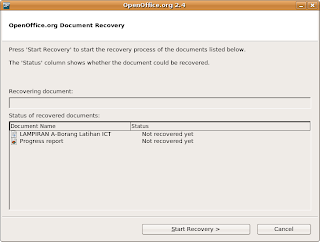
And they keep appearing even after you reboot the PC/laptop.
The solution:
Delete the file XML file named Recovery.xcu found in the locations shown below. Take note that Recovery.xcu contains the settings for Recovery in the Tools ->Options ->Load/Save ->General dialog.
In MS Windows
"Documents and settings"/<user>/"Application data"/Openoffice.org2/user/registry/data/org/openoffice/Office/Recovery.xcu
For OOo3 in MS Windows
"Documents and settings"/<user>/"Application data"/Openoffice.org/3/user/registry/data/org/openoffice/Office/Recovery.xcu
In Linux (I am using Ubuntu 8.10)
~/.openoffice.org2/user/registry/data/org/openoffice/Office/Recovery.xcu
-
- No electric - you loose a document
- Laptops run out of juice - you loose a document
- The OOo document is moved/renamed - OOo didnt detect the changes since it was done within OOo (Save as).


And they keep appearing even after you reboot the PC/laptop.
The solution:
Delete the file XML file named Recovery.xcu found in the locations shown below. Take note that Recovery.xcu contains the settings for Recovery in the Tools ->Options ->Load/Save ->General dialog.
In MS Windows
"Documents and settings"/<user>/"Application data"/Openoffice.org2/user/registry/data/org/openoffice/Office/Recovery.xcu
For OOo3 in MS Windows
"Documents and settings"/<user>/"Application data"/Openoffice.org/3/user/registry/data/org/openoffice/Office/Recovery.xcu
In Linux (I am using Ubuntu 8.10)
~/.openoffice.org2/user/registry/data/org/openoffice/Office/Recovery.xcu
-
Tuesday, June 10, 2008
Transfer phonebook from Motorola V360 to SE K810i
I just purchased a Sony Ericsson K810i to replace the Motorola V360. I've had the V360 for over two years but not its falling apart. Here I will list out the steps to transfer the phonebook from the V360 to the K810i using Ubuntu Linux 7.10 (Gutsy) via USB cable.
1. Create a folder to store the phonebook
mkdir ~/phone.v360
2. In V360,
Settings ->Connectivity ->Sync ->USB Settings ->Data/Fax Connection
3. in Linux
Applications ->Accessories ->KMobile Tools
Choose Phonebook ->All contacts from phone ->Refresh
(If there are many phone numbers, then have to wait longer)
cp ~/.kde/share/apps/kmobiletools/kmobiletools.vcf ~/phone.v360
4. In SE K810i
Plug in the USB cable
Select Phone mode
Choose Settings ->Contacts ->Options ->Advanced ->Backup to M.S.
5. in Linux copy the phonebook from the phone to the Linux
cd ~/phone.v360
cp "/media/PHONE CARD/System/PIM/PB_Backup.vcf" .
6. if there are same names in PB_Backup.vcf and kmobiletoos.vcf then remove them. Otherwise merge the two files. Of course if PB_Backup.vcf is blank the overwrite it with the kmobiletools.vcf file. I take it that the phonebook in the phone is to be backed up and then renamed to PB_Backup.vcf.original
mv PB_Backup.vcf PB_Backup.vcf.original
mv kmobiletools.vcf PB_Backup.vcf
mv PB_Backup.vcf "/media/PHONE CARD/System/PIM"
7. In SE K810i
Unmount PHONE CARD media
Unplug the USB cable.
Select Phone mode
Choose Settings ->Contacts ->New Contact ->Options ->Advanced ->Restore from M.S.
When prompted:
Delete old contacts before new contacts are added?
Choose No
The K810i now have all the phone numbers. Check it out.
Tuesday, June 3, 2008
What AWK can do for Linux.
In Linux, there are many tools to process text and other forms of data. One tool that comes to mind is the AWK. The AWK scripting processes a file line by line and can produce a summary of its finding as header or footer.
TLDP provides a guide on AWK at http://tldp.org/LDP/abs/html/awk.html
EXAMPLE 1
Here is a demonstration of the AWK to extract the directories mounted.
STEP 1. Create an AWK script file called "myscript1.awk". This should contain two lines.
BEGIN{ printf("Display the third field\n"); }
{ print $3 }
STEP 2. Run the following command to use the AWK script.
mount -t ext2,ext3 | awk -f myscript1.awk
EXAMPLE 2
Without using an AWK script file, extract data from the file /etc/passwd and display the results to screen.
STEP 1. Run the following command
awk -F: '{ print $1 ":" $3 ":" $7 }' /etc/passwd
AWK have been used for more complex reporting but the above should give an idea of how this is done.
Subscribe to:
Comments (Atom)
Blog Archive
-
▼
2008
(85)
-
▼
June
(13)
- My list of Linux commands
- R60 and wireless
- Cases on why we need to be open sourced
- Viewing the network
- Problems with FTP
- Multiple X servers - Xephyr and Xnest
- Installing KDE on Ubuntu (Kubuntu)
- CentOS kernel
- OSS Seminar 08 - Miri
- Mobile phone tools
- OpenOffice.org Document Recovery screen
- Transfer phonebook from Motorola V360 to SE K810i
- What AWK can do for Linux.
-
▼
June
(13)