Looking at alternative computer software solutions for a variety of reasons. This includes price, computer security, virus prevention and reliability. Here are my notes and great that if it helps you, otherwise please understand what you are doing and not follow blindly. All works expressed are my own and does not necessarily express the products or organisations mentioned here.
Tuesday, April 30, 2013
Tables in Moodle appear without border lines.
Tables in Moodle 2 will tend to have this issue where users just can't get the grid lines to appear. Another description for this, is the border lines appear during editing, but is not displayed when it is saved and viewed as a normal content page.
The misleading choice was to right click and edit using "Table properties". Did not work in what ever combination that was made.
Following are steps that can be taken when creating a standard table from scratch in Moodle.
Step 1: Right click on the existing table. Choose Cell ->Table cell properties.
It does look like we are changing one cell, but bear with me to get this applied to the whole table.
Step 2: Choose the Advanced tab. Click on the Border color's colour selection box.
Step 3: Choose a colour. Better still click on Palette or Named tabs to choose a standard colour. Click Apply. In this example, Black or #000000 is choosen as the border line colour.
Step 4: At the dropdown box choose "Update all cells in table", click "Update".
Step 5: Save changes to the page where the table is added and view the table with the border lines.
The misleading choice was to right click and edit using "Table properties". Did not work in what ever combination that was made.
Following are steps that can be taken when creating a standard table from scratch in Moodle.
Step 1: Right click on the existing table. Choose Cell ->Table cell properties.
It does look like we are changing one cell, but bear with me to get this applied to the whole table.
Step 2: Choose the Advanced tab. Click on the Border color's colour selection box.
Step 3: Choose a colour. Better still click on Palette or Named tabs to choose a standard colour. Click Apply. In this example, Black or #000000 is choosen as the border line colour.
Step 4: At the dropdown box choose "Update all cells in table", click "Update".
Step 5: Save changes to the page where the table is added and view the table with the border lines.
Monday, April 22, 2013
Samsung S3's Android update March 2013
Just did an OTA update from Jan 2013 to Mar 2013.
Among changes known at this moment;
Lock screen security patch. Previously there is a 5 step hack to by pass the login for the lock screen.
Camera. The menu at sides now have transparent borders. Now missing 3 scene modes, which include the fireworks, backlit.
Among changes known at this moment;
Lock screen security patch. Previously there is a 5 step hack to by pass the login for the lock screen.
Camera. The menu at sides now have transparent borders. Now missing 3 scene modes, which include the fireworks, backlit.
Friday, April 19, 2013
Faces of Clouds
Cloud is a big thing these last few months. Just to clear some terms that is of interest and where even so called IT experts are not able to agree on. This means, that its my personal view based on resources published by industry experts.
3 items are of interest. The first, is naming of a cloud based on its deployment. Second, clouds can further be classified based on services it provide to users. And lastly, a case study. Think of your plan to build a cloud and how it would be shaped.
A) A cloud is named based on its location or deployment.
- Public - Applications, storage and services made available to the general public for free or for a fee.
- Private - For a single organisation and decisions made centrally on resources.
- Community - Shared infrastructure having several organisation with specific interest that is managed internally or by a 3rd party.
- Hybrid - Combination of either Public, Private or Community, or all three.
B) A cloud can then be named based on its services.
- IaaS (Infrastructure-as-a-Service)
- Users install own operating system and maintain its own patches, IP addresses. - Rackspace, Amazon EC2.
- Users can leverage resources to sell as a service provider to their clients.
- PaaS (Platform-as-a-Service)
- Run your own application on a provider's platform
- Develop on a provider's platform - Google AppEngine, Oracle Cloud Platform, OpenShift.
- SaaS (Software-as-a-Service)
- Full web application - E.g. Googledocs, SalesForce, Gmail
- Web services (consumed by other web application) - GoogleMaps API, PayPal
C) A case study
How would you shape a cloud based on above (A) and (B) for following situation?
Lets say a government wants to setup a TeleHealth cloud. It allows any application for hospitals, clinics and government. Some of these applications are built and some bought. Geographically users are very dispersed throughout the country.
A) Community
Why? Organisations apart from the Ministry of Health, clinics and hospitals would also include 3rd party resources for pharmaceutical, research, assets, payments.
B) PaaS
- By providing one or two standard platforms, all development can be better managed. Deployed applications can be made to meet security and other standards set.
- Many new applications/web services can be introduced by users.
Tuesday, April 9, 2013
Dangers in copy and paste to CLI
A reminder for those who are trying to be smart and copy commands found on the internet or via unknown emails, the PASTE may contain dangerous commands.
See http://thejh.net/misc/website-terminal-copy-paste
WARNING, do not try the following if you do not understand dangers of hidden codes. Here below is an attempt to simulate that line to be copied.
Just copy the 1 line below and paste to the CLI, watch what happens.
See http://thejh.net/misc/website-terminal-copy-paste
WARNING, do not try the following if you do not understand dangers of hidden codes. Here below is an attempt to simulate that line to be copied.
Just copy the 1 line below and paste to the CLI, watch what happens.
/dev/null; clear; echo -n "Hello ";whoami|tr -d '\n';echo -e '!\nThat was a bad idea. Don'"'"'t copy code from websites you don'"'"'t trust!
Here'"'"'s the first line of your /etc/passwd: ';head -n1 /etc/passwd
git clone git://git.kernel.org/pub/scm/utils/kup/kup.git
Monday, April 8, 2013
Howto troubleshoot Virtualisation with RHEVM
In the event to do troubleshooting, some of these were carried out for a recent RHEVM;
Only item I do not see is the %TEMP%/manager_hostname/log as mentioned from the RHEV website.
Additional references: http://www.howtoforge.com/virtualization-with-kvm-on-a-centos-6.2-server
- In the RHEVM Administration Portal, check out the events.
- The command rhevm-log-collector collect download logs including from hypervisors to the /tmp folder.
- Collect only RHEVM logs rhevm-log-collector collect --no-hypervisors
- Look at logs in /var/log/rhevm
- Need to check the RHEVM database? Try pg_dump engine -U postgres -W -f /tmp/cu_rhevm.dump -F t
- Check the multipath
- Check configuration with rhevm-config --list
Only item I do not see is the %TEMP%/manager_hostname/log as mentioned from the RHEV website.
Additional references: http://www.howtoforge.com/virtualization-with-kvm-on-a-centos-6.2-server
Tuesday, March 5, 2013
Installing JDBC on MS Windows 7
Basics on getting data from remote MySQL database requires installation of a Java driver.
The JDBC drivers is provided through the current Connector/J 5.1. This is a type 4 driver and works for MySQL 4.1, 5.0, 5.1, 5.5. MySQL reference for the driver can be found at http://docs.oracle.com/cd/E19957-01/mysql-refman-6.0/connectors-apis.html#connector-j-versions
Step 1. Ensure JDK 1.6 or 1.7 is already installed.
At the command prompt check the version, see below example where it was installed in C:\Program Files\Java\jre7
> java -version
java version "1.7.0_03"
Java(TM) SE Runtime Environment (build 1.7.0_03-b05)
Java HotSpot(TM) Client VM (build 22.1-b02, mixed mode, sharing)
Step 2. Download the driver from Maven2 project.
Download from http://mirrors.ibiblio.org/maven2/mysql/mysql-connector-java/5.1.19/
the file mysql-connector-java-5.1.19.jar
And save to C:\Program Files\Java\jre7\
Step 3. Tell Java where to find the driver
Click on Start ->Control Panel ->System
On the left menu choose, Advanced system setting
Choose Environment variables, in the System variables box click on CLASSPATH and choose Edit.
At the end of the text box, append a semi colon followed by location and the name of the drivers, e.g.
;C:\Program Files\Java\jre7\lib\mysql-connector-java-5.1.19.jar
Choose Ok until all boxes are closed.
If you have any command prompt or Java application, they need to be restarted.
Useful information in order to use the driver;
OpenOffice / LibreOffice Base
Step 1. Add the classpath
Open Writer and in the menu choose
Tools ->Option ->Java
Click on the JRE installed; Click Classpath ->Add Archive
Choose location of the driver (In this case C:\Program Files\Java\jre7\lib\mysql-connector-java-5.1.19.jar), click OK until all windows are closed.
Step 2. Close all OpenOffice / LibreOffice applications.
Test using the OpenOffice / LibreOffice Base
The JDBC drivers is provided through the current Connector/J 5.1. This is a type 4 driver and works for MySQL 4.1, 5.0, 5.1, 5.5. MySQL reference for the driver can be found at http://docs.oracle.com/cd/E19957-01/mysql-refman-6.0/connectors-apis.html#connector-j-versions
Step 1. Ensure JDK 1.6 or 1.7 is already installed.
At the command prompt check the version, see below example where it was installed in C:\Program Files\Java\jre7
> java -version
java version "1.7.0_03"
Java(TM) SE Runtime Environment (build 1.7.0_03-b05)
Java HotSpot(TM) Client VM (build 22.1-b02, mixed mode, sharing)
Step 2. Download the driver from Maven2 project.
Download from http://mirrors.ibiblio.org/maven2/mysql/mysql-connector-java/5.1.19/
the file mysql-connector-java-5.1.19.jar
And save to C:\Program Files\Java\jre7\
Step 3. Tell Java where to find the driver
Click on Start ->Control Panel ->System
On the left menu choose, Advanced system setting
Choose Environment variables, in the System variables box click on CLASSPATH and choose Edit.
At the end of the text box, append a semi colon followed by location and the name of the drivers, e.g.
;C:\Program Files\Java\jre7\lib\mysql-connector-java-5.1.19.jar
Choose Ok until all boxes are closed.
If you have any command prompt or Java application, they need to be restarted.
Useful information in order to use the driver;
- The classname: com.mysql.jdbc.Driver
- The connection string: jdbc:mysql://server-name:server-port/database-name
- Username and password to the database
- Default port 3306
OpenOffice / LibreOffice Base
Step 1. Add the classpath
Open Writer and in the menu choose
Tools ->Option ->Java
Click on the JRE installed; Click Classpath ->Add Archive
Choose location of the driver (In this case C:\Program Files\Java\jre7\lib\mysql-connector-java-5.1.19.jar), click OK until all windows are closed.
Step 2. Close all OpenOffice / LibreOffice applications.
Test using the OpenOffice / LibreOffice Base
Monday, February 4, 2013
Android 4.1.2 on Samsung S3
Update from Android 4.1.1 to 4.1.2 on Samsung S3 was straight forward. There were not many noticeable changes so I am listing what were the initial encounters;
- Pull down Notification bar have 2 new buttons
- AllShare cast - to share the screen with other S3 devices. Yet to get a chance to test it.
- Multi window - Allow a menu on the left side of the screen to appear with a list of apps. Two of these apps can be dragged to the screen and viewed at the same time. One app appears at top half and the other at bottom half. Click the horizontal bar at the centre and there are options to switch both app locations or to use the full screen.
- Pull down Notification bar doesn't have the Sync button - Looks like have to sync emails and calendars manually from the settings as the "Auto Sync" button is lost. If you really have the battery and want to leave the sync on, try editing Notification bar or follow this; Left button, choose "System settings" ->"Data Usage". Left button, choose "Auto sync data".
- Edit buttons on Notification bar - Default install have omitted the Sync button, but it can be added back to the Notification bar. To add or remove buttons, Click the Menu button (Left button), Choose "System settings" ->"Display" ->"Notification Panel". Drag additional buttons from the Available Buttons bar into empty spaces in the Notification panel bar.
- Keyboard includes a predictive feature that I could only disable when it appeared the first time I tried to use the keyboard. This include words from all the Facebook, ChatOn, social networking tools. I do not see the option to change the settings anywhere.
- Chrome web browser is included. If you use Chrome on your desktop, and signed in, the same apps open and saved bookmarks can be seen on the S3.
- The Gallery app provides 3 different views to show photos in an Album. In Gallery, choose the top right corner button to switch views.
- Coming soon...
Sunday, January 6, 2013
Getting started with Symfony2 - Part 1
After installing Symfony 2.1 and going through the documentations, everything seems simple enough. To start developing an application from scratch, first create a project, next create a Bundle and start adding codes.
Several assumptions;
A. Create a Bundle
Step 1: Generate the Bundle
Respond to the wizard's questions;
Step 2: Create the routing.
Still in the symfony directory, edit the file src/Sample/HelloBundle/Resources/config/routing.yml
hello:
pattern: /hello/{name}
defaults: { _controller: SampleHelloBundle:Hello:index }
Step 3: Create the controller file.
namespace Sample\HelloBundle\Controller;
use Symfony\Bundle\FrameworkBundle\Controller\Controller;
class HelloController extends Controller
{
public function indexAction($name)
{
return $this->render('SampleHelloBundle:Hello:index.html.twig', array('name' => $name));
}
}
Step 4: Create a view template
vi src/Sample/HelloBundle/Resources/views/Hello/index.html.twig
{% extends '::base.html.twig' %}
{% block body %}
Hello {{ name }}!
{% endblock %}
Step 5: Access the final application
In a web browser, enter the location or URL as
http://localhost/mysymfony/web/app.php/hello/malaysia
---
B. Delete a Bundle
Step 1: Delete the Bundle directory
rm -rf src/Sample/HelloBundle/
Step 2: Remove Bundle routing in /app/config/routing.yml
Example, delete
sample_hello:
resource: "@SampleHelloBundle/Resources/config/routing.yml"
prefix: /
Step 3: Remove Bundle from app/AppKernel.php
Example, delete
new Sample\HelloBundle\SampleHelloBundle(),
Step 4: Clear Symfony cache
or
php app/console cache:clear --env=prod --no-debug
Note to self: No promises when Part 2 will be published.
Several assumptions;
- Installation was done as in my previous posting, including creating the project called mysymfony.
- The Bundle is called HelloBundle in Sample. All Bundle names must end with the word Bundle.
- All Bundles will be under the vendor named "Sample".
A. Create a Bundle
Step 1: Generate the Bundle
cd mysymfony
php app/console generate:bundle --namespace=Sample/HelloBundle --format=yml Respond to the wizard's questions;
- [Enter]
- HelloBundle
- [Enter]
- [Enter]
- [Enter]
- [Enter]
- [Enter]
- [Enter]
Step 2: Create the routing.
Still in the symfony directory, edit the file src/Sample/HelloBundle/Resources/config/routing.yml
hello:
pattern: /hello/{name}
defaults: { _controller: SampleHelloBundle:Hello:index }
Step 3: Create the controller file.
vi src/Sample/HelloBundle/Controller/HelloController.php
namespace Sample\HelloBundle\Controller;
use Symfony\Bundle\FrameworkBundle\Controller\Controller;
class HelloController extends Controller
{
public function indexAction($name)
{
return $this->render('SampleHelloBundle:Hello:index.html.twig', array('name' => $name));
}
}
Step 4: Create a view template
vi src/Sample/HelloBundle/Resources/views/Hello/index.html.twig
{% extends '::base.html.twig' %}
{% block body %}
Hello {{ name }}!
{% endblock %}
Step 5: Access the final application
In a web browser, enter the location or URL as
http://localhost/mysymfony/web/app.php/hello/malaysia
---
B. Delete a Bundle
Step 1: Delete the Bundle directory
rm -rf src/Sample/HelloBundle/
Step 2: Remove Bundle routing in /app/config/routing.yml
Example, delete
sample_hello:
resource: "@SampleHelloBundle/Resources/config/routing.yml"
prefix: /
Step 3: Remove Bundle from app/AppKernel.php
Example, delete
new Sample\HelloBundle\SampleHelloBundle(),
Step 4: Clear Symfony cache
php app/console cache:clear
or
php app/console cache:clear --env=prod --no-debug
Note to self: No promises when Part 2 will be published.
Saturday, January 5, 2013
Installing Symfony2 on Centos 6
Symfony2 framework looks like it provide many useful development tools.
All following codes require access to internet to download the respective files.
Pre installation check list for Symfony2.1.
Lots of resources available online.
Ensure additional php packages are installed, including
Check that /etc/php/ini timezone is edited.
Example;
date.timezone = "Asia/Kuala_Lumpur"
Install GIT
Install Composer for PHP
Install Symfony2.1
Step 1: Download from http://symfony.com/download and extract
tar xvzf Symfony_Standard_Vendors_2.1.6.tgz
Read the text file Symfony/README.md
Step 2: Basic configuration
Step 3: Create your first Symfony2 project
Where
http://localhost/mysymfony/web/config.php
If there is an error, please fix before continuing. I received 2 errors to fix the directory permission for app/cache and app/logs
chown -Rf apache.apache app/logs app/cache
Note: I found following discussion useful
http://forum.symfony-project.org/viewtopic.php?f=32&t=45892
All following codes require access to internet to download the respective files.
Pre installation check list for Symfony2.1.
- Installed and running Apache httpd
- Installed php 5.3 or higher
- Installed GIT 1.7 or higher
Lots of resources available online.
Ensure additional php packages are installed, including
- php-cli
- php-intl
- php-mysql (if you use MySQL database)
- php-gd
- php-pecl-apc
- php-mbstring
Check that /etc/php/ini timezone is edited.
Example;
date.timezone = "Asia/Kuala_Lumpur"
Install GIT
sudo yum install git-core
Install Composer for PHP
cd /var/www/html
curl -s https://getcomposer.org/installer | phpInstall Symfony2.1
Step 1: Download from http://symfony.com/download and extract
tar xvzf Symfony_Standard_Vendors_2.1.6.tgz
Read the text file Symfony/README.md
cp composer.phar Symfony
Step 2: Basic configuration
Step 3: Create your first Symfony2 project
cd /var/www/html/Symfony
php composer.phar create-project symfony/framework-standard-edition /var/www/html/mysymfony 2.1.6Where
- create-project is the command to create a project with 3 arguments
- symfony/framework-standard-edition is the framework to be installed
- /var/www/html/mysymfony is the new directory or project name to be created and installed with base project files
- 2.1.6 is the version
http://localhost/mysymfony/web/config.php
If there is an error, please fix before continuing. I received 2 errors to fix the directory permission for app/cache and app/logs
chown -Rf apache.apache app/logs app/cache
Note: I found following discussion useful
http://forum.symfony-project.org/viewtopic.php?f=32&t=45892
What you should not do for your online portal
At any time if you have launched a portal accessed publicly, its a bad idea to have links showing Minta Maaf.
Just found this on the Malaysian Road Transport Department Portal on 5 Jan 2013.
If its not ready, no need to put it online, right? Just my Opinion.
Just found this on the Malaysian Road Transport Department Portal on 5 Jan 2013.
If its not ready, no need to put it online, right? Just my Opinion.
The link kept directing to http://www.jpj.gov.my/mintamaaf for most of the options I picked.
Friday, December 28, 2012
Statistics on OSS
From time to time, the use of OSS needs justification. What better then information based on open source development model. This includes;
- Large number of contributors
- Frequency of updates (commits)
- Lines of codes
I found such info from Ohloh.net. Example for HTTP Server from Apache is at http://www.ohloh.net/p/apache
Saturday, December 15, 2012
Upgrade Sony Tablet S to Android 4.0.3 rel5
Just received notice of an upgrade. Current Android is 4.0.3 rel 1.
Info on updates is at http://www.sony-asia.com/support/faq/528949
Thursday, December 6, 2012
Speedtest via Digi
Speedtest.net results for Digi on SE Xperia X10i with Android 2.3.3
Subscribed to Digi unlimited
[1st round] on 6 Dec 2012
Download: 558kbps, Upload: 377kbps
Ping 99ms
[2nd round] on 6 Dec 2012
Download: 1658kbps, Upload: 372kbps
Ping 90ms
Hmmm...
Subscribed to Digi unlimited
[1st round] on 6 Dec 2012
Download: 558kbps, Upload: 377kbps
Ping 99ms
[2nd round] on 6 Dec 2012
Download: 1658kbps, Upload: 372kbps
Ping 90ms
Hmmm...
Tuesday, December 4, 2012
Centos Linux and 7z
Files with the extension of .7z indicates its a 7-zip compressed files in unicode format. To access files within the 7z, you will need to uncompress or extract the 7z file. By default, compression uses LZMA or Lempel–Ziv–Markov chain algorithm, which is an algorithm used to perform lossless data compression.
The program used to access 7z files;
Main differences of 7z and tar, is that 7z is meant to be more portable. This includes dropping of the user/group permission of files. I will demonstrate based on Centos 6.
A. Creating a 7z file
Step 1: Installing p7zip
yum install p7zip
Step 2: Compress files in directory named "examples" into the file myfiles.7z
7za a myfiles.7z
Step 3: List files within myfiles.7z
7za l myfiles.7z
Example output as below (note - no user/group info)
Optional steps;
Verify 7z file
7za t myfiles.7z
B. Extracting a 7z file
Step 1: Extract to current directory
7za e myfiles.7z
The program used to access 7z files;
- Windows: 7-zip
- Centos Linux: p7zip
Main differences of 7z and tar, is that 7z is meant to be more portable. This includes dropping of the user/group permission of files. I will demonstrate based on Centos 6.
A. Creating a 7z file
Step 1: Installing p7zip
yum install p7zip
Step 2: Compress files in directory named "examples" into the file myfiles.7z
7za a myfiles.7z
Step 3: List files within myfiles.7z
7za l myfiles.7z
Example output as below (note - no user/group info)
7-Zip (A) [64] 9.20 Copyright (c) 1999-2010 Igor Pavlov 2010-11-18
p7zip Version 9.20 (locale=en_US.UTF-8,Utf16=on,HugeFiles=on,4 CPUs)
Listing archive: scripts.7z
--
Path = scripts.7z
Type = 7z
Method = LZMA
Solid = +
Blocks = 1
Physical Size = 4319
Headers Size = 365
Date Time Attr Size Compressed Name
------------------- ----- ------------ ------------ ------------------------
2012-12-04 09:17:15 ....A 179 3954 examples/svn-auth-users
2012-12-04 09:17:15 ....A 35 examples/tboxmy.sh
2012-12-04 09:17:15 ....A 1004 examples/menusnapshot.sh
2012-12-04 09:17:15 D.... 0 0 examples
------------------- ----- ------------ ------------ ------------------------1218 3954 3 files, 1 folders
Optional steps;
Verify 7z file
7za t myfiles.7z
B. Extracting a 7z file
Step 1: Extract to current directory
7za e myfiles.7z
Saturday, November 24, 2012
Contributing to Libreoffice
well,
Patching of Libreoffice is a commitment from a wide range of users. Below is a response of a contributor on how he contributes.
=======
When I work, I frist create a branch out of a point in master (preferably a oen that build nicely :-) ) so nwo I'm on branch 'foo' for example. I code my patch, then I submity it to gerrit via git push origin foo:refs/for/master then I checkout out master again... and keep going... When the review comes and modification to my patch are needed, I checkout out the branch foo again... the I make the modifications and 'amend' the commit (which _is_ the commit I pushed to gerrit) and then push it again using the same command. rince and repeat until the patch is ready... then I let gerrit cherry pick it on top of master.. if ok, then I can delete the foo branch locally if the cherry pick failed because of a conflict... I fetch ./g fetch and then rebase foo : git rebase origin/master (while being on the foo branch) since the cherry pick from gerrit failed, that rebase should exibit some conflict, with I resolve using git mergetool then one can re-push the patch to gerrit, again using the same command as above.. rince and repeat until the cherry pick from gerrit works If one has commit right, then the last phase can be dealt by bringing the patch to master locally and simply pushing to master
Thursday, November 22, 2012
Change MySQL database directory
Why do I need to change MySQL database directory or location?
- Current disk is out of space
- Current partition is out of space
- There is a better filesystem to improve disk IO performance.
Steps to do this on Centos 6 with SELinux enforced.
Step 1: Stop MySQL server
Step 2: Create the new directory
A new directory can be created in the new disk or partition.
Step 3: Copy existing database to new location
mv /var/lib/mysql/* /srv/mysql/
Step 4: Configure MySQL server
Edit /etc/my.cnf with following
datadir=
socket=
[client]
socket=
Save and close the file.
5. Configure SELinux to allow new database
View current settings
setstatus
ls -lZ /var/lib/mysql
ls -lZ
Edit settings with e.g. as /media/server/mysql
semanage fcontext -a -t mysqld_db_t "/media/server/mysql(/.*)?"
OR
chcon -R -t mysqld_db_t /media/server/mysql
restorecon -Rv /media/server/mysql
Check settings are in the config file
grep -i mysql /etc/selinux/targeted/contexts/files/file_contexts.local
6. Start up MySQL
I had to reboot the server and change selinux to permissive for all this to work.
Wednesday, November 21, 2012
Linux welcome messages
Securing the Linux terminal includes telling users that they may not access the system without authorisation.
Edit following files for this purpose;
- /etc/motd
- /etc/issue
- /etc/issue.net
For items 2 and 3, they only work if you are connected at the terminal or have client server setup. Those using SSH, messages can be set to point to item 3 in the configuration file /etc/ssh/sshd_config
Sunday, November 18, 2012
Howto Yii 1, a PHP framework
This framework seemed worth while to test out. Steps to get started is as follows;
Step 1: Install the framework.
From the www.yiiframework.com site, follow the instructions for pre-requisite to install the Yii framework. Typically you will need
Download Yii-1.1...tar.gz (in tar.gz format) from http://www.yiiframework.com/download/
Extract the tar.gz file to the web folder /var/www/html/yii1
It is also a good point to download the Yii-docs-1.1...tar.gz and extract it to follow its references and tutorials in PDF.
Step 2: Create the skeleton of a new web app.
At the prompt, access the framework's directory /var/www/html/yii1/framework
Type the following:
./yiic webapp ../testdrive
or in windows
yiic webapp ..\testdrive
Open a web browser and access the testdrive application
http://localhost/yii1/testdrive
Step 3: Configure the timezone for the web app.
If an error on the timezone appears, complete following steps
vi /var/www/html/yii1/testdrive/protected/config/main.php
Just before the last line, add the timezone.
'timeZone'=>'Asia/Kuala_Lumpur',
);
Access the testdrive application with the web browser, the error on timezone is gone. It does inform users the following;
You may change the content of this page by modifying the following two files:
View file: C:\Program Files\www\yii1\testdrive\protected\views\site\index.php
Layout file: C:\Program Files\www\yii1\testdrive\protected\views\layouts\main.php
Step 4. Understanding the structure
It is good to know the directories built for the testdrive web application under /var/www/html/yii1/testdrive. From here on, I will refer to the directory /var/www/html/yii1/testdrive as
/index.php
/index-test.php
/assets/ <=Empty
/css/ <=Contains 5 basic CSS files and a bg.gif file
/images/ <=Empty
/protected/ <=This is where your coding goes
/themes/ <=Several directories that is empty
Step 5. The database, mysql
Create a database named yii_testdrive, and load in the SQL from
/protected/data/schema.mysql.sql
By default it has the SQLLITE as its database, edit the file/config/main.php and comment out the following lines
'db'=>array(
'connectionString' => 'sqlite:'.dirname(__FILE__).'/../data/testdrive.db',
),
Uncomment the mysql lines below it and edit the database connection
'db'=>array(
'connectionString' => 'mysql:host=localhost;dbname=yii_testdrive',
'emulatePrepare' => true,
'username' => 'root',
'password' => '',
'charset' => 'utf8',
),
Step 6. Generating the pages based on the database
Uncomment the GII web-based code generator and change the default password to MyPassword
'gii'=>array(
'class'=>'system.gii.GiiModule',
'password'=>'MyPassword',
// If removed, Gii defaults to localhost only. Edit carefully to taste.
'ipFilters'=>array('127.0.0.1','::1'),
),
Open a web browser and point to the gii resource
http://localhost/yii1/testdrive/index.php?r=gii
A login page appears, type the password as
MyPassword
You are then presented with the following to auto generate codes based on your database.
Thats all for now...will continue when time permits.
Step 1: Install the framework.
From the www.yiiframework.com site, follow the instructions for pre-requisite to install the Yii framework. Typically you will need
- Apache web browser
- PHP 5.1 and newer
- PHP PDO
- A database
Download Yii-1.1...tar.gz (in tar.gz format) from http://www.yiiframework.com/download/
Extract the tar.gz file to the web folder /var/www/html/yii1
It is also a good point to download the Yii-docs-1.1...tar.gz and extract it to follow its references and tutorials in PDF.
Step 2: Create the skeleton of a new web app.
At the prompt, access the framework's directory /var/www/html/yii1/framework
Type the following:
./yiic webapp ../testdrive
or in windows
yiic webapp ..\testdrive
Open a web browser and access the testdrive application
http://localhost/yii1/testdrive
Step 3: Configure the timezone for the web app.
If an error on the timezone appears, complete following steps
vi /var/www/html/yii1/testdrive/protected/config/main.php
Just before the last line, add the timezone.
'timeZone'=>'Asia/Kuala_Lumpur',
);
Access the testdrive application with the web browser, the error on timezone is gone. It does inform users the following;
You may change the content of this page by modifying the following two files:
View file: C:\Program Files\www\yii1\testdrive\protected\views\site\index.php
Layout file: C:\Program Files\www\yii1\testdrive\protected\views\layouts\main.php
Step 4. Understanding the structure
It is good to know the directories built for the testdrive web application under /var/www/html/yii1/testdrive. From here on, I will refer to the directory /var/www/html/yii1/testdrive as
Step 5. The database, mysql
Create a database named yii_testdrive, and load in the SQL from
By default it has the SQLLITE as its database, edit the file
'db'=>array(
'connectionString' => 'sqlite:'.dirname(__FILE__).'/../data/testdrive.db',
),
Uncomment the mysql lines below it and edit the database connection
'db'=>array(
'connectionString' => 'mysql:host=localhost;dbname=yii_testdrive',
'emulatePrepare' => true,
'username' => 'root',
'password' => '',
'charset' => 'utf8',
),
Step 6. Generating the pages based on the database
Uncomment the GII web-based code generator and change the default password to MyPassword
'gii'=>array(
'class'=>'system.gii.GiiModule',
'password'=>'MyPassword',
// If removed, Gii defaults to localhost only. Edit carefully to taste.
'ipFilters'=>array('127.0.0.1','::1'),
),
Open a web browser and point to the gii resource
http://localhost/yii1/testdrive/index.php?r=gii
A login page appears, type the password as
MyPassword
You are then presented with the following to auto generate codes based on your database.
- Controller Generator
- Crud Generator
- Form Generator
- Model Generator
- Module Generator
Thats all for now...will continue when time permits.
Saturday, September 29, 2012
Howto Install OpenSIS on Centos 6
Step 1: Retrieve the package
Download from http://sourceforge.net/projects/opensis-ce/files/latest/download
Extract opensis-ce to /vcar/www/html
Step 2: Launch web installer
Start mysqld and httpd (apache web server). Open a web browser and point to the address
http://
Follow onscreen instructions to install database and sample database.
Friday, September 14, 2012
Installing Plone 4 on Centos 6
Plone 4 is based on Python and Zope and provides its own little database.
Installation on Centos 6.3 was pretty straight forward in the standalone mode. Alternative, mode is as ZEO Cluster or a single running instance.
Step 1: Download the Unified installer (comes with Python and Zope) for Plone.
Download from Plone.org (https://launchpad.net/plone/4.2/4.2.1/+download/Plone-4.2.1-UnifiedInstaller.tgz) with a file size of approx 50MB.
See http://plone.org/products/plone/releases/4.2.1
Step 2: Install dependency files.
Most of these are already installed if Centos was installed with the development tools.
Add the RPMForge repo;
wget http://pkgs.repoforge.org/rpmforge-release/rpmforge-release-0.5.2-2.el6.rf.i686.rpm
rpm -ivh rpmforge-release-0.5.2-2.el6.rf.i686.rpm
yum install gcc gcc-g++ make tar bzip2 gzip
yum install readline libgsf
yum install wv
If there is problem with the wv package, download wv from EPEL or http://wvware.sourceforge.net and install with RPM.
rpm -ivh wv-1.2.7-2.el6.i686.rpm
Step 3: Extract & Install Plone
Enter the directory with the UnifiedInstaller (Download directory).
tar zxvf Plone-4.2.1-UnifiedInstaller.tar.gz
cd plone-4.2.1
./install.sh standalone
cd /usr/local/Plone/zinstance
Identify which port (default 8080) will be used for Plone. If needed, change the port then apply changes by typing
bin/buildout
Step 4: Start/Stop Plone
The Plone server can be started or stop with following command (replace the word start)
/usr/local/Plone/zinstance/bin/plonectl start
Step 5: Access Plone
Open a web browser (e.g. Firefox, Chrome) and enter following URL address;
http://localhost:8080
Default password is found in the file /usr/local/Plone/zinstance/adminPassword.txt
Create a Plone instance, then read the instructions at the main page of the Plone instance.
Additional notes:
Install following packages;
References: http://plone.org/documentation/manual/installing-plone/installing-on-linux-unix-bsd/referencemanual-all-pages
Installation on Centos 6.3 was pretty straight forward in the standalone mode. Alternative, mode is as ZEO Cluster or a single running instance.
Step 1: Download the Unified installer (comes with Python and Zope) for Plone.
Download from Plone.org (https://launchpad.net/plone/4.2/4.2.1/+download/Plone-4.2.1-UnifiedInstaller.tgz) with a file size of approx 50MB.
See http://plone.org/products/plone/releases/4.2.1
Step 2: Install dependency files.
Most of these are already installed if Centos was installed with the development tools.
Add the RPMForge repo;
wget http://pkgs.repoforge.org/rpmforge-release/rpmforge-release-0.5.2-2.el6.rf.i686.rpm
rpm -ivh rpmforge-release-0.5.2-2.el6.rf.i686.rpm
yum install gcc gcc-g++ make tar bzip2 gzip
yum install readline libgsf
yum install wv
If there is problem with the wv package, download wv from EPEL or http://wvware.sourceforge.net and install with RPM.
rpm -ivh wv-1.2.7-2.el6.i686.rpm
Step 3: Extract & Install Plone
Enter the directory with the UnifiedInstaller (Download directory).
tar zxvf Plone-4.2.1-UnifiedInstaller.tar.gz
cd plone-4.2.1
./install.sh standalone
cd /usr/local/Plone/zinstance
Identify which port (default 8080) will be used for Plone. If needed, change the port then apply changes by typing
bin/buildout
Step 4: Start/Stop Plone
The Plone server can be started or stop with following command (replace the word start)
/usr/local/Plone/zinstance/bin/plonectl start
Step 5: Access Plone
Open a web browser (e.g. Firefox, Chrome) and enter following URL address;
http://localhost:8080
Default password is found in the file /usr/local/Plone/zinstance/adminPassword.txt
Create a Plone instance, then read the instructions at the main page of the Plone instance.
Additional notes:
Install following packages;
- Openoffice.org or libreoffice (headless) for better document conversion
- msttcorefonts for better formatting compatibility, see previous post.
References: http://plone.org/documentation/manual/installing-plone/installing-on-linux-unix-bsd/referencemanual-all-pages
Wednesday, September 12, 2012
PostgreSQL 9.2 improves
Latest PostgreSQL will support 64 cores, or 3x its current capability. Transactions per second increased to about 350,000 is over 4x its current speed.
Not bad for OPEN SOURCE!
see
http://www.databasejournal.com/features/postgresql/postgresql-9-2-open-source-database.html
Not bad for OPEN SOURCE!
see
http://www.databasejournal.com/features/postgresql/postgresql-9-2-open-source-database.html
Tuesday, September 4, 2012
Howto install Alfresco 4, the Community edition on Centos 6
Alfresco provides some very interesting functions. This includes support for networking with CIFS, WebDav and IMAP.
See https://www.alfresco.com/products/platform
Check following have been done.
Following are steps that I have taken to install Alfresco 4 on Centos 6.
Step 1. Create the database
At the CLI, login to MySQL and create database named "alfresco"
# mysql -u root -p
CREATE DATABASE alfresco;
\q
Step 2. Start LibreOffice as headless
soffice "-accept=socket,host=localhost,port=8100;urp;StarOffice.ServiceManager" \
-nologo -headless
Step 3. Get the software and install
Download from http://wiki.alfresco.com/wiki/Download_and_Install_Alfresco
Double click on the file alfresco-community....bin and follow the onscreen instructions.
I choose the "Easy" method, and included the "Share"
Alternatively, installation can be done at the Linux CLI, just switch to root user, go to the directory where the file was downloaded and type
# ./alfresco-community-4.0.x-installer-linux-x64.bin ---mode text
Step 4. Start Alfresco, based on the Tomcat server port of 8080.
See https://www.alfresco.com/products/platform
Check following have been done.
- Linux must be 64bit. Why? they only provided Alfresco for Linux on 64 bits, thats why.
- Install LibreOffice (yum install libreoffice libreoffice-headless), version 3.4.5.2 was installed
- Install MySQL (yum install mysql-server), in my case version 5.1.61 was installed.
Following are steps that I have taken to install Alfresco 4 on Centos 6.
Step 1. Create the database
At the CLI, login to MySQL and create database named "alfresco"
# mysql -u root -p
CREATE DATABASE alfresco;
\q
Step 2. Start LibreOffice as headless
soffice "-accept=socket,host=localhost,port=8100;urp;StarOffice.ServiceManager" \
-nologo -headless
Step 3. Get the software and install
Download from http://wiki.alfresco.com/wiki/Download_and_Install_Alfresco
Double click on the file alfresco-community....bin and follow the onscreen instructions.
I choose the "Easy" method, and included the "Share"
Alternatively, installation can be done at the Linux CLI, just switch to root user, go to the directory where the file was downloaded and type
# ./alfresco-community-4.0.x-installer-linux-x64.bin ---mode text
Alfresco started automatically, but is needed, got the the /opt/alfresco folder and type
alfresco.sh start
Access the application with a web browser and the following URLs/
alfresco.sh start
Access the application with a web browser and the following URLs/
http://localhost:8080/alfresco
and http://localhost:8080/share
Wednesday, August 22, 2012
Howto add menu to Gnome
Centos 6.3 defaults with the Gnome desktop. After installing / creating a custom application, how do you add it to the start menu?
Answer: Install alacarte
Step 1: Install Alacarte
# yum install alacarte
Step 2: Add the new program as a menu item.
Click System ->Preferences ->Main Menu
Choose the menu and add the new item.
Answer: Install alacarte
Step 1: Install Alacarte
# yum install alacarte
Step 2: Add the new program as a menu item.
Click System ->Preferences ->Main Menu
Choose the menu and add the new item.
Tuesday, August 21, 2012
Kubuntu - USB disk does not mount
Followup from the Kubuntu 10.04 installation, for those who have opted to stay on with Kubuntu 10.04, mounting of USB disk is done manually or alternatively, install usbmount.
Using the Package Manager or at the command line, install the following packages
- usbmount
- pmount
- ntfs-3g
Tuesday, August 14, 2012
Direct Apache access to SSL ports
Secure Socket Layer (SSL) provides an encrypted network connection and is seen to use the HTTPS protocol in the URL.
To ensure that the web server only servers HTTPS, the following needs to be enabled before the HTTPS VirtualHost tag.
RewriteEngine on
RewriteCond %{HTTPS} off
RewriteRule (.*) https://%{HTTP_HOST}:443%{REQUEST_URI}
RewriteEngine on
RewriteCond %{HTTPS} off
RewriteRule (.*) https://%{HTTP_HOST}:443%{REQUEST_URI}
What it means? turn off https if its https, then change the url to always use https.
Actually, you can put a lot more between the VirtualHost tag. E.g. choice of error pages to server and limiting which domain/IP address that can access the contents.
Thursday, August 2, 2012
Screen capture your Android phone
On the Xperia X10i with Android 2.3, and most other Android phones, you can screen capture for purpose of troubleshooting, development, presentation and article writing. Here is listed the instructions on MS Windows 7.
Step 1: Install the Android SDK.
Step 2: Switch the X10i debug.
Click "left" button, choose "Settings" ->"Applications" ->"Development".
Click to Check "USB Debugging".
Step 3: Plug USB cable between X10i and PC.
If asked to charge, choose that option.
Step 4: On the PC, start the Dalvik Debug Monitor (DDMS)
Click the Windows "Start" button, and type following and press "Enter" key.
cmd
Switch to the android directory and type following and press "Enter" key.
tools\ddms.bat
Ensure that you choose your phone from the left list. In my case its written as "XXX [SonyEricsson:X10i]". From the top menu of DDMS, click "Device" ->"Screen capture..."
Step 5: Capture the screen on the Android device (X10i)
On the X10i, select the screen to be captured (or saved).
Then on the PC, the DDMS should show the same screen as the Android, click "Copy". Start the graphics software such as GIMP or MS Paint and "paste" the screen capture. Save as the filename of your choice.
I have not used the "Save" button on DDMS, so I can't say where it saves to.
Step 1: Install the Android SDK.
Step 2: Switch the X10i debug.
Click "left" button, choose "Settings" ->"Applications" ->"Development".
Click to Check "USB Debugging".
Step 3: Plug USB cable between X10i and PC.
If asked to charge, choose that option.
Step 4: On the PC, start the Dalvik Debug Monitor (DDMS)
Click the Windows "Start" button, and type following and press "Enter" key.
cmd
Switch to the android directory and type following and press "Enter" key.
tools\ddms.bat
Ensure that you choose your phone from the left list. In my case its written as "XXX [SonyEricsson:X10i]". From the top menu of DDMS, click "Device" ->"Screen capture..."
Step 5: Capture the screen on the Android device (X10i)
On the X10i, select the screen to be captured (or saved).
Then on the PC, the DDMS should show the same screen as the Android, click "Copy". Start the graphics software such as GIMP or MS Paint and "paste" the screen capture. Save as the filename of your choice.
I have not used the "Save" button on DDMS, so I can't say where it saves to.
Wednesday, August 1, 2012
Bacula on Suse Linux
Anyone tried to install Bacula on Suse?
I started the search from the following site;
http://adrian.onsen.ca/2011/10/bacula-and-webmin-setup/
List of repos that can be used for the installation.
Bacula ver 5.2.1 + Suse 11
Webmin also list support as shown in http://www.webmin.com/cgi-bin/search_third.cgi?modules=1
Bacula Backup System 1.590
Will need to try again another day.
I started the search from the following site;
http://adrian.onsen.ca/2011/10/bacula-and-webmin-setup/
List of repos that can be used for the installation.
Bacula ver 5.2.1 + Suse 11
Bacula ver 5.2.1 +Suse 11&12
Webmin also list support as shown in http://www.webmin.com/cgi-bin/search_third.cgi?modules=1
Bacula Backup System 1.590
| Description | Configure Bacula to perform backups and restores manually or on schedule, for one or many systems |
| Download | bacula-backup.wbm.gz |
| Website | http://www.webmin.com/webmin/standard.html |
| Author | Jamie Cameron |
| Last updated | 2012-07-01 05:49:18 |
Will need to try again another day.
Wednesday, July 25, 2012
List of trainings - Linux
Linux for Web Developers - I
Objective: An intensive program to provide Web developers knowledge to manage basic development on a Linux platform.Pre-req: Participants must already know PHP programming.
Duration: 1day
Outline:
1. Introduction to Linux operating system
- Benefits of Linux, various distros, and the Centos Linux
2. Gnome, the Linux desktop
- Navigate common features of the desktop. Includes the file browsers, windows system, Systems configuration and start menu.
3. Editing text
- Use of the Gedit tool, saving files
4. The Linux Command Line Interface (CLI)
- Accessing the CLI, using BASH basic commands and text file editing
5. Getting help and the man
- Help from the windows, application, internet and man pages
6. Linux file system
- Basics of the folder convention, HOME folder, editing folders and folder permissions.
7. Software management - I
- Basics on package managers, YUM and RPM. Identify software packages installed, add and remove.
8. Manage development services - I
- Monitor status, start and stop Apache, MySql. Identify configuration files for Apache, MySql and PHP (AMP)
9. Troubleshooting the AMP in LAMP.
- Determine disk space utilisation, access Linux and Apache log files. Writing a web page to show phpinfo.
Linux for Web Developers - II
Objective: Manage tools used for web application development on Linux platform.Include graphic editors, manage installation of software, work with Eclipse editor. Writing php codes and installing additional php modules.
Connecting to a remote linux to access the shell commands and transfering files.
Saturday, July 21, 2012
Blogger app from Google Inc needs a lot more of work.
Just installed the app on ICS.
It doesn't provide numbering list and other basic formatting.
My previous postings all appear in html edit view. No options visible to switch editing modes.
Option for tagging as labels are not very intuitive.
Possibly the developer is a single person from Google payroll or was it out sourced to India? Hmm....
Develop Android Apps with Eclipse on Centos 6
This is an update to my previous post.
[Update for Centos 6.3]
Pre-installation check list:
Steps 1. Eclipse Indigo
yum install eclipse-emf eclipse-jdt
Download and install the Indigo version of Eclipse.
Default yum install from Centos 6.3 provided only the older version of Eclipse (Helios) which have too many dependency problems after install.
2. Android SDK
a) download and run installer from http://developer.android.com/sdk/index.html
Current version is named android-sdk_r20.0.3-linux.tgz size of which is about 78Mb.
tar -xvzf android-sdk_r20.0.3-linux.tgz
mv android-sdk /opt/android-sdk
chmod -R a+w /opt/android-sdk
Open the user's $HOME/.bash_profile and add before the last l
PATH=$PATH:/opt/android-sdk/tools:/opt/android-sdk/platform-tools
Follow instructions from http://developer.android.com/sdk/installing/index.html
b) Run the Android SDK Manager
Currently target for API 10 (Android 2.3.3) and API 16 (Android 4.0.1).
3. Eclipse's ADT plugin
a) Start Eclipse and select Help-> Install New Software, click Add (top right)
b) At right of "Work with:", Click Add... and enter the ADT Plugin repository details
https://dl-ssl.google.com/android/eclipse/
c) In Available Software, check Developer Tools and install.
Accept all license agreement.
d) Restart Eclipse
e) Eclipse may assign the Android SDK directory
or
Choose preferences and point to the Android SDK folder (see Section 2).
e.g. /opt/android-sdk
4. Create your first App, see http://developer.android.com/training/basics/firstapp/index.html
[Update for Centos 6.3]
Installing Eclipse Indigo for Android on Centos 6.
Pre-installation check list:
- Java JDK 1.6 or higher is installed
PATH and CLASSPATH has been configured
yum install glibc.i686 ncurses-libs.i686 libstdc libstdc++.i686 \ libzip.i686 libX11 i686 libXrandr.i686 SDL.i686 gegl.i686
Steps 1. Eclipse Indigo
Download and install the Indigo version of Eclipse.
Default yum install from Centos 6.3 provided only the older version of Eclipse (Helios) which have too many dependency problems after install.
2. Android SDK
a) download and run installer from http://developer.android.com/sdk/index.html
Current version is named android-sdk_r20.0.3-linux.tgz size of which is about 78Mb.
tar -xvzf android-sdk_r20.0.3-linux.tgz
mv android-sdk /opt/android-sdk
chmod -R a+w /opt/android-sdk
Open the user's $HOME/.bash_profile and add before the last l
PATH=$PATH:/opt/android-sdk/tools:/opt/android-sdk/platform-tools
Follow instructions from http://developer.android.com/sdk/installing/index.html
b) Run the Android SDK Manager
Currently target for API 10 (Android 2.3.3) and API 16 (Android 4.0.1).
3. Eclipse's ADT plugin
a) Start Eclipse and select Help-> Install New Software, click Add (top right)
b) At right of "Work with:", Click Add... and enter the ADT Plugin repository details
https://dl-ssl.google.com/android/eclipse/
c) In Available Software, check Developer Tools and install.
Accept all license agreement.
d) Restart Eclipse
e) Eclipse may assign the Android SDK directory
or
Choose preferences and point to the Android SDK folder (see Section 2).
e.g. /opt/android-sdk
4. Create your first App, see http://developer.android.com/training/basics/firstapp/index.html
Installing msttcorefonts on Centos 6.3
Documents received may require MS Fonts to display format correctly, and these MS Ffonts are not available by default in Centos 6.2.
Install tools to create fonts and directories (fake ones for compatibility).
yum install ttmkfdir rpmdevtools
note: ensure all RPM building tools have been installed (see my previous post).
Install ATRPMS repository and MS Fonts.
wget http://dl.atrpms.net/el6-x86_64/atrpms/stable/atrpms-repo-6-5.el6.x86_64.rpm
wget http://pkgs.org/centos-6-rhel-6/atrpms-x86_64/atrpms-repo-6-6.el6.x86_64.rpm/download/
(for i686 machines, replace x86_64 with i386 as in line below)
(I am using, x86_64 for remainder of notes)
rpm -ivh rpmbuild/RPMS/noarch/msttcorefonts-2.0-1.noarch.rpm
(open Libreoffice or Character Map, see if the Arial, Georgia and Times New Roman are available)
If fonts are not appearing, run following then relog-in (Do not run these if above steps work)
References: http://corefonts.sourceforge.net/
Install tools to create fonts and directories (fake ones for compatibility).
yum install ttmkfdir rpmdevtools
note: ensure all RPM building tools have been installed (see my previous post).
Install ATRPMS repository and MS Fonts.
wget http://dl.atrpms.net/el6.3-i386/atrpms/stable/atrpms-repo-6-5.el6.i686.rpm
(I am using, x86_64 for remainder of notes)
rpm -ivh atrpms-repo-6-5.el6.x86_64.rpm
yum install chkfontpath
wget http://corefonts.sourceforge.net/msttcorefonts-2.0-1.spec
rpmbuild -bb msttcorefonts-2.0-1.spec
(download MS Fonts and compile into packages) rpm -ivh rpmbuild/RPMS/noarch/msttcorefonts-2.0-1.noarch.rpm
(open Libreoffice or Character Map, see if the Arial, Georgia and Times New Roman are available)
If fonts are not appearing, run following then relog-in (Do not run these if above steps work)
mkfontscale
mkfontdir
References: http://corefonts.sourceforge.net/
Installing Centos 6 on HP Probook 4420s
Finally found time to install Centos 6.2 on the HP Laptop.
Laptop specs:
RAM 4Gb
CPU: i3 ...
Installed (default)
Linux kernel 2.6.32-220.el6.x86_64
Gnome 2.28.2
Mozilla Firefox 10.0.5
Add RPMFORGE software repository (libary of software)
(download the rpm)
(reboot)
Post-Installation
Login as root at the terminal and first few software to be installed (type this out):
yum groupinstall "Desktop" "Desktop Platform" "X Window System" "Fonts"
yum install madwifi
(reboot)
yum install flash-plugin
yum install vlc
yum install libreoffice
(total 25 package, 103Mb download)
yum install libreoffice-ogltrans
Notes: wifi can only be configured easily when linux is in graphical screen/desktop.
Prepare to build from source
yum install cabextract rpm-build
Other observations
Laptop specs:
RAM 4Gb
CPU: i3 ...
Installed (default)
Linux kernel 2.6.32-220.el6.x86_64
Gnome 2.28.2
Mozilla Firefox 10.0.5
Add RPMFORGE software repository (libary of software)
(download the rpm)
rpm --import http://apt.sw.be/RPM-GPG-KEY.dag.txt
rpm -ivh ~/rpmforge-release-0.5.2-2.el6.rf.x86_64.rpm
yum update
(Total 371 files, 385MB downloaded)(reboot)
Post-Installation
Login as root at the terminal and first few software to be installed (type this out):
yum groupinstall "Desktop" "Desktop Platform" "X Window System" "Fonts"
yum install madwifi
(reboot)
yum install flash-plugin
yum install vlc
yum install libreoffice
(total 25 package, 103Mb download)
yum install libreoffice-ogltrans
Notes: wifi can only be configured easily when linux is in graphical screen/desktop.
Prepare to build from source
yum install cabextract rpm-build
Other observations
- The touchpad (black square at center of laptop that helps to move the mouse) is having a soft LEFT and RIGHT button (not working correctly)
- To drag windows, press bottom half of the Touchpad until a click is felt. Then drag without leave finger from the Touchpad.
- To RIGHT click in window, you need to press bottom half then do a second click without lifting the first finger.
- Install from (HP) or better still to use a mouse pointer.
- Music
- Default "Totem Music Player" doesn't support MP3. Need to install gstreamer-plugins-ugly
- Webcam
- Runinng "Cheese" I can adjust to higher resolutions but its frames per seconds is very little. This causes the video to seem very poor quality.
- Option to edit the menu bar (add new items manually) is missing. Installed alacarte package, logout then back in to enable editing of menu items.
- If boot was to only command line (a black screen), switch to graphical. Type init 5.
Thursday, July 5, 2012
Out of phone storage space on x10i
On the Sony Experia X10i, with Android 2.3.3 (Gingerbread) I am currently getting the message
"Phone storage space is getting low."
So, I did a backup (see HERE) then a factory reset to clear all data. Maybe some of the slowness issues on the X10i will be resolved.
Note: Free apps may not be automatically reinstalled. I have not figured out why.
Here are steps for the factory reset.
Step 1: Start the reset
On the X10i, Left click, and in menu choose "settings".
Choose "Factory data reset"
Do not choose "Erase SD card", because all my photos and backup is there.
Click "Reset phone"
Click "Erase everything"
The phone will power off (shut down)
Step 2: Start the x10i
The phone will restart, press the middle button and unlock the phone.
Choose Language,
Choose step 2/6 and change the date and time.
Choose step 5/6, set up the google, email account. What about Sony Ericsson sync (not working)?
Sony Ericsson sync was asking to select your country, but listed only 8 names and didn't list mine. It then says service is discontinued
Click in step 6/6 click "Finish".
"Phone storage space is getting low."
So, I did a backup (see HERE) then a factory reset to clear all data. Maybe some of the slowness issues on the X10i will be resolved.
Note: Free apps may not be automatically reinstalled. I have not figured out why.
Here are steps for the factory reset.
Step 1: Start the reset
On the X10i, Left click, and in menu choose "settings".
Choose "Factory data reset"
Do not choose "Erase SD card", because all my photos and backup is there.
Click "Reset phone"
Click "Erase everything"
The phone will power off (shut down)
Step 2: Start the x10i
The phone will restart, press the middle button and unlock the phone.
Choose Language,
Choose step 2/6 and change the date and time.
Choose step 5/6, set up the google, email account. What about Sony Ericsson sync (not working)?
Sony Ericsson sync was asking to select your country, but listed only 8 names and didn't list mine. It then says service is discontinued
Click in step 6/6 click "Finish".
Backup X10i phone with Gingerbread
In cases where the X10i needs to be fully cleared, such as a fresh reinstall or upgrade, user data needs to be backup. If you are using contacts, calendar from google services, then it can be easily recovered anytime.
Several Android apps are available for backup of the Android 2.3.3 (Gingerbread) and this includes;
- Titanium Backup * root
- MyBackup pro (RERWARE, LLC), with free limited 30 trial
- SMS Backup & Restore (RITESH SAHU)
What to backup? Well there is the;
- Contact numbers,
- SMS,
- APN settings,
- SDCard data,
1. Contact numbers
Step 1: Start the dialer
On the X10i launch the phone dialer. Click LEFT button, choose Backup contacts, then Memory card.
This will prompt the name and location of the back up file, choose OO. E.g.
/sdcard/System/PIM/PIM000001.vcf
Step 2: Verify
Once the progress bar has completed saving all the address book, browse to the SDCard and copy the vcf file to your PC or USB disk.
2. SMS
Step 1: Install from Android Play Store the app, "SMS Backup & Restore"
This saves SMS in XML format.
Launch the app, click on the "Tools" icon at the top. Select the Backup folder which is by default
/mnt/sdcard/SMSBackupRestore/
For advanced users, explorer the other options. For basic needs, I find that there isn't any need to change the other configurations.
Step 2: Do the backup.
Read and accept the screen prompts.
Click "Backup" and enter the backup file name.
Click OK.
My 5,230 SMS was backup and verified in 45 seconds.
Click "Close"
Step 3: Donate
Oh...its optional and I have no idea who developed this app, but it does a pretty good basic backup of SMS. As for the Adds, its not too big to obstruct the buttons.
3. APN Settings
Step 1: Install from Android Play Store the app, "APN Backup & Restore"
This saves SMS in XML format.
^^^Launch the app, click on the "Tools" icon at the top. Select the Backup folder which is by default
/mnt/sdcard/SMSBackupRestore/
For advanced users, explorer the other options. For basic needs, I find that there isn't any need to change the other configurations.
Step 2: Do the backup.
Click "Backup APNs" and enter the backup file name. E.g. default filename is apns-.xml
Click "Close".
It doesn't say where its backup to, but search for it in /mnt/sdcard/ApnBackupRestore/
4. Backup SD Card
Firstly, if you already have a PC backup software, you can perform Step 1, then continue with that backup software.
Step 1: Plug the X10i USB cable.
The PC should be installed with the Sony PC Companion software. This will launch the windows explorer.
Step 2: Copy files to your PC
Using Windows Explorer, drag all files from the SD Card to your PC.
Installing PHPMYADMIN on Centos 6
PHPMyadmin is a web front end to manage MySQL databases. It can be installed on the same server as the database or on a separate server.
Step 1: Open a Linux command line terminal (CLI)
Login as root or administrator.
Step 2: Increase the software repository with rpmforge
Browse for the packages and download from http://packages.sw.be
or
wget http://packages.sw.be/rpmforge-release/rpmforge-release-0.5.2-2.el6.rf.i686.rpm
Select the 64bit version if your machine supports it.
Install the keys from DAG.
rpm --import http://apt.sw.be/RPM-GPG-KEY.dag.txt
Install the rpmforge files to access the repository.
rpm -i rpmforge-release-0.5.2-2.el6.rf.*.rpm
Refer to http://wiki.centos.org/AdditionalResources/Repositories/RPMForge/ for details
Step 3: Install phpmyadmin
yum --enablerepo=rpmforge install phpmyadmin
Step 4: Using a web browser point to the server installed with phpmyadmin.
E.g.
http://localhost/phpmyadmin
where
You should be able to see the main page of phpmyadmin.
Develop Android 4 Apps with Eclipse
Before starting this article, it must be mentioned that the eclipse is preferable be on a 64-bit machine that has relatively big RAM, L2 cache, fast hard disk. This is because of the slowness and constant errors that I am encountering in the past few months with an old pc. This is why I have not been doing any development on android and it will most probably this way until I can get my hands on a better PC.
So, you want to start on Android Programming? Read on...
Pre-installation check list:
Steps
1. Eclipse Indigo
a) download and extract Eclipse
http://www.eclipse.org/downloads/download.php?
file=/eclipse/downloads/drops/R-3.7.2-201202080800/eclipse-SDK-
3.7.2-win32.zip
b) Move to the Program files folder
e.g. c:\Windows\Program Files\eclipse
2. Android SDK
a) download and run installer_r18-windows.exe
http://developer.android.com/sdk/index.html
Follow instructions from http://developer.android.com/sdk/installing/index.html
b) Run the Android SDK Manager
Currently target for API 10 (Android 2.3.3) and API 15 (Android 4.0.3).
Accepted all package to install but HTC OpenSense SDK.
3. Eclipse's ADT plugin
a) Start Eclipse and select Help-> Install New Software, click Add (top right)
b) At right of "Work with:", Click Add... and enter the ADT Plugin repository details
https://dl-ssl.google.com/android/eclipse/
c) In Available Software, check Developer Tools and install.
Accept all license agreement.
d) Restart Eclipse
e) Eclipse may have problem locating the Android SDK directory
Choose preferences and point to the Android SDK folder (see Section 2).
e.g. c:\Windows\Program Files\Android\android-sdk
4. Create your first App, see http://developer.android.com/training/basics/firstapp/index.html
So, you want to start on Android Programming? Read on...
Installing Eclipse Indigo for Android on MS Windows 7.
Pre-installation check list:
- Java JDK 1.6 or higher is installed
- PATH and CLASSPATH has been configured
Steps
1. Eclipse Indigo
a) download and extract Eclipse
http://www.eclipse.org/downloads/download.php?
file=/eclipse/downloads/drops/R-3.7.2-201202080800/eclipse-SDK-
3.7.2-win32.zip
b) Move to the Program files folder
e.g. c:\Windows\Program Files\eclipse
2. Android SDK
a) download and run installer_r18-windows.exe
http://developer.android.com/sdk/index.html
Follow instructions from http://developer.android.com/sdk/installing/index.html
b) Run the Android SDK Manager
Currently target for API 10 (Android 2.3.3) and API 15 (Android 4.0.3).
Accepted all package to install but HTC OpenSense SDK.
3. Eclipse's ADT plugin
a) Start Eclipse and select Help-> Install New Software, click Add (top right)
b) At right of "Work with:", Click Add... and enter the ADT Plugin repository details
https://dl-ssl.google.com/android/eclipse/
c) In Available Software, check Developer Tools and install.
Accept all license agreement.
d) Restart Eclipse
e) Eclipse may have problem locating the Android SDK directory
Choose preferences and point to the Android SDK folder (see Section 2).
e.g. c:\Windows\Program Files\Android\android-sdk
4. Create your first App, see http://developer.android.com/training/basics/firstapp/index.html
Saturday, April 28, 2012
Fatal error: Allowed memory size of 134217728 bytes exhausted (tried to allocate 65536 bytes) in ....
The error above was found on a LAMP (Centos 6, Apache, MySQL and PHP 5) environment.
Where is the problem?
Facts:
134,217,728 bytes is equivalent to 128MB. These numbers indicate that a limit of some memory has been reached.
2 power of 16 = 65536
2 power of 27 = 134217728
There some sites that suggest to increase the memory limit of PHP with memory_limit directive in php.ini file. But this will only prolong the problem to another day. How are you going to keep increasing the memory limit?
Possible approach:
Troubleshooting (approach 1):
Where is the problem?
Facts:
134,217,728 bytes is equivalent to 128MB. These numbers indicate that a limit of some memory has been reached.
2 power of 16 = 65536
2 power of 27 = 134217728
There some sites that suggest to increase the memory limit of PHP with memory_limit directive in php.ini file. But this will only prolong the problem to another day. How are you going to keep increasing the memory limit?
Possible approach:
- Some where along the setup, the application is eating up memory through an infinite loop. Review location of the application file (model) that is causing the error.
- It states "Fatal error" and not "Php Fatal error", indicating Apache web server is sending the error instead of PHP. Check if web server was restarted after the memory_limit was increased in the /etc/php.ini file.
- Database configuration needs to be edited for large selects or join processing. (High performance Innodb)
Troubleshooting (approach 1):
- Use phpinfo() to compare the memory_limit with what was set in php.ini file. Check Loaded Configuration File, did it say which php.ini file was loaded? This file can be placed in many places.
- In PHP, apply the memory_get_usage() to display memory in used.
- For database related calls, use the function mysql_free_result() to release memory used by variables.
- If the memory grows large, it may be possible to remove the object from the memory via the unset() function.
Troubleshooting (approach 3):
- Create a large database and execute various calls via the web browser. Sample large database can be found at Wikipedia.
Monday, April 9, 2012
Installing Java on Centos 6
[Updated for Centos 6.3 32bit]
Installation of Java for compilation and the Java Runtime Environment (JRE) for a Centos 6 server. Additional Java applications can be found from rpmforge.
Step 1: At the command line, login and install
# yum install java-1.7.0-openjdk-devel.i686 java-1.7.0-openjdk-javadoc.noarch
The above results in an installation of about 360MB.
Step 2: Verify installation
# java -version
# javac -version
Note Centos 6 environment:
# yum install redhat-lsb
# lsb_release -a
LSB Version: :core-4.0-ia32:core-4.0-noarch:graphics-4.0-ia32:graphics-4.0-noarch:printing-4.0-ia32:printing-4.0-noarch
Distributor ID: CentOS
Description: CentOS release 6.3 (Final)
Release: 6.3
Codename: Final
# lsb_release -a
LSB Version: :core-4.0-ia32:core-4.0-noarch:graphics-4.0-ia32:graphics-4.0-noarch:printing-4.0-ia32:printing-4.0-noarch
Distributor ID: CentOS
Description: CentOS release 6.3 (Final)
Release: 6.3
Codename: Final
LSB Version: :core-4.0-ia32:core-4.0-noarch:graphics-4.0-ia32:graphics-4.0-noarch:printing-4.0-ia32:printing-4.0-noarch
Distributor ID: CentOS
Description: CentOS release 6.2 (Final)
Release: 6.2
Codename: Final
Monday, October 17, 2011
Camera on SE X10i (Android 2.3)
This is a howto on a Sony Ericsson (SE) X10i with Android 2.3.3.

Photos can be captured with a 4 inch capacitive touch screen, and 8.1 megapixel camera. It also comes with digital zoom of up to 16x, image stabiliser (due to small hand shakiness) and a flash. The updated Android provide a default camera apps that meet most requirements.
Step 1. Starting the camera
Method 1
At the Home screen, tap the Application icon, then tap Camera icon.
Method 2
On the X10i, press the Camera quick button.
Step 2. Select Camera (optional if already selected)
Tap the Camera icon.
Step 3. Snap the photo
There are several methods to do this, but I will note down just the Touch and Normal.
Method Touch
- Select Camera mode icon, and tap Touch capture. (optional if already selected)
- Point the camera to the person or object, press on the screen where is the desired focus.
- Release finger, to take the photo.
Method Normal
- Point the camera to the person or object.
- Half press the Camera button, to focus.
- Press Camera button down fully to take the photo.
Step 4. Preview photo
Press on the last taken photo at bottom of the screen, or tap the Filmstrip icon
Other setting for the camera can be accessed by the on screen icons or by the Menu key.

Thursday, October 13, 2011
Call handling on SE X10i (Android 2.3)
This is a Howto on a Sony Ericsson (SE) X10i updated with the latest Android (in this case to version 2.3.3). So you've got the smart phone, many do not have the time to experiment, so here is the first share on some of the solutions to common things you might need.
After the update, Sony Ericcson did not provide an easy to find help document for the Help option in Android. It is a bit disappointing considering its SE, and the help is in the phones menu, but empty. At SE website, there is a download to “restore your user guide in your phone” (instructions are not good at this moment)
Make a call (yes, the phone can make calls)
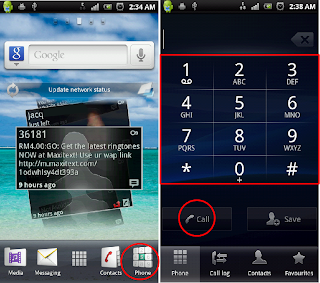
Step 1. You will need to start the dialer.
From the home screen, tap the Phone button.
Step 2. There 3 methods to dial a number;
Method 1:
Enter the number using the screen Keypad, and tap Call.

Method 2: Tap the Contacts button and choose the contact to call
Method 3: Tap the Favourites button and choose the contact to call
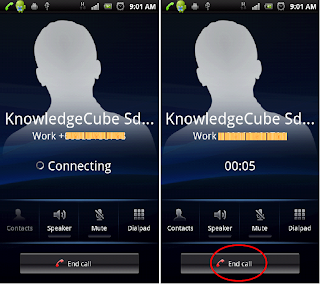
Step 3. During the call you have the options to
- Put call on loud speaker – tap the Speaker button
- Mute, so the other party cant hear you but you can listen – tap the Mute button
- Use the onscreen dialpad for automated transactions like Phone banking – tap the Dialpad
Step 4. When you want to end the call, tap End call button.

Decline a call (in a meeting and suddenly a call comes in, lets cancel that call)
Access to other applications during a call (Retrieve or to write a note. It is a smart phone)
You have 2 ways to do this;
1. Return to a previous running application (just before you were interrupted by the call)
Press the BACK key (left arrow sign)
2. Return to Home screen to select an application.
Press the HOME key (This is the key with a square sign) then tap on the application you wish to start
Monday, June 27, 2011
Clone a VirtualBox disk
Duplicating a disk for a new VirtualBox VM requires addressing the disk UUID conflict with same value. The following steps address this matter.
1. Start VirtualBox graphical interface (GUI), and edit settings for the VM using the disk we wish to clone. E.g VM name is centos and the virtual disk as centos_hdd.vdi
2. Remove (Do not delete) this disk from the VM.
3. At a command prompt
VBoxManage clonehd centos_hdd.vdi copy_centos_hdd.vdi
VBoxManage internalcommands setvdiuuid copy_centos_hdd.vdi
The first command duplicates the virtual disk. In the second command we assign a new UUID to the new disk (copy_centos_hdd.vdi)
4. Return to VirtualBox GUI and attach back the centos.vdi to the VM.
5. Create a new VM to attach the copy_centos_hdd.vdi
The new virtual machine is ready to use the cloned virtual disk. As a note, why not just make more copies of the disk with new UUIDs in case you need another image.
1. Start VirtualBox graphical interface (GUI), and edit settings for the VM using the disk we wish to clone. E.g VM name is centos and the virtual disk as centos_hdd.vdi
2. Remove (Do not delete) this disk from the VM.
3. At a command prompt
VBoxManage clonehd centos_hdd.vdi copy_centos_hdd.vdi
VBoxManage internalcommands setvdiuuid copy_centos_hdd.vdi
The first command duplicates the virtual disk. In the second command we assign a new UUID to the new disk (copy_centos_hdd.vdi)
4. Return to VirtualBox GUI and attach back the centos.vdi to the VM.
5. Create a new VM to attach the copy_centos_hdd.vdi
The new virtual machine is ready to use the cloned virtual disk. As a note, why not just make more copies of the disk with new UUIDs in case you need another image.
Thursday, June 23, 2011
An Open source software antivirus called ClamAV
The ClamAV is the only OSS implemented on a large scale with a consistenly updated virus database.
It can be used in 3 different ways:
I just ran an update, output as below:
daily.cvd updated (version: 13231, sigs: 130699, f-level: 60, builder: arnaud)
WARNING: Your ClamAV installation is OUTDATED!
WARNING: Current functionality level = 58, recommended = 60
DON'T PANIC! Read http://www.clamav.net/support/faq
bytecode.cvd is up to date (version: 143, sigs: 40, f-level: 60, builder: edwin)
Database updated (976953 signatures) from db.local.clamav.net (IP: 222.124.18.201)
Configuration of the ClamAV installed can be inspected with the command clamconf, and the virus scanner GUI is simple to use.

It can be used in 3 different ways:
- Installed on a PC. It can be scheduled to run at specific times or to scan all new storage medium and incoming files.
- Installed on a server. It is used in conjunction with server services such as email servers, backup and file servers.
- Application built with the ClamAV library. Customised applications can manage how and when the file scannings are done.
I just ran an update, output as below:
daily.cvd updated (version: 13231, sigs: 130699, f-level: 60, builder: arnaud)
WARNING: Your ClamAV installation is OUTDATED!
WARNING: Current functionality level = 58, recommended = 60
DON'T PANIC! Read http://www.clamav.net/support/faq
bytecode.cvd is up to date (version: 143, sigs: 40, f-level: 60, builder: edwin)
Database updated (976953 signatures) from db.local.clamav.net (IP: 222.124.18.201)
Configuration of the ClamAV installed can be inspected with the command clamconf, and the virus scanner GUI is simple to use.

Subscribe to:
Posts (Atom)