Wednesday, July 25, 2012

List of trainings - Linux

Linux for Web Developers - I

Objective: An intensive program to provide Web developers knowledge to manage basic development on a Linux platform.
Pre-req: Participants must already know PHP programming.
Duration: 1day
Outline:
1. Introduction to Linux operating system
- Benefits of Linux, various distros, and the Centos Linux
2. Gnome, the Linux desktop
- Navigate common features of the desktop. Includes the file browsers, windows system, Systems configuration and start menu.
3. Editing text
- Use of the Gedit tool, saving files
4. The Linux Command Line Interface (CLI)
- Accessing the CLI, using BASH basic commands and text file editing
5. Getting help and the man
- Help from the windows, application, internet and man pages
6. Linux file system
- Basics of the folder convention, HOME folder, editing folders and folder permissions.
7. Software management - I
- Basics on package managers, YUM and RPM. Identify software packages installed, add and remove.
8. Manage development services - I
- Monitor status, start and stop Apache, MySql. Identify configuration files for Apache, MySql and PHP (AMP)
9. Troubleshooting the AMP in LAMP.
- Determine disk space utilisation, access Linux and Apache log files. Writing a web page to show phpinfo.

Linux for Web Developers - II

Objective: Manage tools used for web application development on Linux platform.
Include graphic editors, manage installation of software, work with Eclipse editor. Writing php codes and installing additional php modules.
Connecting to a remote linux to access the shell commands and transfering files.

Saturday, July 21, 2012

Blogger app from Google Inc needs a lot more of work.

Just installed the app on ICS.

It doesn't provide numbering list and other basic formatting.

My previous postings all appear in html edit view. No options visible to switch editing modes.

Option for tagging as labels are not very intuitive.

Possibly the developer is a single person from Google payroll or was it out sourced to India? Hmm....

Develop Android Apps with Eclipse on Centos 6

This is an update to my previous post.
[Update for Centos 6.3]

Installing Eclipse Indigo for Android on Centos 6.


Pre-installation check list:

  1. Java JDK 1.6 or higher is installed
  2. PATH and CLASSPATH has been configured 
The Centos was installed as 64bits, but Android tools require 32bit libraries. Add them via following;
yum install glibc.i686 ncurses-libs.i686 libstdc libstdc++.i686 \
   libzip.i686 libX11 i686 libXrandr.i686 SDL.i686 gegl.i686

Steps 1. Eclipse Indigo

yum install eclipse-emf eclipse-jdt
Download and install the Indigo version of Eclipse.
Default yum install from Centos 6.3 provided only the older version of Eclipse (Helios) which have too many dependency problems after install.

2. Android SDK
a) download and run installer from http://developer.android.com/sdk/index.html
Current version is named android-sdk_r20.0.3-linux.tgz size of which is about 78Mb.

tar -xvzf android-sdk_r20.0.3-linux.tgz
mv android-sdk /opt/android-sdk
chmod -R a+w /opt/android-sdk

Open the user's $HOME/.bash_profile and add before the last l
PATH=$PATH:/opt/android-sdk/tools:/opt/android-sdk/platform-tools


Follow instructions from http://developer.android.com/sdk/installing/index.html

b) Run the Android SDK Manager
Currently target for API 10 (Android 2.3.3) and API 16 (Android 4.0.1).


3. Eclipse's ADT plugin
a) Start Eclipse and select Help-> Install New Software, click Add (top right)

b) At right of "Work with:", Click Add... and enter the ADT Plugin repository details
https://dl-ssl.google.com/android/eclipse/

c) In Available Software, check Developer Tools and install.
Accept all license agreement.

d) Restart Eclipse

e) Eclipse may assign the Android SDK directory
or
Choose preferences and point to the Android SDK folder (see Section 2). 
e.g. /opt/android-sdk

4. Create your first App, see http://developer.android.com/training/basics/firstapp/index.html

Installing msttcorefonts on Centos 6.3

Documents received may require MS Fonts to display format correctly, and these MS Ffonts are not available by default in Centos 6.2.

Install tools to create fonts and directories (fake ones for compatibility).
yum install ttmkfdir rpmdevtools

note: ensure all RPM building tools have been installed (see my previous post).

Install ATRPMS repository and MS Fonts.
wget  http://dl.atrpms.net/el6-x86_64/atrpms/stable/atrpms-repo-6-5.el6.x86_64.rpm
wget http://pkgs.org/centos-6-rhel-6/atrpms-x86_64/atrpms-repo-6-6.el6.x86_64.rpm/download/

(for i686 machines, replace x86_64 with i386 as in line below)
wget  http://dl.atrpms.net/el6.3-i386/atrpms/stable/atrpms-repo-6-5.el6.i686.rpm


(I am using, x86_64 for remainder of notes)
rpm -ivh atrpms-repo-6-5.el6.x86_64.rpm
yum install chkfontpath
wget http://corefonts.sourceforge.net/msttcorefonts-2.0-1.spec
rpmbuild -bb msttcorefonts-2.0-1.spec
(download MS Fonts and compile into packages)
rpm -ivh rpmbuild/RPMS/noarch/msttcorefonts-2.0-1.noarch.rpm
(open Libreoffice or Character Map, see if the Arial, Georgia and Times New Roman are available)

If fonts are not appearing, run following then relog-in (Do not run these if above steps work)
mkfontscale
mkfontdir

References: http://corefonts.sourceforge.net/

Installing Centos 6 on HP Probook 4420s

Finally found time to install Centos 6.2 on the HP Laptop.

Laptop specs:
RAM 4Gb
CPU: i3 ...

Installed (default)
Linux kernel 2.6.32-220.el6.x86_64

Gnome 2.28.2
Mozilla Firefox 10.0.5

Add RPMFORGE software repository (libary of software)
(download the rpm)
rpm --import http://apt.sw.be/RPM-GPG-KEY.dag.txt
rpm -ivh ~/rpmforge-release-0.5.2-2.el6.rf.x86_64.rpm
yum update
(Total 371 files, 385MB downloaded)

(reboot)

Post-Installation
Login as root at the terminal and first few software to be installed (type this out):

yum groupinstall "Desktop" "Desktop Platform" "X Window System" "Fonts"
yum install madwifi
(reboot)
yum install flash-plugin
yum install vlc
yum install libreoffice
(total 25 package, 103Mb download)
yum install libreoffice-ogltrans


Notes: wifi can only be configured easily when linux is in graphical screen/desktop.

Prepare to build from source

yum install cabextract rpm-build


Other observations
  1. The touchpad (black square at center of laptop that helps to move the mouse) is having a soft LEFT and RIGHT button (not working correctly)
    • To drag windows, press bottom half of the Touchpad until a click is felt. Then drag without leave finger from the Touchpad.
    • To RIGHT click in window, you need to press bottom half then do a second click without lifting the first finger.
    • Install from (HP) or better still to use a mouse pointer.
  2. Music
    • Default "Totem Music Player" doesn't support MP3. Need to install gstreamer-plugins-ugly
  3. Webcam
    • Runinng "Cheese" I can adjust to higher resolutions but its frames per seconds is very little. This causes the video to seem very poor quality. 
  4. Option to edit the menu bar (add new items manually) is missing. Installed alacarte package, logout then back in to enable editing of menu items.
  5. If boot was to only command line (a black screen), switch to graphical. Type init 5.

Thursday, July 5, 2012

Out of phone storage space on x10i

On the Sony Experia X10i, with Android 2.3.3 (Gingerbread) I am currently getting the message
"Phone storage space is getting low."

So, I did a backup (see HERE) then a factory reset to clear all data. Maybe some of the slowness issues on the X10i will be resolved. 
Note: Free apps may not be automatically reinstalled. I have not figured out why.

Here are steps for the factory reset.
Step 1: Start the reset
On the X10i, Left click, and in menu choose "settings".

Choose "Factory data reset"

Do not choose "Erase SD card", because all my photos and backup is there.

Click "Reset phone"
Click "Erase everything"

The phone will power off (shut down)

Step 2: Start the x10i
The phone will restart, press the middle button and unlock the phone.

Choose Language,
Choose step 2/6 and change the date and time.
Choose step 5/6, set up the google, email account. What about Sony Ericsson sync (not working)?


Sony Ericsson sync was asking to select your country, but listed only 8 names and didn't list mine. It then says service is discontinued


Click in step 6/6 click "Finish".

Backup X10i phone with Gingerbread

In cases where the X10i needs to be fully cleared, such as a fresh reinstall or upgrade, user data needs to be backup. If you are using contacts, calendar from google services, then it can be easily recovered anytime.

Several Android apps are available for backup of the Android 2.3.3 (Gingerbread) and this includes;

  1. Titanium Backup * root
  2. MyBackup pro (RERWARE, LLC), with free limited 30 trial
  3. SMS Backup & Restore (RITESH SAHU)
What to backup? Well there is the;
  1. Contact numbers,
  2. SMS,
  3. APN settings,
  4. SDCard data, 
1. Contact numbers
Step 1: Start the dialer
On the X10i launch the phone dialer. Click LEFT button, choose Backup contacts, then Memory card.

This will prompt the name and location of the back up file, choose OO. E.g.
/sdcard/System/PIM/PIM000001.vcf

Step 2: Verify
Once the progress bar has completed saving all the address book, browse to the SDCard and copy the vcf file to your PC or USB disk.

2. SMS
Step 1: Install from Android Play Store the app, "SMS Backup & Restore"
This saves SMS in XML format. 
Launch the app, click on the "Tools" icon at the top. Select the Backup folder which is by default
/mnt/sdcard/SMSBackupRestore/

For advanced users, explorer the other options. For basic needs, I find that there isn't any need to change the other configurations.

Step 2: Do the backup.
Read and accept the screen prompts.
Click "Backup" and enter the backup file name. 
Click OK.

My 5,230 SMS was backup and verified in 45 seconds.

Click "Close"

Step 3: Donate
Oh...its optional and I have no idea who developed this app, but it does a pretty good basic backup of SMS. As for the Adds, its not too big to obstruct the buttons.

3. APN Settings
Step 1: Install from Android Play Store the app, "APN Backup & Restore"
This saves SMS in XML format. 

^^^Launch the app, click on the "Tools" icon at the top. Select the Backup folder which is by default
/mnt/sdcard/SMSBackupRestore/

For advanced users, explorer the other options. For basic needs, I find that there isn't any need to change the other configurations.

Step 2: Do the backup.
Click "Backup APNs" and enter the backup file name. E.g. default filename is apns-.xml

Click "Close".
It doesn't say where its backup to, but search for it in /mnt/sdcard/ApnBackupRestore/

4. Backup SD Card
Firstly, if you already have a PC backup software, you can perform Step 1, then continue with that backup software.

Step 1: Plug the X10i USB cable.
The PC should be installed with the Sony PC Companion software. This will launch the windows explorer.

Step 2: Copy files to your PC
Using Windows Explorer, drag all files from the SD Card to your PC.


Installing PHPMYADMIN on Centos 6


PHPMyadmin is a web front end to manage MySQL databases. It can be installed on the same server as the database or on a separate server.


Step 1: Open a Linux command line terminal (CLI)
Login as root or administrator.


Step 2: Increase the software repository with rpmforge
Browse for the packages and download from http://packages.sw.be
or

wget http://packages.sw.be/rpmforge-release/rpmforge-release-0.5.2-2.el6.rf.i686.rpm


Select the 64bit version if your machine supports it.


Install the keys from DAG.
rpm --import http://apt.sw.be/RPM-GPG-KEY.dag.txt


Install the rpmforge files to access the repository.
rpm -i rpmforge-release-0.5.2-2.el6.rf.*.rpm


Refer to http://wiki.centos.org/AdditionalResources/Repositories/RPMForge/ for details


Step 3: Install phpmyadmin
yum --enablerepo=rpmforge install phpmyadmin


Step 4: Using a web browser point to the server installed with phpmyadmin.
E.g.
http://localhost/phpmyadmin

where is the server's IP address.

You should be able to see the main page of phpmyadmin.


Develop Android 4 Apps with Eclipse

Before starting this article, it must be mentioned that the eclipse is preferable be on a 64-bit machine that has relatively big RAM, L2 cache, fast hard disk. This is because of the slowness and constant errors that I am encountering in the past few months with an old pc. This is why I have not been doing any development on android and it will most probably this way until I can get my hands on a better PC.

So, you want to start on Android Programming? Read on...


Installing Eclipse Indigo for Android on MS Windows 7.


Pre-installation check list:

  1. Java JDK 1.6 or higher is installed
  2. PATH and CLASSPATH has been configured 

Steps
1. Eclipse Indigo
a) download and extract Eclipse
http://www.eclipse.org/downloads/download.php?

file=/eclipse/downloads/drops/R-3.7.2-201202080800/eclipse-SDK-

3.7.2-win32.zip

b) Move to the Program files folder
e.g. c:\Windows\Program Files\eclipse

2. Android SDK
a) download and run installer_r18-windows.exe
http://developer.android.com/sdk/index.html

Follow instructions from http://developer.android.com/sdk/installing/index.html

b) Run the Android SDK Manager
Currently target for API 10 (Android 2.3.3) and API 15 (Android 4.0.3).
Accepted all package to install but HTC OpenSense SDK.

3. Eclipse's ADT plugin
a) Start Eclipse and select Help-> Install New Software, click Add (top right)

b) At right of "Work with:", Click Add... and enter the ADT Plugin repository details
https://dl-ssl.google.com/android/eclipse/

c) In Available Software, check Developer Tools and install.
Accept all license agreement.

d) Restart Eclipse

e) Eclipse may have problem locating the Android SDK directory
Choose preferences and point to the Android SDK folder (see Section 2). 
e.g. c:\Windows\Program Files\Android\android-sdk

4. Create your first App, see http://developer.android.com/training/basics/firstapp/index.html

Saturday, April 28, 2012

Fatal error: Allowed memory size of 134217728 bytes exhausted (tried to allocate 65536 bytes) in ....

The error above was found on a LAMP (Centos 6, Apache, MySQL and PHP 5) environment.

Where is the problem?

Facts:
134,217,728 bytes is equivalent to 128MB. These numbers indicate that a limit of some memory has been reached.

2 power of 16 = 65536
2 power of 27 = 134217728


There some sites that suggest to increase the memory limit of PHP with memory_limit directive in php.ini file. But this will only prolong the problem to another day. How are you going to keep increasing the memory limit?

Possible approach:

  1. Some where along the setup, the application is eating up memory through an infinite loop. Review location of the application file (model) that is causing the error.
  2. It states "Fatal error" and not "Php Fatal error", indicating Apache web server is sending the error instead of PHP. Check if web server was restarted after the memory_limit was increased in the /etc/php.ini file.
  3. Database configuration needs to be edited for large selects or join processing. (High performance Innodb)


Troubleshooting (approach 1):
  1. Use phpinfo() to compare the memory_limit with what was set in php.ini file. Check Loaded Configuration File, did it say which php.ini file was loaded? This file can be placed in many places.
  2. In PHP, apply the memory_get_usage() to display memory in used.
  3. For database related calls, use the function mysql_free_result() to release memory used by variables.
  4. If the memory grows large, it may be possible to remove the object from the memory via the unset() function.
Troubleshooting (approach 3):
  1. Create a large database and execute various calls via the web browser. Sample large database can be found at Wikipedia.

Monday, April 9, 2012

Installing Java on Centos 6

[Updated for Centos 6.3 32bit]

Installation of Java for compilation and the Java Runtime Environment (JRE) for a Centos 6 server. Additional Java applications can be found from rpmforge.

Step 1: At the command line, login and install

yum install java-1.6.0-openjdk-javadoc java-1.6.0-openjdk-devel
# yum install java-1.7.0-openjdk-devel.i686 java-1.7.0-openjdk-javadoc.noarch

The above results in an installation of about 360MB.

Step 2: Verify installation

# java -version
# javac -version

Step 3: Install Java plugin for web browser

yum install icedtea-web

Note Centos 6 environment:

# yum install redhat-lsb
# lsb_release -a
LSB Version:    :core-4.0-ia32:core-4.0-noarch:graphics-4.0-ia32:graphics-4.0-noarch:printing-4.0-ia32:printing-4.0-noarch
Distributor ID:    CentOS
Description:    CentOS release 6.3 (Final)
Release:    6.3
Codename:    Final


LSB Version: :core-4.0-ia32:core-4.0-noarch:graphics-4.0-ia32:graphics-4.0-noarch:printing-4.0-ia32:printing-4.0-noarch
Distributor ID: CentOS
Description: CentOS release 6.2 (Final)
Release: 6.2
Codename: Final


Monday, October 17, 2011

Camera on SE X10i (Android 2.3)

This is a howto on a Sony Ericsson (SE) X10i with Android 2.3.3.

Photos can be captured with a 4 inch capacitive touch screen, and 8.1 megapixel camera. It also comes with digital zoom of up to 16x, image stabiliser (due to small hand shakiness) and a flash. The updated Android provide a default camera apps that meet most requirements.

Step 1. Starting the camera

Method 1
At the Home screen, tap the Application icon, then tap Camera icon.
Method 2
On the X10i, press the Camera quick button.

Step 2. Select Camera (optional if already selected)
Tap the Camera icon.
Step 3. Snap the photo
There are several methods to do this, but I will note down just the Touch and Normal.

Method Touch
  • Select Camera mode icon, and tap Touch capture. (optional if already selected)
  • Point the camera to the person or object, press on the screen where is the desired focus.
  • Release finger, to take the photo.
Method Normal
  • Point the camera to the person or object.
  • Half press the Camera button, to focus.
  • Press Camera button down fully to take the photo.

Step 4. Preview photo
Press on the last taken photo at bottom of the screen, or tap the Filmstrip icon


Other setting for the camera can be accessed by the on screen icons or by the Menu key.


Thursday, October 13, 2011

Call handling on SE X10i (Android 2.3)

This is a Howto on a Sony Ericsson (SE) X10i updated with the latest Android (in this case to version 2.3.3). So you've got the smart phone, many do not have the time to experiment, so here is the first share on some of the solutions to common things you might need.

After the update, Sony Ericcson did not provide an easy to find help document for the Help option in Android. It is a bit disappointing considering its SE, and the help is in the phones menu, but empty. At SE website, there is a download to “restore your user guide in your phone” (instructions are not good at this moment)


Make a call (yes, the phone can make calls)

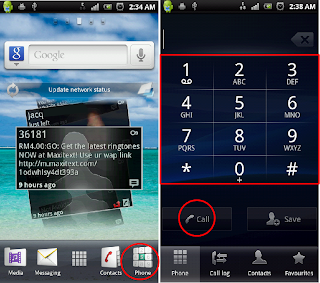
Step 1. You will need to start the dialer.
From the home screen, tap the Phone button.

Step 2. There 3 methods to dial a number;
Method 1:
Enter the number using the screen Keypad, and tap Call.

Method 2: Tap the Contacts button and choose the contact to call
Method 3: Tap the Favourites button and choose the contact to call


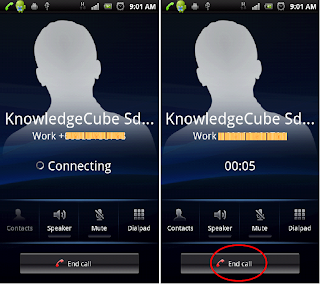
Step 3. During the call you have the options to
  • Put call on loud speaker – tap the Speaker button
  • Mute, so the other party cant hear you but you can listen – tap the Mute button
  • Use the onscreen dialpad for automated transactions like Phone banking – tap the Dialpad
Step 4. When you want to end the call, tap End call button.


Decline a call (in a meeting and suddenly a call comes in, lets cancel that call)
Step 1. Drag the Decline button to the left.

Access to other applications during a call (Retrieve or to write a note. It is a smart phone)
You have 2 ways to do this;
1. Return to a previous running application (just before you were interrupted by the call)
Press the BACK key (left arrow sign)
2. Return to Home screen to select an application.
Press the HOME key (This is the key with a square sign) then tap on the application you wish to start

Monday, June 27, 2011

Clone a VirtualBox disk

Duplicating a disk for a new VirtualBox VM requires addressing the disk UUID conflict with same value. The following steps address this matter.

1. Start VirtualBox graphical interface (GUI), and edit settings for the VM using the disk we wish to clone. E.g VM name is centos and the virtual disk as centos_hdd.vdi

2. Remove (Do not delete) this disk from the VM.

3. At a command prompt
VBoxManage clonehd centos_hdd.vdi copy_centos_hdd.vdi
VBoxManage internalcommands setvdiuuid copy_centos_hdd.vdi

The first command duplicates the virtual disk. In the second command we assign a new UUID to the new disk (copy_centos_hdd.vdi)

4. Return to VirtualBox GUI and attach back the centos.vdi to the VM.

5. Create a new VM to attach the copy_centos_hdd.vdi

The new virtual machine is ready to use the cloned virtual disk. As a note, why not just make more copies of the disk with new UUIDs in case you need another image.

Thursday, June 23, 2011

An Open source software antivirus called ClamAV

The ClamAV is the only OSS implemented on a large scale with a consistenly updated virus database.

It can be used in 3 different ways:
  1. Installed on a PC. It can be scheduled to run at specific times or to scan all new storage medium and incoming files.
  2. Installed on a server. It is used in conjunction with server services such as email servers, backup and file servers.
  3. Application built with the ClamAV library. Customised applications can manage how and when the file scannings are done.
There are lots of cool features that is comparative to proprietary antivirus. As of June, it is rank as the top 10 antivirus in terms of virus detection.

I just ran an update, output as below:

daily.cvd updated (version: 13231, sigs: 130699, f-level: 60, builder: arnaud)
WARNING: Your ClamAV installation is OUTDATED!
WARNING: Current functionality level = 58, recommended = 60
DON'T PANIC! Read http://www.clamav.net/support/faq
bytecode.cvd is up to date (version: 143, sigs: 40, f-level: 60, builder: edwin)
Database updated (976953 signatures) from db.local.clamav.net (IP: 222.124.18.201)

Configuration of the ClamAV installed can be inspected with the command clamconf, and the virus scanner GUI is simple to use.


Tuesday, June 14, 2011

Linux security checklist

The Anonymous is announcing an attack on www.malaysia.gov.my, which is a central portal to reach all other Malaysian Government portals. This is reported by F-Secure Corporation and theStar, 14 Jun 2011. Makes you wonder why Anonymous would want to do that.

Follow up from my previous post, I realise that many Linux Admins out there do not have a Security Checklist for their web application. I am sharing the following checklist here as it provides a standard security consideration for almost all web application on Linux or LAMP stack. It is by no means the only security guide, please apply all other security concerns specific to your needs and you can then sleep better at night.

Check List for Web Application (deployment)

Category

Item

Notes

Logins

A.1

Operating system

-Administrator password is secured and recorded as only accessible by ONE administrator

-All login's are done as normal user

-Normal users with access to Administrator priviledges are recorded. Access should be via SUDO.

-All logins are recorded


A.2

Application

-All users to have secured logins

-Administrator logins are assigned to specific individuals and listed

-Web based self registered user must have email and spam prevention facilities

-Lock down on Web server's user/application access

-Default access and password for all administrator applications must be secured. This includes the main application, phpmyadmin, firewall.


A.3

Database

-Each application to have a specific user and password access. This user cannot access other databases.

-Administrator access is with secured password. Assignment to specific individuals must be recorded.


Services

B.1

Disable unnecassary services

-Firewalls must be enabled to restrict external access to only the approved application (via port numbers).

-Identify every services running. Disable those not in use.

-Remote access must be via encrypted protocols

-Disable local email server (e.g. sendmail) from runnin/listening continuously. Or use external email server.

-Email servers controlled to allow access to specific application and directories.

-Anti-virus if implemented, must have patches and pattern updates kept to the most recent.


B.2

Create a base point of security

-A penetration test must be carried out. The type and complexity is based on the specific application.

-Establish an integrity check point


B.3

Tell them you do not allow access

-Place warning messages to all points of access. E.g. motd and issue.net


B.4

Logging

-Log activities to separate files for operating system and application.

-Make logs available to a centralised log server.


B.5

Backup

-Establish a backup plan.

-Implement a backup process


B.6

Create a boot disk and rescue of the Linux


B.7

System updates

-Disable the automatic system updates. Updates should be installed only after it is verfied working with the application.

-Periodically check with security issues, respective application security notices and update as needed.


Physical

C.1

Physical Access

-Ensure only authorised personel can access to the server.

-A record of physical access is maintained.


C.2

Storage Media

-All storage media is tagged.

-Storage location and transportation is secure and recorded.


C.3

Security Policy

-Ensure the document is readily available to authorised users.


Creative Commons License

Checklist for Web Application (Deployment) by Nicholas A. Suppiah is licensed under a Creative Commons Attribution-ShareAlike 3.0 Unported License.
Permissions beyond the scope of this license may be available at http://www.blogger.com/profile/06749525177696246387.

Monday, June 13, 2011

Linux security for organisations

Linux provides a great solution for small and large organisations. Its scalability and reliability have been continuously promoted over the years as reputable organisations keep adopting them.

The recent spate of security breaches at Citibank, USA and Sony Online Entertainment (SOE), Sony Playstation tells us a lot about the amount of importance organisations put on security. In 2009, There were words that Citibank was robbed and in 2011, there was a breach to over 200,000 USA Citibank card holders in the Citigroup. ZDNet in 2011, "Sony security hole exposes another 24.6 million accounts" tells about how over 100 million users can be affected by failures on security. Maybe Sony Certified Security Professional needs to consider a systems security program for Sony (I am joking).

Other security compromised news (hacked) in 2011
  • Vendor-sec email list was compromised and this was a discussion on linux vulnerabilities at openwall.com
  • Wordpress.com root access was gained to their servers. Nothing else much on extend of damage to users or blogs at wordpress.com
  • Mobile devices like Android could potentially have user data compromised when using public wifi, says University of Ulm, Germany
  • International Monetary Fund (IMF), network break-in sounded like it was blamed to the staff use of internet and emails when read in ZDNET.
  • Lockheed Martin, provider of defence technology breach in their remote access via use of tokens affected Pentagon.
  • GMail major phishing was traced back to China and Google looks geared up for more changes as spear-phishing becomes a term many would see more often.
  • In Malaysia, the newly launched 1Malaysia Pengguna Bijak's portal costing RM1.4 million wasn't built with safe guarding the users information at all. Here the only explaination (NO apology to the rakyat) was that the system was not built to cope with the 3 million hits it received within 2 days of its launching. Over 2,000 1Pengguna user account details were confirmed compromised. I took it as a government initiative but the name www.1pengguna.com made me wonder if its a Malaysian government effort or a private business.

Over the years of implementing Linux based solution, there are a few basic things I can share when deploying web applications and other similar systems.

  1. Put a security policy in place. This includes security administrators reading emails from public who voluntarily lodge about security flaws.
  2. Budget to implement these policies
  3. Have security checklists (use it, audit with it)

If disaster happens, you just need to fix it. There are people's "life" at stake. At the same time get those culprits, if you can.

Wednesday, May 4, 2011

What are Perlis students going to do with Netbooks?

Its in NST that 700 students will receive netbooks.

Not reported how it will be usable to the students. Or if they have internet access.

Schools should prepare wifi so that these students can access education freely in school.

Sunday, March 27, 2011

New Android App on Market

Just post my Application to Android Market. It is for those who are learning to use Gnome as a Linux Desktop.

Its called Learn Linux - Gnome and developed entirely on Ubuntu. If I managed to get Gnome 3, will work to get some of its updates into the application.


:)

Wednesday, March 23, 2011

Blog Archive