I am running a Joomla training this week. One of the main items is getting the password assignment for root and database user. As a reference here is to resetting root password and assigning user to have full access to a database.
Reset root password
Step 1: Restart the MySQL server without using the user restrictions and access to the network.
#/etc/init.d/mysql stop
#mysqld --skip-grant-tables --skip-networking&
Step 2: Open another terminal and reset your password
# mysql mysql -u root
mysql> UPDATE user SET password=PASSWORD('NewPassword') WHERE user="root";
mysql> FLUSH PRIVILEGES;
# /etc/init.d/mysql restart
Assigning user access to database
Step 1: Login a root to mysql
Step 2: Assign the user joe to use from localhost the database somedatabase.
mysql> GRANT ALL privileges ON somedatabse.* TO joe@localhost IDENTIFIED BY 'SomePassword';
mysql> FLUSH PRIVILEGES;
Monday, May 25, 2009


Friday, May 22, 2009
Backup Thunderbird2
Just after installing the Kubuntu Jaunty 9.04 Linux, its time to restore some of my stuff. Firstly, I need communications and this is via my Thunderbird.
Backup:
I found it necessary to disable some of the extensions to allow the new Thunderbird to run properly.
Copy the Thunderbird directory profile (usually it goes with some crazy name followed by your profile name to the backup device. Example
cp ~/.mozilla-thunderbird/izwvasdx.default /media/backupdisk
Restore:
Step 1:
Copy the directory profile back to the new system
Step 2:
In the terminal create an email profile that uses the old directory, type
thunderbird -profilemanager
Ref: Mozilla
Backup:
I found it necessary to disable some of the extensions to allow the new Thunderbird to run properly.
Copy the Thunderbird directory profile (usually it goes with some crazy name followed by your profile name to the backup device. Example
cp ~/.mozilla-thunderbird/izwvasdx.default /media/backupdisk
Restore:
Step 1:
Copy the directory profile back to the new system
Step 2:
In the terminal create an email profile that uses the old directory, type
thunderbird -profilemanager
Ref: Mozilla
Wednesday, May 20, 2009
Install Moodle on CentOS 5
Following are steps to install Moodle 1.9 on CentOS 5.
Step 1
Install mysql-server-5.0.45, mysql-5.0.45 and php-5.1.6
Install other PHP library php-mbstring-5.1.6, php-xmlrpc-5.1.6
Step 2
Add the user name "user1" and database "mymoodle" to MySQL with the correct privilege.
Step 3
Download the moodle and extract to /var/www/html/moodle
Create and assign the permission of the webserver to the data directory at /var/www/moodledata
Step 4
In a start the moodle installation via web browser, use the location
http://localhost/moodle
Copy the script into a file named config.php within the root directory of Moodle.
Follow the rest of the instruction to complete.
Step 5
Install lynx to activate the cron. Edit the crontab to run every 30 minutes.
$ crontab -e
*/30 * * * * wget -q -O /dev/null http://localhost/moodle/admin/cron.php
See http://docs.moodle.org/en/Installing_Moodle
http://docs.moodle.org/en/Administration_FAQ
Step 1
Install mysql-server-5.0.45, mysql-5.0.45 and php-5.1.6
Install other PHP library php-mbstring-5.1.6, php-xmlrpc-5.1.6
Step 2
Add the user name "user1" and database "mymoodle" to MySQL with the correct privilege.
Step 3
Download the moodle and extract to /var/www/html/moodle
Create and assign the permission of the webserver to the data directory at /var/www/moodledata
Step 4
In a start the moodle installation via web browser, use the location
http://localhost/moodle
Copy the script into a file named config.php within the root directory of Moodle.
Follow the rest of the instruction to complete.
Step 5
Install lynx to activate the cron. Edit the crontab to run every 30 minutes.
$ crontab -e
*/30 * * * * wget -q -O /dev/null http://localhost/moodle/admin/cron.php
See http://docs.moodle.org/en/Installing_Moodle
http://docs.moodle.org/en/Administration_FAQ
Tuesday, May 19, 2009

Friday, May 8, 2009
[Jaunty] Adding mp3 into OpenOffice.org Impress presentations
One of the popular format for music is the MP3 where a form of lossy compression algorithm is used. A typical music CDROM would hold only a few songs but when saved as MP3, almost a hundred music and song can be saved on a single CDROM. MP3 allows a smaller sized file that still provided an acceptable quality in audio.
On Kubuntu 9.04 with OpenOffice.org (OOo) 3.0.1, adding of the MP3 to play audio during a presentation is simple. Default audio support is on MIDI, AIF, AU and WAV format. The Linux system needs to have gstreamer from fluendo installed for OOo to play MP3s. So this is to all my friends who is trying to get their presentation done with audio and still hanging on to OOo, here are the steps.
Step 1: This is a one time step.
Open a terminal and with an internet connection, type
$ sudo apt-get install gstreamer0.10-fluendo-mp3
Step 2:
Open the Impress presentation and choose the slide where you want to start the audio. Select the "Slide transition" tab.
Step 3:
In the Modify transition section, choose Sound and select "Other Sound..." then choose the file containing the desired music. In this case, it should be a working MP3. And check the option for "Loop until next sound".
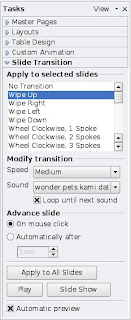
Warning: Do not click the button "Apply to All Slides", as this will force the MP3 to restart after each slide. Volume is controlled by the PC speakers or you could remake the audio.
On Kubuntu 9.04 with OpenOffice.org (OOo) 3.0.1, adding of the MP3 to play audio during a presentation is simple. Default audio support is on MIDI, AIF, AU and WAV format. The Linux system needs to have gstreamer from fluendo installed for OOo to play MP3s. So this is to all my friends who is trying to get their presentation done with audio and still hanging on to OOo, here are the steps.
Step 1: This is a one time step.
Open a terminal and with an internet connection, type
$ sudo apt-get install gstreamer0.10-fluendo-mp3
Step 2:
Open the Impress presentation and choose the slide where you want to start the audio. Select the "Slide transition" tab.
Step 3:
In the Modify transition section, choose Sound and select "Other Sound..." then choose the file containing the desired music. In this case, it should be a working MP3. And check the option for "Loop until next sound".

Warning: Do not click the button "Apply to All Slides", as this will force the MP3 to restart after each slide. Volume is controlled by the PC speakers or you could remake the audio.
Sunday, May 3, 2009
[Jaunty]Installing scanning and photo editing tools on Kubuntu 9.04
In a fresh install of Kubuntu Jaunty 9.04, the next best thing to do is try out its scanning and photo editing capabilities.
$ sudo apt-get install gimp gimp2.0-quiteinsane gimp-gutenprint gimp-data-extras
This install GIMP the popular photo editor and the SANE tools for scanning.
$ sudo apt-get install gimp gimp2.0-quiteinsane gimp-gutenprint gimp-data-extras
This install GIMP the popular photo editor and the SANE tools for scanning.
[Jaunty]Adding the VLC video player
Kubuntu Linux 9.04 supports the VLC video player very well. In a fresh install, open the terminal and type
$ sudo apt-get install vlc videolan-doc mozilla-plugin-vlc vlc-plugin-sdl libvcdinfo0
$ sudo apt-get install vlc videolan-doc mozilla-plugin-vlc vlc-plugin-sdl libvcdinfo0
[Jaunty]Installing Thunderbird 2 on Kubuntu Linux 9.04
Just after installing Kubuntu Linux 9.04 and all seems well, the email client is the next stop.
Install Thunderbird 2.0 from a terminal
$ sudo apt-get install thunderbird thunderbird-dispmua mozilla-thunderbird-bidiui lightning-extension enigmail
The installation included the following packages:
calendar-google-provider calendar-timezones
Install Thunderbird 2.0 from a terminal
$ sudo apt-get install thunderbird thunderbird-dispmua mozilla-thunderbird-bidiui lightning-extension enigmail
The installation included the following packages:
calendar-google-provider calendar-timezones
Saturday, May 2, 2009
First look at Kubuntu 9.04 Jaunty
I have just completed a number of fresh install of Kubuntu Jaunty 9.04 Linux on a
Lenovo R60 (9459BF8) 32 bits
CPU T5600 @ 1.83GHz
L1 64KiB
L2 Cache 1984KiB
RAM 1Gb
Here are some quick comments:
The KMenu
This is the KDE Start Menu. One of its main menu options is the Favourites. This contain the Konqueror, Kontact, System Settings, Dolphin, Kopete and Amarok menu. Users should add frequently used programs here.
Desktop
There is a desktop that takes only a small place on dashboard. There are Plasmoid widgets that can be added to the dashboard to increase user experience. to view only the Dashboard, press Ctrl+F12 (or press the Show Dashboard Applet in thebottom panel) to dim all applications and view only the widgets and Desktop.
Workspace
Default Kubuntu had only 2 workspace and no keyboard shortcut to switch betweenmany workspaces. I can only return to 1st workspace with Ctrl+F1.
1. Right click Pager applet (in the bottom panel) and choose "Configure Desktop", increase to 4 workspace.
Screen
The screen is sharp and nice, which is why I have always choosen KDE when Looks matter.
Quick look at accessing applications
Web browser: Konqueror 4.2.2
Office: OpenOffice.org 3.0.1
Print screen: Ksnapshot 0.8.1 (The PrtSc button problem have been fixed)
Terminal: Konsole 2.2.2
System process: (Ctrl + Esc)
Software installer: KPackageKit
Desktop: KDE 4.2.2 (Ctrl + F12) One cool and futuristic desktop for all.
Compression tool: Ark 2.12 (Integrated well with Dolphin)
Others:
Post installation recommendations
At the terminal run
$ sudo apt-get install flashplugin-installer msttcorefonts
Open Konqueror, when it ask to install the Flash plugin this will now be successful.
$ sudo apt-get install kubuntu-restricted-extras
This will add JRE, mp3, mpeg, odbc, unrar and other useful support.
$ sudo apt-get install tpb
This will allow the Thinkpad special keys to be available. To install this package, the following package is removed:
hotkey-setup
$ sudo apt-get install gdecrypt password-gorilla
This allows the disk to be encrypted and manage passwords.
$ sudo apt-get install wine wine-gecko
This will allow installation of standard MS Windows based applications.
$ sudo apt-get install ssh sshfs ksshaskpass kdessh
Allow secure SSH connection to and from SSH servers.
Conclusion
Jaunty is a great Linux distro, but those who cannot accept the KDE4 changes should continue with Gnome on Ubuntu Linux.
Lenovo R60 (9459BF8) 32 bits
CPU T5600 @ 1.83GHz
L1 64KiB
L2 Cache 1984KiB
RAM 1Gb
Here are some quick comments:
The KMenu
This is the KDE Start Menu. One of its main menu options is the Favourites. This contain the Konqueror, Kontact, System Settings, Dolphin, Kopete and Amarok menu. Users should add frequently used programs here.
Desktop
There is a desktop that takes only a small place on dashboard. There are Plasmoid widgets that can be added to the dashboard to increase user experience. to view only the Dashboard, press Ctrl+F12 (or press the Show Dashboard Applet in thebottom panel) to dim all applications and view only the widgets and Desktop.
Workspace
Default Kubuntu had only 2 workspace and no keyboard shortcut to switch betweenmany workspaces. I can only return to 1st workspace with Ctrl+F1.
1. Right click Pager applet (in the bottom panel) and choose "Configure Desktop", increase to 4 workspace.
Screen
The screen is sharp and nice, which is why I have always choosen KDE when Looks matter.
Quick look at accessing applications
Web browser: Konqueror 4.2.2
Office: OpenOffice.org 3.0.1
Print screen: Ksnapshot 0.8.1 (The PrtSc button problem have been fixed)
Terminal: Konsole 2.2.2
System process: (Ctrl + Esc)
Software installer: KPackageKit
Desktop: KDE 4.2.2 (Ctrl + F12) One cool and futuristic desktop for all.
Compression tool: Ark 2.12 (Integrated well with Dolphin)
Others:
- Initially I could not login to my home wireless network. Had to manually use the iwconfig, it could load automatically there onwards. So, if you have the same problem, open a terminal and type the following to detect your wireless network (e.g. mywireless)
$ sudo iwlist wlan0 scanning essid looney - I could resize the KPanel to a smaller size easily.
- First site I went with Konqueror was the blogspot.com and all looks good. Only problem is that the default menus during editing of post did not allow me to change the fonts. Only option allowed was spelling, Add image and Preview. A pop-up appeared with the need to install Shockwave Flash plugin but it keeps failing to install. See below for the resolution.
- Konqueror did not refresh properly when used as a web browser.
- The Amarok did not have any sound when playing an mp3. The midi file was not supported at all.
- The add/remove software manager did not seem to function. I cant get a list of software and it kept crashing. I needed to choose "Software Updates" ->Refresh. First thing I did is to install Kubuntu-restricted-extras package.
Post installation recommendations
At the terminal run
$ sudo apt-get install flashplugin-installer msttcorefonts
Open Konqueror, when it ask to install the Flash plugin this will now be successful.
$ sudo apt-get install kubuntu-restricted-extras
This will add JRE, mp3, mpeg, odbc, unrar and other useful support.
$ sudo apt-get install tpb
This will allow the Thinkpad special keys to be available. To install this package, the following package is removed:
hotkey-setup
$ sudo apt-get install gdecrypt password-gorilla
This allows the disk to be encrypted and manage passwords.
$ sudo apt-get install wine wine-gecko
This will allow installation of standard MS Windows based applications.
$ sudo apt-get install ssh sshfs ksshaskpass kdessh
Allow secure SSH connection to and from SSH servers.
Conclusion
Jaunty is a great Linux distro, but those who cannot accept the KDE4 changes should continue with Gnome on Ubuntu Linux.
Tuesday, April 28, 2009
Laptop connecting to Internet via K810i phone
Almost all mobile phones have internet connection today. In cases where the laptop need to access the internet and the only network device available is the mobile phone, I can run a script and have the mobile service provider charge me pay as you use style.
Here I describe how Kubuntu Intrepid with Kde 4.3 is used to access a Sony Ericsson K810i mobile phone via USB cable. The service provider is DIGI and I have verified that the phone can be used to access the internet.
Step 1:
Ensure that the USB cable connects the K810i to the laptop. On the phone choose "Use mobile phone"
Step 2:
Install wvdial package then use wvdial to setup the basic connection file and detect the mobile phone.
$ sudo apt-get install wvdial
$ wvdialconf
Found an USB modem on /dev/ttyACM0.
Modem configuration written to /etc/wvdial.conf.
ttyACM0: Speed 460800; init "ATQ0 V1 E1 S0=0 &C1 &D2 +FCLASS=0"
Step 3:
Try to dial using the default script. This verifies that the call can be made but setting to the service provider is not working.
$ sudo wvdial
Step 4: Set the K810i to allow usage of the internet.
In K810i choose the menu ->Settings ->Connectivity ->USB ->USB Internet ->Turn on
Step 5:
Edit the script found in /etc/wvdial.conf
[Dialer Defaults]
Init1 = ATZ
Init2 = ATQ0 V1 E1 S0=0 &C1 &D2 +FCLASS=0
Modem Type = USB Modem
ISDN = 0
Phone = /dev/ttyACM0
Username = digi
New PPPD = yes
Password = digi
Modem = /dev/ttyACM0
Baud = 460800
OR configure the script to be able to access bluetooth and USB with different settings
[Dialer Defaults]
Phone =
Username =
Password =
New PPPD = yes
[Dialer Digiusb]
Modem = /dev/ttyACM0
Baud = 460800
Init = ATZ
Init2 = ATQ0 V1 E1 S0=0 &C1 &D2 +FCLASS=0
Init3 = AT+CGDCONT=1,"IP","diginet"
Phone = *99#
Dial Command = ATDT
Username = digi
Password = digi
Ask Password = off
Auto DNS = on
Check Def Route = off
Carrier Check = off
Stupid Mode = on
Auto Reconnect = off
Idle Seconds = 0
Abort on Busy = off
Abort on No Dialtone = off
Dial Attempts = 1
[Dialer DigiBluetooth]
Modem = /dev/rfcomm0
Baud = 460800
Init = ATZ
Init2 = ATQ0 V1 E1 S0=0 &C1 &D2 +FCLASS=0
Init3 = AT+CGDCONT=1,"IP","diginet"
Phone = *99#
Dial Command = ATDT
Username = digi
Password = digi
Ask Password = off
Auto DNS = on
Check Def Route = off
Carrier Check = off
Stupid Mode = on
Auto Reconnect = off
Idle Seconds = 0
Abort on Busy = off
Abort on No Dialtone = off
Dial Attempts = 1
Final step:
Log off then log back in (optional). At the prompt, start the Digiusb configuration
$ sudo wvdial Digiusb
Here I describe how Kubuntu Intrepid with Kde 4.3 is used to access a Sony Ericsson K810i mobile phone via USB cable. The service provider is DIGI and I have verified that the phone can be used to access the internet.
Step 1:
Ensure that the USB cable connects the K810i to the laptop. On the phone choose "Use mobile phone"
Step 2:
Install wvdial package then use wvdial to setup the basic connection file and detect the mobile phone.
$ sudo apt-get install wvdial
$ wvdialconf
Found an USB modem on /dev/ttyACM0.
Modem configuration written to /etc/wvdial.conf.
ttyACM0
Step 3:
Try to dial using the default script. This verifies that the call can be made but setting to the service provider is not working.
$ sudo wvdial
Step 4: Set the K810i to allow usage of the internet.
In K810i choose the menu ->Settings ->Connectivity ->USB ->USB Internet ->Turn on
Step 5:
Edit the script found in /etc/wvdial.conf
[Dialer Defaults]
Init1 = ATZ
Init2 = ATQ0 V1 E1 S0=0 &C1 &D2 +FCLASS=0
Modem Type = USB Modem
ISDN = 0
Phone = /dev/ttyACM0
Username = digi
New PPPD = yes
Password = digi
Modem = /dev/ttyACM0
Baud = 460800
OR configure the script to be able to access bluetooth and USB with different settings
[Dialer Defaults]
Phone =
Username =
Password =
New PPPD = yes
[Dialer Digiusb]
Modem = /dev/ttyACM0
Baud = 460800
Init = ATZ
Init2 = ATQ0 V1 E1 S0=0 &C1 &D2 +FCLASS=0
Init3 = AT+CGDCONT=1,"IP","diginet"
Phone = *99#
Dial Command = ATDT
Username = digi
Password = digi
Ask Password = off
Auto DNS = on
Check Def Route = off
Carrier Check = off
Stupid Mode = on
Auto Reconnect = off
Idle Seconds = 0
Abort on Busy = off
Abort on No Dialtone = off
Dial Attempts = 1
[Dialer DigiBluetooth]
Modem = /dev/rfcomm0
Baud = 460800
Init = ATZ
Init2 = ATQ0 V1 E1 S0=0 &C1 &D2 +FCLASS=0
Init3 = AT+CGDCONT=1,"IP","diginet"
Phone = *99#
Dial Command = ATDT
Username = digi
Password = digi
Ask Password = off
Auto DNS = on
Check Def Route = off
Carrier Check = off
Stupid Mode = on
Auto Reconnect = off
Idle Seconds = 0
Abort on Busy = off
Abort on No Dialtone = off
Dial Attempts = 1
Final step:
Log off then log back in (optional). At the prompt, start the Digiusb configuration
$ sudo wvdial Digiusb
Friday, April 17, 2009
Encrypting passwords for web applications
Just heard about security concerns and username/passwords being scanned over the network. This is the weakness of the HTTP protocol. One solution is to use the HTTPS with OpenSSL.
With reference to http://www.centos.org/docs/5/html
Step 1: Install the SSL components
yum install mod_ssl openssl
Step 2: Create the certificates
openssl req -new -key ca.key -out ca.csr
openssl x509 -req -days 365 -in ca.csr -signkey ca.key -out ca.crt
mv ca.crt /etc/pki/tls/certs
mv ca.key /etc/pki/tls/private/ca.key
mv ca.csr /etc/pki/tls/private/ca.csr
Step 3: Configure Apache to use the certificates
vi /etc/httpd/conf.d/ssl.conf
Search for the SSLCertificateFile and SSLCertificateKeyFile lines and point it to the correct TLS directory.
# Server Certificate:
# Point SSLCertificateFile at a PEM encoded certificate. If
# the certificate is encrypted, then you will be prompted for a
# pass phrase. Note that a kill -HUP will prompt again. A new
# certificate can be generated using the genkey(1) command.
SSLCertificateFile /etc/pki/tls/certs/ca.crt
# nicholas
# Server Private Key:
# If the key is not combined with the certificate, use this
# directive to point at the key file. Keep in mind that if
# you've both a RSA and a DSA private key you can configure
# both in parallel (to also allow the use of DSA ciphers, etc.)
SSLCertificateKeyFile /etc/pki/tls/private/ca.key
Restart apache server
service httpd restart
Step 4: Assign Apache to use a secure folder for the HTTPS while redirecting the port 80 of the HTTP to another folder.
vi /etc/httpd/conf/httpd.conf
NameVirtualHost *:80
</virtualhost *:80>
<directory>
AllowOverride All
</directory>
DocumentRoot /var/www/html
ServerName servername.com
</virtualhost>
NameVirtualHost *:443
<virtualhost *:443>
SSLEngine on
SSLCertificateFile /etc/pki/tls/certs/ca.crt
SSLCertificateKeyFile /etc/pki/tls/private/ca.key
<directory>
AllowOverride All
</directory>
DocumentRoot /var/www/vhosts/servername/httdocs
ServerName tservername.com
</virtualhost>
Restart Apache server. The virtual host can be verified with the command
httpd -S
Step 5: Test the HTTPS and HTTP
Use a web browser to access with HTTP and HTTPS, both should point to different directory.
Certain web browsers do not know about cacert as a validation server. This can be done easily with following steps.
Step 1. Download from www.cacert.org the Root Certificates for class 1 and 3 PKI keys.
Step 2. Use firefox to add these root keys.
Choose edit ->Preferences ->Advanced ->Encryptions ->View Certificates
Choose Authorities ->Import
Choose both of the root keys that was downloaded
Step 3. Restart the web browser.
With reference to http://www.centos.org/docs/5/html
Step 1: Install the SSL components
yum install mod_ssl openssl
Step 2: Create the certificates
openssl req -new -key ca.key -out ca.csr
openssl x509 -req -days 365 -in ca.csr -signkey ca.key -out ca.crt
mv ca.crt /etc/pki/tls/certs
mv ca.key /etc/pki/tls/private/ca.key
mv ca.csr /etc/pki/tls/private/ca.csr
Step 3: Configure Apache to use the certificates
vi /etc/httpd/conf.d/ssl.conf
Search for the SSLCertificateFile and SSLCertificateKeyFile lines and point it to the correct TLS directory.
# Server Certificate:
# Point SSLCertificateFile at a PEM encoded certificate. If
# the certificate is encrypted, then you will be prompted for a
# pass phrase. Note that a kill -HUP will prompt again. A new
# certificate can be generated using the genkey(1) command.
SSLCertificateFile /etc/pki/tls/certs/ca.crt
# nicholas
# Server Private Key:
# If the key is not combined with the certificate, use this
# directive to point at the key file. Keep in mind that if
# you've both a RSA and a DSA private key you can configure
# both in parallel (to also allow the use of DSA ciphers, etc.)
SSLCertificateKeyFile /etc/pki/tls/private/ca.key
Restart apache server
service httpd restart
Step 4: Assign Apache to use a secure folder for the HTTPS while redirecting the port 80 of the HTTP to another folder.
vi /etc/httpd/conf/httpd.conf
NameVirtualHost *:80
</virtualhost *:80>
<directory>
AllowOverride All
</directory>
DocumentRoot /var/www/html
ServerName servername.com
</virtualhost>
NameVirtualHost *:443
<virtualhost *:443>
SSLEngine on
SSLCertificateFile /etc/pki/tls/certs/ca.crt
SSLCertificateKeyFile /etc/pki/tls/private/ca.key
<directory>
AllowOverride All
</directory>
DocumentRoot /var/www/vhosts/servername/httdocs
ServerName tservername.com
</virtualhost>
Restart Apache server. The virtual host can be verified with the command
httpd -S
Step 5: Test the HTTPS and HTTP
Use a web browser to access with HTTP and HTTPS, both should point to different directory.
Certain web browsers do not know about cacert as a validation server. This can be done easily with following steps.
Step 1. Download from www.cacert.org the Root Certificates for class 1 and 3 PKI keys.
Step 2. Use firefox to add these root keys.
Choose edit ->Preferences ->Advanced ->Encryptions ->View Certificates
Choose Authorities ->Import
Choose both of the root keys that was downloaded
Step 3. Restart the web browser.
Changes are hard to accept
Reading the drama from The Apple Cart by George Bernard Shaw gave light to how changes just cant be accepted. Pity the glass blower's earnings would be affected by improvement in technology that would reduce breakages of bulbs during transport. Can you imagine some businesses that strive on expected breakdowns and expect paying users to be their released software testers being in the same light?
King Magnus (like my little boy's name) in the play seems to entertain the request of power to be transfered to the ministers. Followup is the thought of a lady that she could replace the queen as she have much more to offer. The finese of Magnus manages so many different issues while maintaining a certain royalty charm.
In dealing with introducing the OpenOffice.org to agencies, some just cannot accept the positive side and to pave way for the future. Concern is just to get past living each day and each report or presentation to be submitted. Worst case is that some software company even comes over to tell the agencies off that their business will be effected. Maybe a little bit of King Magnus is needed.
If anyone have the time, the play is really something decent and naughty that can be enjoyed easily.
King Magnus (like my little boy's name) in the play seems to entertain the request of power to be transfered to the ministers. Followup is the thought of a lady that she could replace the queen as she have much more to offer. The finese of Magnus manages so many different issues while maintaining a certain royalty charm.
In dealing with introducing the OpenOffice.org to agencies, some just cannot accept the positive side and to pave way for the future. Concern is just to get past living each day and each report or presentation to be submitted. Worst case is that some software company even comes over to tell the agencies off that their business will be effected. Maybe a little bit of King Magnus is needed.
If anyone have the time, the play is really something decent and naughty that can be enjoyed easily.
Thursday, April 16, 2009
Akonadi Basics
The KDE 4 introduced a common framework for applications to store and access mail, calendars, addressbooks, and other PIM data. The reduced the development time of applications that shared data such as the addressbook and calendars.
On Kubuntu the package is called akonadi-server and akonadi-kde. The current version is 1.1.1. Akonadi server supports a number of KDE applications like Akregator · Amarok · digiKam · Dolphin · Dragon Player · Gwenview · JuK · K3b · Kaffeine · Kate · Kdenlive · KDevelop · KGet · KMess · KOffice · Konqueror · Konsole · Kontact · Kopete · KTorrent · Okular
On Wikipedia this is described as reducing the need for space and also collaboration of information between applications.
To demonstrate the use of Akonadi, I started by opening the KDE System Settings and choose the Advanced tab. Choosing the Akonadi Server icon, it says Akonadi server not running. Waited a while, then the server started and I have 2 tabs. In the resources tab I have a std.ics (Calendar), std.vcf (Address book) and Birthdays (self explained). The next tab indicated that the server was running with MySQL database.
Next I proceeded to launch the PIM known as Kontact. I tried adding a New Contact in the Address Book and it works fine. How can I populate this? I dont use KMail to manage my emails address, instead I use Thunderbird. This wont support Akonadi and I cant moved the data across other applications.
Lets try using Kopete (The instant messenger) where I already have a well built list of contacts. I start Kopete and login to my account. From the Kopete menu, choose File ->Export Contacts. Select the Address book called resource (this is the name I set in the Kontact address book). It copies all the messenger contacts along with the photos into Kontact.
I now have a backup of the messenger names on my address book and I can use this to manage my mailing when I decide to use KMail for emails.

On Kubuntu the package is called akonadi-server and akonadi-kde. The current version is 1.1.1. Akonadi server supports a number of KDE applications like Akregator · Amarok · digiKam · Dolphin · Dragon Player · Gwenview · JuK · K3b · Kaffeine · Kate · Kdenlive · KDevelop · KGet · KMess · KOffice · Konqueror · Konsole · Kontact · Kopete · KTorrent · Okular
On Wikipedia this is described as reducing the need for space and also collaboration of information between applications.
To demonstrate the use of Akonadi, I started by opening the KDE System Settings and choose the Advanced tab. Choosing the Akonadi Server icon, it says Akonadi server not running. Waited a while, then the server started and I have 2 tabs. In the resources tab I have a std.ics (Calendar), std.vcf (Address book) and Birthdays (self explained). The next tab indicated that the server was running with MySQL database.
Next I proceeded to launch the PIM known as Kontact. I tried adding a New Contact in the Address Book and it works fine. How can I populate this? I dont use KMail to manage my emails address, instead I use Thunderbird. This wont support Akonadi and I cant moved the data across other applications.
Lets try using Kopete (The instant messenger) where I already have a well built list of contacts. I start Kopete and login to my account. From the Kopete menu, choose File ->Export Contacts. Select the Address book called resource (this is the name I set in the Kontact address book). It copies all the messenger contacts along with the photos into Kontact.
I now have a backup of the messenger names on my address book and I can use this to manage my mailing when I decide to use KMail for emails.
Scanning with Kubuntu Intrepid and KDE 4.3
Scanning with Kubuntu Intrepid is easy with Xsane and EPSON Perfection 1250 scanner. XSane is GPL and is currently at version 0.995
Step 1:
sudo apt-get install xsane xsane-doc
Step 2:
Plug in the USB connection to the computer and from the KMenu choose Application ->Graphics ->XSane
You can see that the scanner is detected by typing the command
lsusb
Step 3:
In the XSane Window leave all as default except the settings for;
Viewer
File location and name (I choose a PDF name)
Type by ext
Color/Lineart/Monocrome
Resolution to minimum 150
Step 4:
In the XSane Preview Window, choose Full Size then "Acquire Preview". When this is done the first time, it takes a while.
In the XSane Window, press "Scan". Make sure it is the image that you want and continue by choosing File ->Save Image.
Note:
To scan multiple pages into one PDF, change the Viewer to multipages.
Step 1:
sudo apt-get install xsane xsane-doc
Step 2:
Plug in the USB connection to the computer and from the KMenu choose Application ->Graphics ->XSane
You can see that the scanner is detected by typing the command
lsusb
Step 3:
In the XSane Window leave all as default except the settings for;
Viewer
File location and name (I choose a PDF name)
Type by ext
Color/Lineart/Monocrome
Resolution to minimum 150
Step 4:
In the XSane Preview Window, choose Full Size then "Acquire Preview". When this is done the first time, it takes a while.
In the XSane Window, press "Scan". Make sure it is the image that you want and continue by choosing File ->Save Image.
Note:
To scan multiple pages into one PDF, change the Viewer to multipages.
Wednesday, April 15, 2009
Ubuntu Manual in Bahasa Malaysia
There are lots of documentation on Ubuntu Linux. For those looking for a Bahasa Malaysia version, an 8 Mb documentation that can be easily understood by most level of users that is compiled by Zulkifli b Abdullah. See Malay Ubuntu
Good job!
Good job!
Friday, April 10, 2009
Setting up printer for Kubuntu
The KDE system on Kubuntu uses network discovery to find the available printers. This means, users do not need to manually add printers. This is done in 2 steps.
Step 1:
At the KMenu choose Applications ->System ->Printer Configuration.
Step 2:
Choose Server settings and check the "Show printers shared by other systems". Press "Apply".
Users need to wait for about a min for the first time discovery of the printers. Press Ok and test the printings.
Step 1:
At the KMenu choose Applications ->System ->Printer Configuration.
Step 2:
Choose Server settings and check the "Show printers shared by other systems". Press "Apply".
Users need to wait for about a min for the first time discovery of the printers. Press Ok and test the printings.
Wednesday, April 1, 2009
OpenOffice.org Best Practice
1. Introduction
This document describes best practices to improve operational efficiencies in creating and exchange of office electronic documents. This list is not meant to be lengthy and too technical. Only the Writer, Calc and Impress is covered in this document.
Comments are invited to improve this list.
2. MANAGEMENT MATTERS
Policies
Provide a standard version of OpenOffice.org installed on all stations.
There are many distributions of OpenOffice.org such as Sun OpenOffice.org, StarOffice and Go-OO that provide the latest stable versions.
Provide a list of standard extensions and its version that should be installed in all OpenOffice.org installed.
Ensure that the version of OpenOffice.org is kept updated.
Default Documents
The standard file formats for saving must be determined.
Currently Open Document Format (ODF) 1.2 is recommended.
For archiving purpose, the Portable Document Format (PDF) is to be used.
In the OpenOffice.org User Data option, all fields must be filled correctly.
This allows tracking of changes in documents correctly.
3. STANDARD FORMATTING
Templates
The following is to be made available to all users
A template of default styles. Users can load the template or just the styles from the Styles and Formatting dialog box.
Relevant templates of commonly used documents should be made available to users.
The templates are to provide the default values for formatting. This includes;
Page size
Font Type and Size
Amount of line spacings
Creating documents
All new documents should be created from an existing template.
If no suitable template is available, the user may use the default template.
Intial stage of document creation should emphasize on its contents and flow. Once the basic structure of the document is ready, use the Styles and Formatting dialog box to apply the required styles.
Using MS Office documents
Use the Document Converter tool to identify possible errors.
Format layout
Paragraphs should be format using pre-defined styles. Where possible, avoid formatting characters and paragraphs directly.
Use Heading styles for grouping of topics into logical structures. The order should be Heading 1, Heading 2, and so on.
Change or create heading styles to suite the document.
Do not skip heading levels.
All hyperlinks must be descriptive.
Use bullets or numbered list. Manual characters used as bullets or numbering should not be used.
When copying bullets or list from another document, paste as plain text to avoid loss of current formatting.
Graphics
Graphic elements such as images, diagrams or charts in a document must have information about those graphics in the text of the document.
When copying graphics into documents that are to be sent out, ensure that the links are broken.
In Writer menu choose, Edit ->Links.
Avoid flashing, blinking and similar animated text.
Tables
Rows in a table that is the heading must be format as Table Heading style.
Normal rows in a table must be format as Table Contents style.
Printing documents with Writer
In the print option, uncheck the “Print automatically inserted blank pages”.
4. PRESENTATION WITH IMPRESS
General
Each slide should use the predefined slide layout.
Tables should be added with the tables layout.
Charts should be added with the chart layout.
Column arrangement should be done with the predefined layout where possible.
News slides should be built with the Outline View. This will focus on content before beautification is taken place.
Audio and Movies
All audio and movie embedded must use the standard format that is supported by OpenOffice.org
Audio: MPEG, OGG, 3GPP
Video: Quick time, AVI, MPEG, OGG, Divx, FLV
Audio and Movies should be only one for each slide.
This will reduce the need for extremely high memory usage.
5. SPREADSHEET WITH CALC
General
Use row and column headers extensively and avoid ambiguity within these headers. Make them clear and self-explanatory.
Use the Heading and Heading 1 styles
All sheets must be given descriptive names.
Use region names for individual or group of cells.
This allows functions to refer to specific cells.
Users can use the Go-To tool, to quickly moved around the spreadsheet.
6. OTHER ISSUES
Macros
Usage of macros should be minimized.
Use the extensions to add functionality to OpenOffice.org
Extension support the programming language in Java, Python and C++
Monday, March 30, 2009
Preserving electronic data with office suites
Anyone trying to open a document created by Microsoft (MS) Office will find that they need to upgrade to support the .docx, .pptx and .xlsx. This is understandable since they are newer formats. Same goes for those opening ODF1.2 would be better off with OpenOffice.org (OOo) 3.
But for those who have been archiving documents in MS Word for Windows 1.x and 2.x will now find that MS Word 2007 cannot open such files. Yup, you wont be able to open such files as mentioned in MS website. Yup reality, one of the mainstream and widely used software provider just showed that they can indeed drop support of their own document support. Below is what you can find at their website.

Fortunately, OOo3 can be used to open such files if needed.
Data arvhiving for the Future
How to preserve such data? Best practices (none found documented) from experience, two copies need to be saved. An editable and non-editable.
But for those who have been archiving documents in MS Word for Windows 1.x and 2.x will now find that MS Word 2007 cannot open such files. Yup, you wont be able to open such files as mentioned in MS website. Yup reality, one of the mainstream and widely used software provider just showed that they can indeed drop support of their own document support. Below is what you can find at their website.

Fortunately, OOo3 can be used to open such files if needed.
Data arvhiving for the Future
How to preserve such data? Best practices (none found documented) from experience, two copies need to be saved. An editable and non-editable.
- Non editable files, save as PDF or PS (postscript).
- Editable word processor files (why the need to edit archives?), save as RTF (ruch text format) or ODF (open document format).
- Editable spreadsheet files, save as ODF (open document format). This preserves the formulas among other complexities.
- Editable presentation files, save as ODF (open document format).
Sunday, March 29, 2009
Improving OpenOffice.org3 performance (basic)
OpenOffice.org (OOo) can be improved based on how it is used by the user. This means there is no single solution. Recently, during a demo my OOo froze! So I needed to find the fault.
Here I take it that you are a normal user with 1GB RAM PC and having Internet access. In the beginning
soffice.bin -> 17,724K memory, 55,044K shared memory.
After the above alterations, my memory usage was averaged as below.
soffice.bin -> 16,956K memory, 53,224K shared memory.
Not much but its a start. You will get the idea, work on the average number of documents that you will open at one time. In Kubuntu, only one process is created for however many OOo applications that are opened. Which I have tested for upto 30 documents opened at a time. I have not tested OOo3 behaviour on MS Windows at this moment. Will be looking for feedback on this.
Here I take it that you are a normal user with 1GB RAM PC and having Internet access. In the beginning
soffice.bin -> 17,724K memory, 55,044K shared memory.
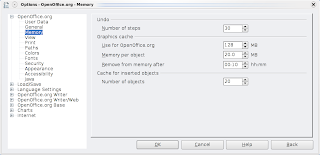
- Start OpenOffice.org Writer. In the menu choose Tools ->Options ->OpenOffice.org ->Memory.
- The Undo, Number of Steps should be reduce to your normal figure. Over the last 2 weeks, I have been compiling the number of undos and I have not used more that 15 undos at one time. Multiply this by 2 and I set it now to 30.
- Graphics cache, "Use for OpenOffice.org" ->128Mb. Cause I have 1GB RAM.
- Graphics cache, "Memory per Object" ->20MB. This is the charts and graphics I create in documents.
- Graphics cache, "Cache for inserted object" ->20 objects. I have only used most objects in the Impress documents.

After the above alterations, my memory usage was averaged as below.
soffice.bin -> 16,956K memory, 53,224K shared memory.
Not much but its a start. You will get the idea, work on the average number of documents that you will open at one time. In Kubuntu, only one process is created for however many OOo applications that are opened. Which I have tested for upto 30 documents opened at a time. I have not tested OOo3 behaviour on MS Windows at this moment. Will be looking for feedback on this.
Friday, March 20, 2009
Development on KDE4 with Solid
After using KDE 4.2 it really looks like there are lots of positive opportunities for Kubuntu. This use the QT 4.4.3 library. Below is how my desktop looks at the moment.

For developers, the first thing to do is to understand about Solid. This is a library introduced since 2006 to discover hardware independent of hardware architecture. There is an increase awareness on mobility features. Can you imagine how much effort is being taken? Just look at the seriousness of the Start menu development. A brief description of KDE Solid can be found at the URL http://solid.kde.org/
The C++ tutorial on Solid can be found at http://techbase.kde.org/Development/Tutorials/Solid_Tutorials/ for the eager developers.
The KDE Goals seems to indicate a radical approach. This will break lots of stuff. Many older application and library will need to be rewritten and lots of people will be kept waiting. However, this barrier needs to be taken, else revolutionary changes can't take place. Supporting Solid is the Phonon library, that is expected to provide an independant multimedia framework to be used in gstreamer, xine and DirectX/DirectSound. Even the user interface will undergo a systematic development with the introduction of the Human Interface Guideline (HIG).
Look forward to KDE4!

For developers, the first thing to do is to understand about Solid. This is a library introduced since 2006 to discover hardware independent of hardware architecture. There is an increase awareness on mobility features. Can you imagine how much effort is being taken? Just look at the seriousness of the Start menu development. A brief description of KDE Solid can be found at the URL http://solid.kde.org/
The C++ tutorial on Solid can be found at http://techbase.kde.org/Development/Tutorials/Solid_Tutorials/ for the eager developers.
The KDE Goals seems to indicate a radical approach. This will break lots of stuff. Many older application and library will need to be rewritten and lots of people will be kept waiting. However, this barrier needs to be taken, else revolutionary changes can't take place. Supporting Solid is the Phonon library, that is expected to provide an independant multimedia framework to be used in gstreamer, xine and DirectX/DirectSound. Even the user interface will undergo a systematic development with the introduction of the Human Interface Guideline (HIG).
Look forward to KDE4!
Subscribe to:
Posts (Atom)