Wednesday, September 9, 2015

Tutorial on Linux Shell Fundamentals

Most Linux admin and developers on Linux will benefit from knowing some shell scripting skills.

In most Linux, the shell is run on BASH. There are a few other shells out there but the default is BASH which I will introduce the basics here.

Gain access to a Linux terminal or also known as the command line terminal (CLI) and follow along these topics.

Fundamentals 1 (START)
  1. Getting started
  2. Creating a script
  3. Comments, printout and local strings
  4. Builtin variables
  5. Backup a folder
  6. Separate variable names and back slash
  7. Linux command in scripts
  8. Function basics
  9. Script arguments
  10. Accepting user input
  11. Simple if/else decision
Fundamentals 2 (START)
  1. The while loop
  2. Array variables
  3. Read from a file
  4. The for loop
  5. The until loop
  6. Find plain text files
  7. Quick menu input with select
  8. The case to create a menu
  9. Formatted printing with printf
  10. Print a line full length of screen


--

Monday, September 7, 2015

Display Dnsmasq status on Nagios

This article is an example of adding a custom process status in Nagios here the server (10.10.2.1) is separate from the host (10.10.2.2). In Nagios reference there are lots of option for configurations.

Dnsmasq as a light weight alternative to named, will appear in the linux process. E.g. when issuing the command ps -C dnsmasq

Pre-configuration checklist:

Ensure NRPE is installed and working on the host.

Step 1: Update nrpe.cfg with following;

# vi /etc/nagios/nrpe.cfg

Add the line
command[check_dnsmasq]=/usr/lib64/nagios/plugins/check_procs -C dnsmasq -w 5 -c 10

Save and test the new nrpe command;
# /usr/lib64/nagios/plugins/check_procs -C dnsmasq -w 5 -c 10
PROCS OK: 1 process with command name 'dnsmasq'


Restart nrpe
#service nrpe restart

Step 2: Add this service to the Nagios host

# vi /etc/nagios/servers/server1.cfg

define service{
use generic-service
host_name lbserver2
service_description Dnsmasq
check_command check_nrpe!check_dnsmasq
}

Save and restart Nagios


These 2 step works for any services that the linux ps command can detect.

Install Nagiosgraph on Centos 6

This article is on how to install Nagiosgraph on Centos.

Nagiosgraph is a plugin to Nagios and it provides graphical display of information captured by Nagios.

Installation environment:
Centos 6.5 x86_64
Nagios version 3.5.1-1
Pre-requisite perl modules: rrd tool 1.4+, Nagios::Config, GD, Object

Step 1: Prepare Nagiosgraph 1.5 for installation

# wget http://downloads.sourceforge.net/project/nagiosgraph/nagiosgraph/1.5.2/nagiosgraph-1.5.2.tar.gz
#  tar xvzf nagiosgraph-1.5.2.tar.gz
#  cd nagiosgraph-1.5.2
# less README

Install Perl module if havent installed.
# ./install.pl --check-prereq
# yum install perl-rrdtool perl-GD perl-Nagios-Plugin
# cpan Nagios::Config
If there are many modules not installed, just press Enter (Yes), unless you have other config.

Check all dependencies are met.
# ./install.pl --check-prereq


Step 2: Install Nagiosgraph source

# install.pl --prefix=/usr/share/nagiosgraph
Follow the instructions online. I choose the default values where nagios and httpd (apache) files were not updated automatically.

Step 3: Post configuration

If in step 2, it was chosen to not modify apache and nagios, then following must be configured. All instructions are printed at end of the installation of Step 3.

nagios.cfg
In the nagios configuration file (nagios.cfg),
    add/change these lines:
# vi /etc/nagios/nagios.cfg

Edit value for
process_performance_data=1

Add following lines
# process nagios performance data using nagiosgraph
service_perfdata_file=/tmp/perfdata.log
service_perfdata_file_template=$LASTSERVICECHECK$||$HOSTNAME$||$SERVICEDESC$||$SERVICEOUTPUT$||$SERVICEPERFDATA$
service_perfdata_file_mode=a
service_perfdata_file_processing_interval=30
service_perfdata_file_processing_command=process-service-perfdata-for-nagiosgraph

template.cfg
# vi /etc/nagios/objects/templates.cfg
define service {
        name    graphed-service
        action_url      /nagiosgraph/cgi-bin/show.cgi?host=$HOSTNAME$&service=$SERVICEDESC$
        register 0
}

command.cfg
# vi /etc/nagios/objects/commands.cfg

# command to process nagios performance data for nagiosgraph
define command {
  command_name process-service-perfdata-for-nagiosgraph
  command_line /usr/share/nagiosgraph/bin/insert.pl
}

Host service files. E.g. for servername server1, append to show the graph service
vi  /etc/nagios/servers/server1.cfg
define service{
use generic-service,graphed-service
host_name applicationser1
service_description Current Load
check_command check_nrpe!check_load
}

* In the apache configuration file (httpd.conf),
    add this line:

include /usr/share/nagiosgraph/etc/nagiosgraph-apache.conf

Restart nagios to start data collection:
# service nagios restart

Restart apache to enable display of graphs:
# service httpd restart
Nagioschart: Chart icon in Nagios page

Nagioschart: Configuration page

Troubleshoot

Check graphs are displaying data, open a web browser and enter the URL
http://serversite/nagiosgraph/cgi-bin/show.cgi

Check RRD is collecting data with the command
# ls /usr/share/nagiosgraph/var/rrd

Check the nagios configuration files for errors
# /usr/sbin/nagios -v /etc/nagios/nagios.cfg

To enable graph links and mouseovers, see README sections:
       Displaying Per-Service and Per-Host Graph Icons and Links
       Displaying Graphs in Nagios Mouseovers

Thursday, September 3, 2015

Howto add Dropbox as Backup to Kodi - OSMC on Raspberry Pi 2

This is generally for backup purpose.

Step 1: Create API in dropbox

Login to dropbox.com or create an account if you haven't.
Go to the URL https://www.dropbox.com/developers/apps
Click "Create"
Choose "Dropbox API app"
In Can you app be limited to its own folder, choose "Yes"
App Name: "Kodi backup"
Click check box for "I agree to...conditions"
Click "Create app"

Write down the values for
App key and App secret.


Step 2: Configure Dropbox in Kodi

Open the Kodi screen and click Programs ->Get more...
Choose "Backup"-> "Install"
Click "Configure", in tab "General", change Remote path type to "Dropbox".
Enter values for Dropbox key
and Dropbox Secret
Click "ok"
Click "Launch"


Step 3: Start the backup

AT THE KODI SCREEN

A popup window "XBMC Backup - Mode" will appear, choose "Backup"
DO NOT CLICK "OK"

Step 4: Locate dropbox authorization
AT THE SSH TERMINAL
Using SSH tool like Putty, login to the OSMC Raspberry Pi and look for the dropbox authorization key in the file kodi.log.
Type
$ grep dropbox /home/osmc/.kodi/temp/kodi.log


AT THE PC WEB BROWSER
Copy that URL to a web browser and when the API request appears, click "Allow"

Step 4: Start backup

Return back to the screen in Step 3 and click "Ok"

Backup should begin.

Check dropbox for a new folder with the backup contents in
Apps/Kodi backup

Done.

Other stuff to do with Dropbox is to stream your home videos.
**To access files on dropbox**
Open the Kodi screen and click Programs ->Get more...
Choose Dbmc (Dropbox add-on)
Click "Install"

Once Dbmc has completed installation, click Dbmc (Dropbox add-on)
Click "Configure"

Tuesday, September 1, 2015

Setup Centos as Nagios clients

Centos Linux servers can be monitored by Nagios remotely. This typically provides information of ping response, services running and system information.
The setup is fairly straight forward assuming Nagios server IP is 10.10.2.1 and uses port 5666.

Step 1: Install Nagios plugins and NRPE.

Read the NRPE documentation.
Login to the nagios host, e.g. 10.10.2.2
# yum install -y nagios-plugins-all nrpe net-snmp

Edit /etc/nagios/nrpe.cfg with these 2 values

server_address=127.0.0.1
or the nagios IP

allowed_hosts=10.10.2.1
or the nagios IP

Example to enable monitoring of http is to have this line;
command[check_http]=/usr/lib64/nagios/plugins/check_http -I 10.10.2.2 -w 5 -c 10

Step 2: Start NRPE

# service nrpe start
# chkconfig nrpe on

Test with
 /usr/lib64/nagios/plugins/check_nrpe -H 10.10.2.2 -c check_load

Step 3: Allow monitoring through firewall

E.g. if using IPTABLES, make it as a rule at the top
# iptables -I INPUT 2 -p tcp -m tcp --dport 5666 -j ACCEPT
# iptables -L |grep 5666
ACCEPT     tcp  --  anywhere             anywhere            tcp dpt:5666

# service iptables save

Step 4: Configure Nagios server

Enable the services in the Nagios server, in this example 10.10.2.1
# vi /etc/nagios/servers/server1.cfg

define service{
use generic-service,graphed-service
host_name server1
service_description Http
check_command check_nrpe!check_http!-w 5 -c 10
}


Post installation

Check the service is running
# netstat -anlp |grep nrpe
tcp        0      0 10.240.1.14:5666            0.0.0.0:*                   LISTEN      12467/nrpe
unix  2      [ ]         DGRAM                    14250318 12467/nrpe

From the nagios server, test with 
/usr/lib64/nagios/plugins/check_nrpe -H 10.10.2.2

this should return the NRPE version.

/usr/lib64/nagios/plugins/check_nrpe -H 10.10.2.2 -c check_http

this should return the http check at the host.


Self reminder: TODO check_postgres source github

Thursday, August 27, 2015

Raspberry Pi: Starting Kodi

Kodi is an application that provides the interface to manage video, music, pictures and liveTV. Its the default media centre on OSMC.

If you have not installed OSMC, see previous post on getting started.

Step 1: Adding source for video add-ons from tvaddons.ag
Start Kodi, choose System ->Setting ->File Manager
Click Add Source and enter location as
http://fusion.tvaddons.ag

Enter a name: Fusion

Click "OK"

Step 2: Install plugins for streaming movies and TV shows

Choose 1Channel and Genesis

Remainder of installation reference is from here.

Tuesday, August 25, 2015

Access VirtualBox VM via SSH

A virtual machine provides lots of space for development, troubleshooting and learning. Sometimes its required to remotely access the virtual machine guest using SSH from the host. Virtualbox allow users to setup so many different type of virtual machines known as the guest.

The machine installed with VirtualBox is known as the host. In this example, the host is a MS Windows 7 computer with virtual machine guest OS being Centos Linux 6. SSH client such as Putty is run on the host computer and will attempt to connect to the virtual machine. This will also allow multiple guest OS to SSH between one another.

Step 1: Configure VirtualBox networking

Shutdown all guest virtual machines. Open VirtualBox Manager, click on the virtual machine to be configured and choose Settings ->Network. There should already be an existing network for access to the Internet. Nothing needs to be changed if you can already access the Internet from the guest OS.

Guest virtual machine default networking with access to Internet

Choose one of the unused Adapter (example Adapter 2) and configure the settings:
Attached to: Host-only Adapter
Name: VirtualBox Host-Only Ethernet Adapter


On the MS Windows, VirtualBox has already setup its own network 192.168.56.1 as can be seen below. The other IP is the dynamic IP used by host computer to access the Internet.


Step 2: Configure a static IP on guest OS.

Start the guest OS and login. Open a terminal as root and the new network device has been identified but we need to configure the IP to match that of the VirtualBox network 192.168.56.x.


In the case above, VirtualBox has already configured network device eth0 to access Internet. Check eth1 with

# ethtool eth1

The default eth1 if we started that network, it would use DHCP but we want a static IP so that we know the IP for SSH. We now need to create/edit eth1

vi /etc/sysconfig/network-scripts/ifcfg-eth1

Add/modify following lines;

DEVICE="eth1"
BOOTPROTO=static
NM_CONTROLLED="yes"
ONBOOT="yes"
TYPE="Ethernet"
IPADDR=192.168.56.10
NETMASK=255.255.255.0
IPV6INIT=no
NAME="System eth1"

Start the networking for eth1 and check that eth1 is using the new IP. 

Step 3: Restart the guest virtual machine.

Reboot the guest OS and test access to Internet and ability to SSH into the guest OSS from the host computer as can be seen below.

Guest VM network for Internet and SSH

The network routing is shown below.
Guest virtual machine network routing


Tuesday, August 18, 2015

Getting started with LibreOffice 5

There are quite a number of options for word processors, spreadsheets and slide presentation these days and many of it with the option for being online. LibreOffice 5 is available to users on popular platforms like Mac, Linux and MS Windows. This makes it easier for implementation across any type of systems for any organisation.

LibreOffice can help save lots within an organisation while having access to a top class application that is continuously being kept updated. The document formats will ensure it can be preserved for a long time. The installer file can be downloaded from libreoffice.org site and the offline help can also be downloaded separately.

LibreOffice 5 Installer

The minimum installation system pre-requisites recommended is a Pentium III,  512MB RAM which should be fine for almost all computers. However, is does require a considerable 1.5GB disk space and display of 1024x768 resolution with 256 colours.

Java Runtime Environment (JRE) is needed if using some features in Base.

LibreOffice 5 provides the following;

  • Writer document
  • Calc spreadsheet
  • Impress presentation
  • Draw drawing
  • Math formula
  • Base database
LibreOffice 5 Main Screen
The 3 notable features (see release notes for more);

AutoCorrect
Default unicode 6 support which is included in its AutoCorrect. E.g. if you type :camera: it displays the camera. Here are a few more;


Compatibility with MS Office
Improved import and export of MS Word, Excel and Powerpoint documents. This means, users can work with these docs without much hassle. More controls for compatibility is found in the Tools ->Option ->Load/Save

Improvements in import of annotated text ranges from Word documents. Better support for RTF document formats.

Entire row/column references
Ever wanted to specify an entire row/column? Now this can be done with "A:A" and "1:1".

Monday, August 17, 2015

Howto Install PHP and Postgresql on Fedora Core

Fedore Core 22 came out in May 2015 with quite a number of changes that even the usual Linux guy had trouble getting around.

This included
  • The dfn package manager to replace Yum
  • Gnome 3.16 to provide a new desktop look
  • The firewall-cmd to replace iptables firewall
  • Retreive systemd notices with journalctl

For basic PHP web application development with Postgresql database it was pretty straight forward after learning these new commands. This will also server as an introduction to the new commands mentioned above. Apache was already installed.


Step 1. Install PHP

Open a command terminal and type
$ sudo dnf install php php-xmlrpc php-xml php-mbstring

It installed the following;
php-common-5.6.11-2.fc22.x86_64
php-pgsql-5.6.11-2.fc22.x86_64
php-xmlrpc-5.6.11-2.fc22.x86_64
php-cli-5.6.11-2.fc22.x86_64
php-xml-5.6.11-2.fc22.x86_64
php-mbstring-5.6.11-2.fc22.x86_64
php-pdo-5.6.11-2.fc22.x86_64
php-pecl-jsonc-1.3.7-1.fc22.x86_64
php-5.6.11-2.fc22.x86_64

Restart web server

$ sudo systemctl restart httpd.service

If there are errors, open the log and inspect.

$sudo journalctl -xe

== Check that Apache is permitted through the Firewall==
firewall-cmd --permanent --zone=FedoraWorkstation --add-service=http
firewall-cmd --permanent --zone=FedoraWorstation --add-service=https
firewall-cmd --reload

In this case, my default-zone was "FedoraWorkstation" and not "public".

Step 2: Install Postgresql database


$ sudo dnf install postgresql-server postgresql

It installed the following;
postgresql-9.4.4-1.fc22.x86_64
postgresql-libs-9.4.4-1.fc22.x86_64
postgresql-server-9.4.4-1.fc22.x86_64

$ postgresql-setup --initdb

Edit /var/lib/pgsql/data/pg_hba_conf

local   all             all                         trust
host    all             all             127.0.0.1/32            trust

$ sudo -u postgres psql
postgres=> alter user postgres password 'password';
postgres=> create user tboxmy createdb createuser password
'somepassword';
postgres=> create database tboxmy owner tboxmy;
postgres=> \q

$ psql
tboxmy=# \dn
tboxmy=# \q

Then run some test with the PHP and database.

Other useful tools.

Export database from existing Postgresql

$ pg_dump -U username -h localhost -W databasename > output.text.sql

Restore the sql dump file to a database

$ psql --set ON_ERROR_STOP=on -U username -h localhost -W databasename < output.text.sql

Friday, August 7, 2015

What is OpenStack? Some Figures and statistics.

Cloud computing is still gaining some interest in public and private organisations. Many large organisations have shown interest and support for OpenStack as a software to deliver cloud platforms. With the source code to OpenStack freely accessible and welcomes community participation via the Foundation, it has also grown into an operating system of its own.

Recognition of the companies contributing to some parts of OpenStack include;
Those who are keen, should look up these developers to see how they contribute to the project.

There are some statistics that may be of interest at Openstack Activity Dashboard. Number are just numbers, but it makes lots of nice charts and puts some perspective of the project.

Some figures as of 6th Aug 2015;
  • Code developers; 3,971
  • Code submitters; 4,171
  • Launchpad participation; 8,881
  • IRC participants; 20,302
  • Ask participants; 4,035


Contribution by companies like HP, IBM and Red Hat;


There is a Malaysian OpenStack meetup on 13th Aug 2015 (Event), and its free.

Monday, June 22, 2015

Accessing password for D-Link provided by TM Unifi

As a note, if the admin password is lost or forgotten, there is a way to access the admin console for the D-Link routers (DIR-615) before 2015.

Some people say, better to just don't share it but, some may say that its public knowledge anyways.

Method 1: Brute force attack. Or in layman term, guess the admin password (Its either empty or admin).
Method 2: Use a feature within the router. Not sure if newer routers have the same feature. See below;

Step 1

Connect a PC to the router (LAN or wireless) and open a web browser URL at
192.168.0.1

This should show the admin page of the router.

Step 2

Change the URL to
192.168.0.1/model/__show_info.php?REQUIRE_FILE=/var/etc/httpasswd

It will display the login password for admin.


Kid: OMG...you mean I can change the password as much as I like but anyone can view the password?
Tech support: Err... yeah.
Kid: Time to change the router?
Tech support: You could. We can arrange for the technician to come over.

Update:
TM unifi has updated their routers remotely. Please check, if you see your password displayed, contact them for a fix.

Saturday, June 20, 2015

Raspberry Pi: Getting Started with OSMC

After getting the Raspberry Pi 2 (RPI), NOOB SDcard from Element14 started up without a network cable. Only 3 option for the OS is shown as it boot from the NOOB SDcard (yes, it has to be plugged in)

Plugged in the networking cable and restarted RPI. This time, it loaded the remaider of the OS like OSMC and OpenElect.

OSMC (Open source Media Center), is a Debian based Linux operating system. Fomerly known as Raspbmc.  OSMC features an application store for TV use. Kodi is an application included for handling multimedia locally or online on OSMC.

Kodi or formerly known as XBMC, is an open source software (GPL) for handling of videos, music and pictures. Live TV can be viewed via Kodi and its add-ons expand its use. The support of UPnP allows streaming of Kodi to any other Kodi instances. Its like multi screen mirror display.

Here are steps to start off with the OSMC operating system.

Step 1: Boot to OSMC

Boot up the RPI. It goes into the RPI boot screen, press the "SHIFT" key to bring up the editing screen. Click on OSMC for PI2 and press "Enter" and an "x" will appear for the OSMC.

Press "Esc" and it should start downloading OSMC and install. Once done, it reboots to OSMC.

Troubleshooting
After OSMC splash screen appeared, the Samsung TV displayed
"Mode not supported".

What does this mean? OSMC got the wrong resolution or the TV did not support multiple modes automatically.

Troubleshooting Step 1: 

In the same network, open the SSH client (Putty) and connect to the RPI via IP address.
username: osmc
password: osmc

At the command line type:

Identify which mode is being used that is causing the problem.
tvservice -s

Identify which modes are available in OSMC monitor service
tvservice -m DMT

Output that I got:

osmc@osmc:~$ tvservice -s
state 0x12001a [HDMI DMT (39) RGB full 16:9], 1360x768 @ 60.00Hz, progressive
osmc@osmc:~$ tvservice -m DMT
Group DMT has 4 modes:
           mode 4: 640x480 @ 60Hz 4:3, clock:25MHz progressive
           mode 9: 800x600 @ 60Hz 4:3, clock:40MHz progressive
           mode 16: 1024x768 @ 60Hz 4:3, clock:65MHz progressive
  (prefer) mode 39: 1360x768 @ 60Hz 16:9, clock:85MHz progressive

Troubleshooting Step 2:  

Reboot RPI, and as it loads press "SHIFT" until the edit boot screen appears. Click on OSMC and choose "Edit config".

Changed the value to match below. E.g. to use alternative mode, change hdmi_mode from 16 to 4.


Click"OK", and press "Esc". Reboot as normal.

Keep changing the value of the mode until it works and display Kodi with default OSMC skin/template.

Tuesday, June 16, 2015

Raspberry Pi: Getting Started

Where can I find a tiny little computer that can be programmed and cost under RM300? Lots of tablets floating around but I finally settled with just a bare computer, the Raspberry Pi 2.

What is this? 

Bare computer with NO monitor, keyboard or mouse.

What can be done with Raspberry Pi? Here is a short list;
Just release in 2015, here are the specs for Raspberry Pi 2.
  • SoC Broadcom BCM2836
  • CPU: Quad-core ARM Cortex-A7 (~6x performance)
  • GPU: Broadcom VideoCore IV
  • Memory: 1GB LPDDR2 SDRAM (2x memory)
  • Video outputs: HDMI and 4-pole 3.5 mm jack
  • Audio outputs: 4-pole 3.5 mm jack, HDMI
  • Onboard storage: microSD card slot
  • 10/100 Ethernet RJ45 onboard network
  • 5V micro USB power input jack
  • 40 pin 2.54mm header expansion slot (The layout)
  • 4 USB ports

How to get this done?

Read the Setting up instructions, and buy the components.
What I bought.


Try joining a Raspberry group like that in Googleplus.

To start off, an operating system needs to be selected from one of many;
  • Raspbian (Debian Wheezy port)
  • OpenElec
  • RISC OS
  • Arch Linux
  • OSMC (Replacing RaspBMC)
  • Pidora (Fedora Linux)
To be continued...


Thursday, June 4, 2015

Centos Linux Status Reporting with xsos

Centos linux status can be read from so many ways. Ryan Sawhill provides a nice layout of so many reporting formats in xsos. The source and documentation is fairly well prepared at https://github.com/ryran/xsos

Requirements: one of it is BASH 4

Step 1: Download xsos and make it executable. Use root access.

wget -O /usr/local/bin/xsos bit.ly/xsos-direct
chmod +x /usr/local/bin/xsosa

Step 2: Run xsos

Example of some of the reports;

1. Display the help commands
$ xsos -h

2. Display OS and memory information
$ xsos -om


3. Display CPU, LSPCI and Network devices
$ xsos -cln


4. Display sysctls info
$ xsos -sysctl

It is a really handy tool to prepare documentation and analyse status for troubleshooting.


Monday, April 20, 2015

Did you know there is a Windows Remix?

Just heard a pretty awesome tune but wait till you see the video.

How many of these screens have you seen?

Fake listings on Google Maps

Why would you want to create a fake listing on Google Map?

Nice write-up from Danny Sullivan of Search Engine Land on Bryan Seely who presented this weakness at TEDx Kirkland.

Advantages of being in the open source software is apparent here. If developers picked up on this, some form of followup or monitoring would have taken place.

Wednesday, April 15, 2015

Read DVD with Avidemux

Avidemux cannot directly open a DVD file. Instead a readable VOB file is needed to provide a format to access the DVD.

Operating system: MS Windows 7

Open a command prompt.

To create VOB for title 1, chapter 1, or in the DVD file its called VTS_01_0.vob, type

"E:\mplayer-svn-37386\mplayer.exe" dvd://1 -chapter 1 -dumpstream -dumpfile rippeddvd1_1.vob

To create VOB for title 2, or in the DVD file its called VTS_01_1.vob, type

"E:\mplayer-svn-37386\mplayer.exe" dvd://2 -dumpstream -dumpfile rippeddvd1_2.vob

To create VOB for chapter 2, or in the DVD file its called VTS_01_1.vob, type

"E:\mplayer-svn-37386\mplayer.exe" dvd://1 -chapter 2 -dumpstream -dumpfile rippeddvd1_2.vob

Alternatively if above still fails, use another application and convert the DVD to a readable format. E.g. Handbrake software.

Read www.avidemux.org for further details

Friday, March 20, 2015

PhpPgAdmin ERROR: column “spclocation” does not exist


The Installation of PostgreSQL and phpPgAdmin was great with the following;
phpPgAdmin 5.0.4-1.el6
Centos 6.3
PostgreSQL 9.4.1

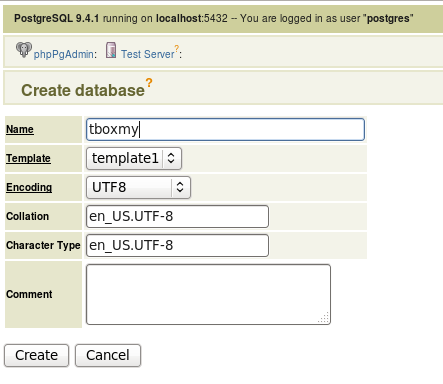
Attempt to create a new database using phpPgAdmin, the following error appears
ERROR: column “spclocation” does not exist

Possible cause;
Using outdated phpPgAdmin
and
There is no definition of the column spclocation for PostgreSQL version 9.4.

Solution:

Step 1: Edit Connection.php

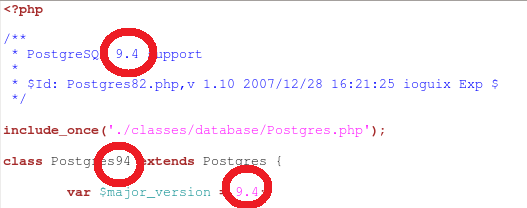
In Centos Linux, go to the folder /usr/share/phpPgAdmin/classes/database/ and notice that there are no Postgresql file for 9.4. Edit the file Connection.php. Add the case '9.4' line around line number 82, as shown below;

// Detect version and choose appropriate database driver
                switch (substr($version,0,3)) {
                        case '9.4': return 'Postgres94'; break;
                        case '8.4': return 'Postgres'; break;

Step 2: Edit files

Make a copy Postgres84.php file with the command below;
#cp Postgres84.php Postgres94.php

Open Postgres.php and copy the functions getTablespaces and getTablespace to the file Postgres94.php

Edit Postgres94.php;

Replace all references of version from 8.4 to 9.4. E.g.

Amend the 2 lines
$sql = "SELECT spcname, pg_catalog.pg_get_userbyid(spcowner) AS spcowner, spclocation,
to
$sql = "SELECT spcname, pg_catalog.pg_get_userbyid(spcowner) AS spcowner, pg_tablespace_location(oid) as spclocation,

and

$sql = "SELECT spcname, pg_catalog.pg_get_userbyid(spcowner) AS spcowner, spclocation,
to
$sql = "SELECT spcname, pg_catalog.pg_get_userbyid(spcowner) AS spcowner, pg_tablespace_location(oid) as spclocation,

Step 3: Create database

Open the web browser and access phpPgAdmin to create a new database.


Friday, March 13, 2015

Installation of Postgresql and phpPgAdmin

PostgreSQL is an object-relational database management system and can be downloaded from http://www.postgresql.org or via Linux packagers like Yum or through other 3rd party solutions. PgAdmin3 can be installed to manage the database.

It is available under PostgreSQL License, similar to the MIT license.

Today, a large number of PHP programming framework have support to use PostgreSQL.

PhpPgAdmin is a web based administration tool for PostgreSQL. Source and binary can be downloaded from http://phppgadmin.sourceforge.net

It is available under GNU General Public License.

Steps listed if for installation environment:
Centos 6.3
Selinux in permissive mode
Apache httpd version 2.2.15

Step 1:  Install PostgreSQL

Refer previous posting for the installation. PostgreSQL version 9.4 is available at this point and its safe to say that just replacing 9.3 with 9.4 will work. Here are list of the changes;

Yum repository

  • 32bits: http://yum.postgresql.org/9.4/redhat/rhel-6-i386/pgdg-centos94-9.4-1.noarch.rpm
  • 64bits: http://yum.postgresql.org/9.4/redhat/rhel-6-x86_64/pgdg-centos94-9.4-1.noarch.rpm

RPM packages: postgresql94-server postgresql94-contrib

Ensure TCPIP connection is setup, edit /var/lib/pgsql/9.4/data/postgresql.conf
listen_addresses = '*'
port = 5432

Important files:
Configure authentications: /var/lib/pgsql/9.4/data/pg_hba.conf
Configure server to accept TCPIP: /var/lib/pgsql/9.4/data/postgresql.conf


Starting and enabling at Linux bootup.
service postgresql-9.4 start
chkconfig postgresql-9.4 on

Step 2: Configure firewall

Its good to keep local firewall enabled. Edit at end of /etc/sysconfig/iptables

-A INPUT -m state --state NEW -m tcp -p tcp --dport 5432 -j ACCEPT
-A INPUT -m state --state NEW -m tcp -p tcp --dport 80 -j ACCEPT

Restart iptables.

Note: Although the Linux is in permissive, its good to enable web servers to access the database using the command;
setsebool -P httpd_can_network_connect_db 1

Step 3: Install phpPgAdmin

From the command line, type
yum install epel-release
yum install phpPgAdmin

Edit /etc/httpd/conf.d/phpPgAdmin.conf

Alias /phpPgAdmin /usr/share/phpPgAdmin


        # Apache 2.2
        Order deny,allow
        Allow from all


Then restart httpd.

Step 4: Configure phpPgAdmin

Lets use a server administration configuration called "Test Server" that we can practice with. Edit and/or add following server instance to /etc/phpPgAdmin/config.inc.php
Add
        $conf['servers'][1]['desc'] = 'Test Server';
        $conf['servers'][1]['host'] = 'localhost';
        $conf['servers'][1]['port'] = 5432;
        $conf['servers'][1]['sslmode'] = 'allow';
        $conf['servers'][1]['defaultdb'] = 'postgres';
        $conf['servers'][1]['pg_dump_path'] = '/usr/bin/pg_dump';
        $conf['servers'][1]['pg_dumpall_path'] = '/usr/bin/pg_dumpall';

Edit
        $conf['extra_login_security'] = false;
        $conf['owned_only'] = true;

Restart PostgreSQL.

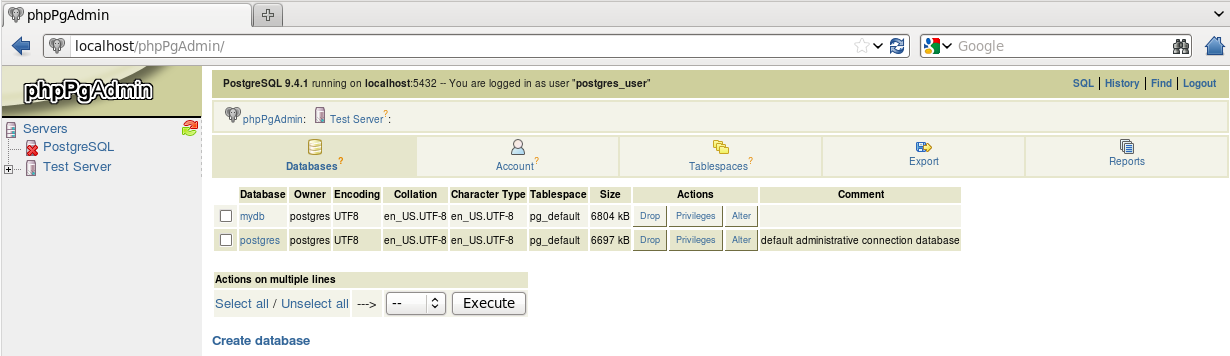
Open a web browser and type in the URL http://localhost/phpPgAdmin


Some important files that might be of use;

  • /usr/share/phpPgAdmin/conf/config.inc.php
  • /etc/httpd/conf.d/phpPgAdmin.conf
  • /etc/phpPgAdmin/config.inc.php


Notes:
  1. phpPgAdmin: If keep getting "Login failed", check the PostgreSQL server for problems. Most likely the pg_hba.conf isnt fully using md5.
  2. References on administration from PostgreSQL Documentation.

Thursday, February 12, 2015

What causes Mozilla Thunderbird to Freeze constantly?

The last 1 month after a re-installation of MS Windows 8 and Mozilla Thunderbird, some productivity have drop and temper going up. One of the reasons is due to Thunderbird 31.4 freezing constantly.

Thunderbird email client, have always been on my Linux and MS Windows PC for years. But somehow, something changed that caused a lot of difficulties for me to work with emails. It is not clear when this started but its about the time I re-installed the computer.


Thunderbird setup:

  1. Thunderbird updated to version 31.4.0
  2. Email profile uses IMAP with the SMTP server in the same local network. There are few folders apart from the standard INBOX, SENT, which is less than 12 folders. Check for new messages is set to every 10 minutes and at startup.
  3. Address book includes sync with Google contacts
  4. Calendar includes Lightning sync with Google calendars
  5. Local folder is contains standard folders, which is less than 5 folders.
  6. The Profile folder is in the onedrive folder

Symptoms;

  1. After login, every 1 to 10 minutes Thunderbird freezes rather randomly. This "freeze" last about 30 seconds to 3 minutes and its not predictable.
  2. After I stop onedrive sync, problem still persist.
  3. Disconnect network and problem still persist.
Findings (to some extend)
Its unfortunate that I could not exactly identify the problem but I found 2 steps taken that have made this "freeze" vanish. In rush to resolve the problem, I did both at the same time.
  1. Using the Windows Explorer, access the C:\users\username and right click "appdata" folder, click "Advanced". UNCHECK Allow files in this folder to have contents indexed in addition to file properties, click "OK". Click "Apply" and choose to include subfolders.
  2. Open McAfee Internet Security Suite, it the default antivirus on the computer. Click on Real-Time Scanning (status is ON). Click "Real-Time Scanning:", current status is again On. Click "Settings", UNCHECK Email attachments. CHECK Strike a balance between the scan throroughness and my PC's speed (Recommended). Go back to the antivirus main screen, and turn off the "Scheduled Scans:"
If you encounter the same problem, do test and see which works for you.

Monday, February 2, 2015

Install Android Studio on Microsoft Windows 8

Android SDK is used for the development of Android mobile application and it utilises Java Technology. There are a number of ways to develop Android application but using command line, notepad or IDE, they will all require the basic system requirements;

  1. Java development Kit (JDK)
  2. Android SDK Tools. Alternatively, the Android Studio can be installed which comes with all the required SDK.
Following are steps to prepare for Android development on MS Windows 8 64-bit.

Step 1: 

Read information provided at the Android developer site. Then read up installation at Java site. More materials on JDK 7 is at docs.oracle.com/javase/7/docs
Good point to note is that Oracle has declared that the year 2015 is the end of public updates for JDK 7.

Following steps are just additional guide in case you prefer not to read fully the official installation guides.

Step 2:

Download JDK and install. At the point of writing, JDK 7 (jdk-7u25-windows-x64.exe) is downloaded from Oracle. Uccess MS Windows with Administration right to install and double click to start installation. This will have the JDK installed at C:\Program Files\Java\jdk1.7.0_25 which also installs a public JRE at C:\Program Files\Java\jre7 directory.

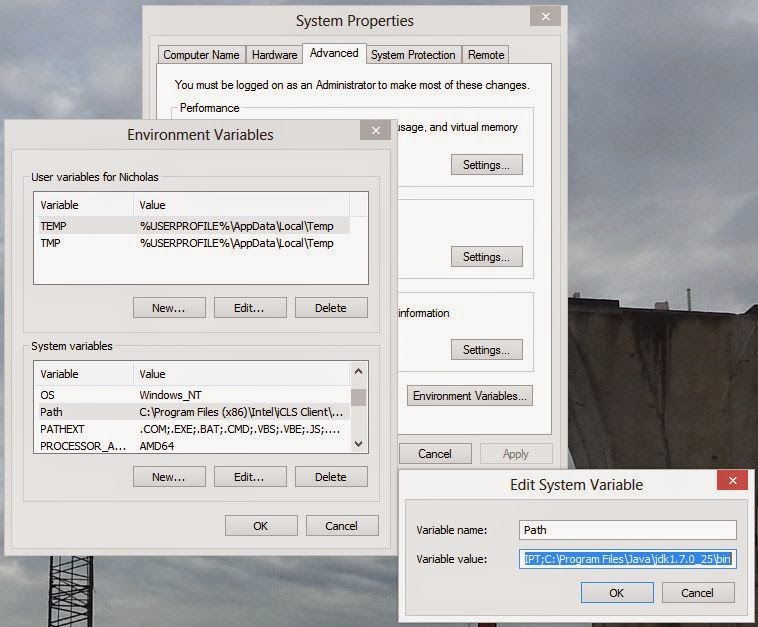
Click the Windows 8 search icon ->Settings, and type "Variable". Click on option to edit the system environment variables, then click "Environment variables", locate the system variables area, click the Variable "Path", then click "Edit". Append to the end of the "Variable value:"

;C:\Program Files\Java\jdk1.7.0_25\bin

Then click "OK".

Next, in  System variables, click "New..." and enter following values;
name: JAVA_HOME
value: C:\Program Files\Java\jdk1.7.0_25

Then click "OK" until all the window closes.

Step 3:

Download and install the Android studio bundle from developer.android.com. Double click and follow the installation instructions.

Note: this install at C:\Program Files\Android\Android Studio
and the SDK location: C:\Users\tboxmy\AppData\Local\Android\sdk

There is an option to manually install Android SDK Tools which is at revision 24.0.2. Ignore it.

Step 4:

Start Android Studio, start a new project and click
Tools-> Android-> SDK Manager.

It should recommend to install several basic packages to compile using the latest SDK (or Android). If you intend to compile for the Android 3.0 API, then check the box for "Android 3.0 (API 11)".

Click on the "Install ... packages..." button. Click on the accept license, then "Install".

Post Installation


  1. If your PC have the Intel Virtualization Technology feature, install Intel HAXM (see link) to speed up the Android Emulator. 
  2. Update the Android Studio (see My past post).
  3. Access the Android command line with ADB (see Debug Android App in Android Studio)


Post install notes:

These are just ramblings and just for personal reference.

As a minimum when setting up the Android SDK, download the latest tools and Android platform:

1. Open the Tools directory and select:
        Android SDK Tools
        Android SDK Platform-tools
        Android SDK Build-tools (highest version)
2. Open the first Android X.X folder (the latest version) and select:
        SDK Platform
        A system image for the emulator, such as
        ARM EABI v7a System Image


Finally

Proceed to create the first application from https://developer.android.com/training/basics/firstapp/index.html

Ref https://developer.android.com/sdk/installing/adding-packages.html


Howto Update to Android Studio 1.1

The Android Studio 1.1 Preview 2 is released to address bug fixes. Many new Android developers will benefit lots from the bug fixes and will have better experience on Android development with this powerful IDE.

Look for details on the update at android.com. One nice feature is having the AVD Manager on a separate window. This is great for multi display set ups.


Thursday, January 8, 2015

Android: Calling Toast in Fragment class


A quick way to pop up messages within Android application is to use the Toast class. This doesn't require users to click any button for it to go away and helps in debugging Android interaction. The class reference can be found at developers.android.com. An introduction to use of Toast can be found at developer.android.com. It shows the basics of Toast and how to position it.

Syntax for the Toast is straight forward as the static function makeText is used. Syntax:

makeText(Context context, int resId, int duration)
and
makeText(Context context, CharSequence text, int duration)


Both gets the Context as the 1st param where this is commonly called via  the getApplicationContext() function from the Activity class. This is common in examples to use the ListView, e.g. Vogella.

Following error is given if this function is used outside of an Activity class;

can't resolve method getApplicationContext()

Sometimes, a piece of the user interface is separated from the Activity into smaller chunk called the Fragment class. For example, getting the Toast to pop up messages in the class that extends Fragment class involves getting the Activity context to be used in the Toast 1st param. Use the function getActivity( ) in Fragment class instead of getApplicationContext( ) function in Activity class.

In the example below, the Toast will contain message from text retrieved in the ListView.

ListView lv = (ListView) rootView.findViewById(R.id.listview_attendance);
        lv.setAdapter(mAttendanceAdapter);
        lv.setOnItemClickListener(new AdapterView.OnItemClickListener() {
            @Override
            public void onItemClick(AdapterView parent, View view, int position, long id) {
                int duration = Toast.LENGTH_SHORT;
                String text = (String)parent.getItemAtPosition(position);

                Toast toast = Toast.makeText(getActivity(), text, duration);
                toast.show();

            }
        });


---
Project build: minSdkVersion 10

Monday, December 22, 2014

Debug Android App in Android Studio

In MS Windows, Android Studio provides debugging options in its IDE.

For some who prefer to use the command line, there is the command adb to call debugging. Example

adb logcat

But if you get an error that is similar to;

'adb' is not recognized as an internal or external command, operable program or batch file.

Then, the adb path must be made known. Here are notes for MS Windows 8, with Android Studio version 1.0.1

Step 1: Copy the path for the Android Platform-Tools.

This is by default 
C:\Users\[YOUR USERNAME]\AppData\Local\Android\sdk\platform-tools

Replace [YOUR USERNAME] with the username in use by your system. This means that the computer lab should have done this, otherwise "Administration" rights is needed.

Step 2: Edit the MS Windows, System Environment's Path variable

Open the Windows Environment Variables in System Properties. Add (or Edit) to the end of Path variable in "System variables" with the value in step 1 above. Close all the boxes and restart the MS Windows all "cmd" terminal.

Step 3: Test

Unplug the Android device OR turnoff the emulator. In the Android Studio's command prompt OR in MS Windows cmd prompt type 2 commands to test;

> adb version 
Android Debug Bridge version 1.0.32
> adb logcat
- waiting for device -

Quick Guide to Using ADB 

Following are basic commands to use the debugger from a terminal. Firstly, plugin a device (or start up an Android emulator). The ">" below is a prompt to enter commands from the command line.

List available emulator or devices
> adb devices
List of devices attached
4df7a2af25be30c1        device

In the above example, "4df7a2af25be30c1" is the attached mobile Android device.

Access the emulator or device shell
> adb shell
or a specific device
> adb -s 4df7a2af25be30c1 shell

From here, you can issue commands within the device. Press Ctrl - D to exit.
One commonly used command is logcat to display logging info of the application. Code learn provides some basic tips.

Display memory usage by application
> adb -s 4df7a2af25be30c1 shell dumpsys meminfo

or by a specific application

> adb -s 4df7a2af25be30c1 shell dumpsys meminfo  com.example.tboxmy.helloworld

Tuesday, December 16, 2014

Howto Linux Pretty Prompts

The linux terminal provides many useful functions to improve productivity and looks. Just imagine always having to access many remote Linux servers or creating sub shells and then forgetting which server or shell are you keying in the commands.

In the Bash shell, there as a programmable prompt (so to speak). It uses the variable named PS1 and PS2. For a beginner, its good to know how to modify the prompt displayed, change its colours and applying it to a single user or as default for all. Bash 4.2 added support for unicode which means way more fonts are available to make pretty prompts.


Basics

A simple assignment of the prompt is as follows;

export PS1='Demo$ '

The space after the '$' is commonly used to make typing more readable.

The prompt can be assigned with the Bash shell special characters. Some are visible and other not. Following list some of these characters;
\d     the date  in  "Weekday  Month  Date"  format (e.g., "Tue May 26")
\e     an ASCII escape character (033)
\h     the hostname up to the first '.'
\H    the hostname
\t      the current time in 24-hour HH:MM:SS format
\T     the current time in 12-hour HH:MM:SS format
\@     the current time in 12-hour am/pm format
\w     the current working directory
\W     the basename of current working directory


Example 1: Common prompt lets user know their login user name, server host name and working directory.
export PS1='[\u@\h \W]\$'

Example 2: Display time the prompt was executed.
export PS1='\t:\w$ '

Example 3: A two line prompt which documents the last history number.
export PS1='=\d \u@\h \!=\n\t $ '


Colours

The prompt supports colours as defined by ANSI (see linuxhowtos.org). This is in the format to display colours;

 \[\ecolourcode\]

Example of ANSI colours
Black      0;30m       Dark Gray    1;30m
Red        0;31m       Bold Red     1;31m
Green      0;32m       Bold Green   1;32m
Yellow     0;33m       Bold Yellow  1;33m
Blue       0;34m       Bold Blue    1;34m
Purple     0;35m       Bold Purple  1;35m
Cyan       0;36m       Bold Cyan    1;36m
Light Gray 0;37m       White        1;37m


The first digit 0=normal, 1=bold, 4=underline and each code ends with the letter 'm'. At end of prompt, return to the default colour, with \[\e[m\]


Colour 40m onwards can be used to highlight the background.

Example 1: Prompt is in blue and user types in blue.
export PS1='[\[\e[0;34m\]\u@\h \W]\$ '

Example 2:Prompt is in blue and user types using default font colours.
export PS1='[\[\e[0;34m\]\u@\h \W]\$\[\e[m\] '

Example 3: Highlight text in prompt
export PS1='\[\e[1;34m\]\u\[\e[1;33m\]@\[\e[1;32m\]\h\[\e[1;37m\]:\[\e[1;31m\]\w \[\e[1;36m\]\$ \[\e[m\]'


Example 4: Blue background with red text.
export PS1='\[\e[44m\]\[\e[1;31m\][\u@\h \W]\$\[\e[m\] '

Saving changes

This PS1 value can be set in /etc/bashrc to be used by all users. Each user can change their prompt by editing the file ~/.bashrc with this PS1 or PS2 assignment.

Example: ~/.bashrc file
# .bashrc
# Source global definitions
if [ -f /etc/bashrc ]; then
    . /etc/bashrc
fi

# User specific aliases and functions

export PS1='[\[\e[0;34m\]\u@\h \W]\$\[\e[m\] '


Advanced prompt


To run a command before the bash prompt is displayed, use PROMPT_COMMAND. This supports many more flexible formatting of values for advance Linux administrators.

Example:
PROMPT_COMMAND='printf "\033]0;%s@%s:%s\007" "${USER}" "${HOSTNAME%%.*}" "${PWD/#$HOME/~}" ' \
export PS1='[\[\e[0;34m\]\u@\h \W]\$\[\e[m\] '

Example 2: Charles Torvalds Basic Power Prompt
PROMPT_COMMAND='history -a;echo -en "\033[m\033[38;5;2m"$(( `sed -n "s/MemFree:[\t ]\+\([0-9]\+\) kB/\1/p" /proc/meminfo`/1024))"\033[38;5;22m/"$((`sed -n "s/MemTotal:[\t ]\+\([0-9]\+\) kB/\1/Ip" /proc/meminfo`/1024 ))MB"\t\033[m\033[38;5;55m$(< /proc/loadavg)\033[m"' \
PS1='\[\e[m\n\e[1;30m\][$$:$PPID \j:\!\[\e[1;30m\]]\[\e[0;36m\] \T \d \[\e[1;30m\][\[\e[1;34m\]\u@\H\[\e[1;30m\]:\[\e[0;37m\]${SSH_TTY} \[\e[0;32m\]+${SHLVL}\[\e[1;30m\]] \[\e[1;37m\]\w\[\e[0;37m\] \n($SHLVL:\!)\$ '


Unicode

If you have Bash 4.2 onwards, then unicode characters can be added. First find a UTF 8 bit unicode you like from UTF8 or unicodelookup. Bash provide good number of symbols but does not map to 100% of the unicodes.

Ramblings...In UTF-8 unicode for U+2620, Hex is 2620 in Octal is 023040, in Decimal is 9760 and HTML is &#9760.

Example 1: Display skull and bones U+2620 or UTF-8 for URI encoding is E2 98 A0. The Octal equivalent is 342 230 240.
export PS1='[\u@\h \W]\342\230\240 '

Example 2: Display helm symbol U+2388 (See unicode) which is UTF-8 for URI encoding e2 8e 88
export PS1='[\u@\h \W]\342\216\210 '


Example 3: Multi line prompt
export PS1='\342\214\210\d \t \W\342\214\211\n\342\216\210 '

Done.

Blog Archive