I am running a Joomla training this week. One of the main items is getting the password assignment for root and database user. As a reference here is to resetting root password and assigning user to have full access to a database.
Reset root password
Step 1: Restart the MySQL server without using the user restrictions and access to the network.
#/etc/init.d/mysql stop
#mysqld --skip-grant-tables --skip-networking&
Step 2: Open another terminal and reset your password
# mysql mysql -u root
mysql> UPDATE user SET password=PASSWORD('NewPassword') WHERE user="root";
mysql> FLUSH PRIVILEGES;
# /etc/init.d/mysql restart
Assigning user access to database
Step 1: Login a root to mysql
Step 2: Assign the user joe to use from localhost the database somedatabase.
mysql> GRANT ALL privileges ON somedatabse.* TO joe@localhost IDENTIFIED BY 'SomePassword';
mysql> FLUSH PRIVILEGES;
Monday, May 25, 2009
Friday, May 22, 2009
Backup Thunderbird2
Just after installing the Kubuntu Jaunty 9.04 Linux, its time to restore some of my stuff. Firstly, I need communications and this is via my Thunderbird.
Backup:
I found it necessary to disable some of the extensions to allow the new Thunderbird to run properly.
Copy the Thunderbird directory profile (usually it goes with some crazy name followed by your profile name to the backup device. Example
cp ~/.mozilla-thunderbird/izwvasdx.default /media/backupdisk
Restore:
Step 1:
Copy the directory profile back to the new system
Step 2:
In the terminal create an email profile that uses the old directory, type
thunderbird -profilemanager
Ref: Mozilla
Wednesday, May 20, 2009
Install Moodle on CentOS 5
Following are steps to install Moodle 1.9 on CentOS 5.
Step 1
Install mysql-server-5.0.45, mysql-5.0.45 and php-5.1.6
Install other PHP library php-mbstring-5.1.6, php-xmlrpc-5.1.6
Step 2
Add the user name "user1" and database "mymoodle" to MySQL with the correct privilege.
Step 3
Download the moodle and extract to /var/www/html/moodle
Create and assign the permission of the webserver to the data directory at /var/www/moodledata
Step 4
In a start the moodle installation via web browser, use the location
http://localhost/moodle
Copy the script into a file named config.php within the root directory of Moodle.
Follow the rest of the instruction to complete.
Step 5
Install lynx to activate the cron. Edit the crontab to run every 30 minutes.
$ crontab -e
*/30 * * * * wget -q -O /dev/null http://localhost/moodle/admin/cron.php
See http://docs.moodle.org/en/Installing_Moodle
http://docs.moodle.org/en/Administration_FAQ
Tuesday, May 19, 2009

Friday, May 8, 2009
[Jaunty] Adding mp3 into OpenOffice.org Impress presentations
One of the popular format for music is the MP3 where a form of lossy compression algorithm is used. A typical music CDROM would hold only a few songs but when saved as MP3, almost a hundred music and song can be saved on a single CDROM. MP3 allows a smaller sized file that still provided an acceptable quality in audio.
On Kubuntu 9.04 with OpenOffice.org (OOo) 3.0.1, adding of the MP3 to play audio during a presentation is simple. Default audio support is on MIDI, AIF, AU and WAV format. The Linux system needs to have gstreamer from fluendo installed for OOo to play MP3s. So this is to all my friends who is trying to get their presentation done with audio and still hanging on to OOo, here are the steps.
Step 1: This is a one time step.
Open a terminal and with an internet connection, type
$ sudo apt-get install gstreamer0.10-fluendo-mp3
Step 2:
Open the Impress presentation and choose the slide where you want to start the audio. Select the "Slide transition" tab.
Step 3:
In the Modify transition section, choose Sound and select "Other Sound..." then choose the file containing the desired music. In this case, it should be a working MP3. And check the option for "Loop until next sound".
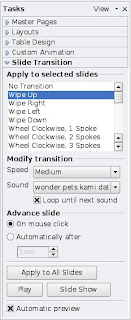
Warning: Do not click the button "Apply to All Slides", as this will force the MP3 to restart after each slide. Volume is controlled by the PC speakers or you could remake the audio.
On Kubuntu 9.04 with OpenOffice.org (OOo) 3.0.1, adding of the MP3 to play audio during a presentation is simple. Default audio support is on MIDI, AIF, AU and WAV format. The Linux system needs to have gstreamer from fluendo installed for OOo to play MP3s. So this is to all my friends who is trying to get their presentation done with audio and still hanging on to OOo, here are the steps.
Step 1: This is a one time step.
Open a terminal and with an internet connection, type
$ sudo apt-get install gstreamer0.10-fluendo-mp3
Step 2:
Open the Impress presentation and choose the slide where you want to start the audio. Select the "Slide transition" tab.
Step 3:
In the Modify transition section, choose Sound and select "Other Sound..." then choose the file containing the desired music. In this case, it should be a working MP3. And check the option for "Loop until next sound".
Warning: Do not click the button "Apply to All Slides", as this will force the MP3 to restart after each slide. Volume is controlled by the PC speakers or you could remake the audio.
Sunday, May 3, 2009
[Jaunty]Installing scanning and photo editing tools on Kubuntu 9.04
In a fresh install of Kubuntu Jaunty 9.04, the next best thing to do is try out its scanning and photo editing capabilities.
$ sudo apt-get install gimp gimp2.0-quiteinsane gimp-gutenprint gimp-data-extras
This install GIMP the popular photo editor and the SANE tools for scanning.
$ sudo apt-get install gimp gimp2.0-quiteinsane gimp-gutenprint gimp-data-extras
This install GIMP the popular photo editor and the SANE tools for scanning.
[Jaunty]Adding the VLC video player
Kubuntu Linux 9.04 supports the VLC video player very well. In a fresh install, open the terminal and type
$ sudo apt-get install vlc videolan-doc mozilla-plugin-vlc vlc-plugin-sdl libvcdinfo0
$ sudo apt-get install vlc videolan-doc mozilla-plugin-vlc vlc-plugin-sdl libvcdinfo0
[Jaunty]Installing Thunderbird 2 on Kubuntu Linux 9.04
Just after installing Kubuntu Linux 9.04 and all seems well, the email client is the next stop.
Install Thunderbird 2.0 from a terminal
$ sudo apt-get install thunderbird thunderbird-dispmua mozilla-thunderbird-bidiui lightning-extension enigmail
The installation included the following packages:
calendar-google-provider calendar-timezones
Install Thunderbird 2.0 from a terminal
$ sudo apt-get install thunderbird thunderbird-dispmua mozilla-thunderbird-bidiui lightning-extension enigmail
The installation included the following packages:
calendar-google-provider calendar-timezones
Saturday, May 2, 2009
First look at Kubuntu 9.04 Jaunty
I have just completed a number of fresh install of Kubuntu Jaunty 9.04 Linux on a
Lenovo R60 (9459BF8) 32 bits
CPU T5600 @ 1.83GHz
L1 64KiB
L2 Cache 1984KiB
RAM 1Gb
Here are some quick comments:
The KMenu
This is the KDE Start Menu. One of its main menu options is the Favourites. This contain the Konqueror, Kontact, System Settings, Dolphin, Kopete and Amarok menu. Users should add frequently used programs here.
Desktop
There is a desktop that takes only a small place on dashboard. There are Plasmoid widgets that can be added to the dashboard to increase user experience. to view only the Dashboard, press Ctrl+F12 (or press the Show Dashboard Applet in thebottom panel) to dim all applications and view only the widgets and Desktop.
Workspace
Default Kubuntu had only 2 workspace and no keyboard shortcut to switch betweenmany workspaces. I can only return to 1st workspace with Ctrl+F1.
1. Right click Pager applet (in the bottom panel) and choose "Configure Desktop", increase to 4 workspace.
Screen
The screen is sharp and nice, which is why I have always choosen KDE when Looks matter.
Quick look at accessing applications
Web browser: Konqueror 4.2.2
Office: OpenOffice.org 3.0.1
Print screen: Ksnapshot 0.8.1 (The PrtSc button problem have been fixed)
Terminal: Konsole 2.2.2
System process: (Ctrl + Esc)
Software installer: KPackageKit
Desktop: KDE 4.2.2 (Ctrl + F12) One cool and futuristic desktop for all.
Compression tool: Ark 2.12 (Integrated well with Dolphin)
Others:
Post installation recommendations
At the terminal run
$ sudo apt-get install flashplugin-installer msttcorefonts
Open Konqueror, when it ask to install the Flash plugin this will now be successful.
$ sudo apt-get install kubuntu-restricted-extras
This will add JRE, mp3, mpeg, odbc, unrar and other useful support.
$ sudo apt-get install tpb
This will allow the Thinkpad special keys to be available. To install this package, the following package is removed:
hotkey-setup
$ sudo apt-get install gdecrypt password-gorilla
This allows the disk to be encrypted and manage passwords.
$ sudo apt-get install wine wine-gecko
This will allow installation of standard MS Windows based applications.
$ sudo apt-get install ssh sshfs ksshaskpass kdessh
Allow secure SSH connection to and from SSH servers.
Conclusion
Jaunty is a great Linux distro, but those who cannot accept the KDE4 changes should continue with Gnome on Ubuntu Linux.
Lenovo R60 (9459BF8) 32 bits
CPU T5600 @ 1.83GHz
L1 64KiB
L2 Cache 1984KiB
RAM 1Gb
Here are some quick comments:
The KMenu
This is the KDE Start Menu. One of its main menu options is the Favourites. This contain the Konqueror, Kontact, System Settings, Dolphin, Kopete and Amarok menu. Users should add frequently used programs here.
Desktop
There is a desktop that takes only a small place on dashboard. There are Plasmoid widgets that can be added to the dashboard to increase user experience. to view only the Dashboard, press Ctrl+F12 (or press the Show Dashboard Applet in thebottom panel) to dim all applications and view only the widgets and Desktop.
Workspace
Default Kubuntu had only 2 workspace and no keyboard shortcut to switch betweenmany workspaces. I can only return to 1st workspace with Ctrl+F1.
1. Right click Pager applet (in the bottom panel) and choose "Configure Desktop", increase to 4 workspace.
Screen
The screen is sharp and nice, which is why I have always choosen KDE when Looks matter.
Quick look at accessing applications
Web browser: Konqueror 4.2.2
Office: OpenOffice.org 3.0.1
Print screen: Ksnapshot 0.8.1 (The PrtSc button problem have been fixed)
Terminal: Konsole 2.2.2
System process: (Ctrl + Esc)
Software installer: KPackageKit
Desktop: KDE 4.2.2 (Ctrl + F12) One cool and futuristic desktop for all.
Compression tool: Ark 2.12 (Integrated well with Dolphin)
Others:
- Initially I could not login to my home wireless network. Had to manually use the iwconfig, it could load automatically there onwards. So, if you have the same problem, open a terminal and type the following to detect your wireless network (e.g. mywireless)
$ sudo iwlist wlan0 scanning essid looney - I could resize the KPanel to a smaller size easily.
- First site I went with Konqueror was the blogspot.com and all looks good. Only problem is that the default menus during editing of post did not allow me to change the fonts. Only option allowed was spelling, Add image and Preview. A pop-up appeared with the need to install Shockwave Flash plugin but it keeps failing to install. See below for the resolution.
- Konqueror did not refresh properly when used as a web browser.
- The Amarok did not have any sound when playing an mp3. The midi file was not supported at all.
- The add/remove software manager did not seem to function. I cant get a list of software and it kept crashing. I needed to choose "Software Updates" ->Refresh. First thing I did is to install Kubuntu-restricted-extras package.
Post installation recommendations
At the terminal run
$ sudo apt-get install flashplugin-installer msttcorefonts
Open Konqueror, when it ask to install the Flash plugin this will now be successful.
$ sudo apt-get install kubuntu-restricted-extras
This will add JRE, mp3, mpeg, odbc, unrar and other useful support.
$ sudo apt-get install tpb
This will allow the Thinkpad special keys to be available. To install this package, the following package is removed:
hotkey-setup
$ sudo apt-get install gdecrypt password-gorilla
This allows the disk to be encrypted and manage passwords.
$ sudo apt-get install wine wine-gecko
This will allow installation of standard MS Windows based applications.
$ sudo apt-get install ssh sshfs ksshaskpass kdessh
Allow secure SSH connection to and from SSH servers.
Conclusion
Jaunty is a great Linux distro, but those who cannot accept the KDE4 changes should continue with Gnome on Ubuntu Linux.
Subscribe to:
Posts (Atom)