Friday, December 1, 2023

Manage services on Centos Linux

On Centos Linux (in this case version 8), the command systemctl allows administration of services on Linux. The version of systemctl in use is displayed with command

systemctl --version

systemd 239 (239-58.el8)

+PAM +AUDIT +SELINUX +IMA -APPARMOR +SMACK +SYSVINIT +UTMP +LIBCRYPTSETUP +GCRYPT +GNUTLS +ACL +XZ +LZ4 +SECCOMP +BLKID +ELFUTILS +KMOD +IDN2 -IDN +PCRE2 default-hierarchy=legacy


Check status of services

systemctl status httpd

systemctl status containerd

systemctl status kubelet

systemctl list-unit-files


Background services is list with

systemctl list-jobs


View service information

systemctl show httpd

systemctl show containerd


Start and stop a service

systemctl start httpd

systemctl stop httpd


On some services, there is the command to restart or reload. Reload, reads the updated configuration for a service without stopping the service.

systemctl start httpd

systemctl reload httpd


Boot target

On linux, the run levels describe what the server should do after a startup. Where runlevel and the numeric equivalent of target. Here is a list of runlevel and in brackets are the systemctl commands for it.

Runlevel 0 - poweroff.target (systemctl isolate poweroff.target)
Runlevel 1 - rescue.target  (systemctl isolate rescue.target)
Runlevel 2 - text based multi-user.target without network  (systemctl isolate runlevel2.target)
Runlevel 3 - text based multi-user.target with network  (systemctl isolate runlevel3.target)
Runlevel 5 - graphical graphical.target  (systemctl isolate graphical.target)
Runlevel 6 - reboot.target (systemctl isolate reboot.target)

Default boot target is set by /etc/systemd/system/default.target and can be easily viewed with the command 'ls'.

Or the command systemctl get-default
multi-user.target

View available targets
systemctl list-units --type target --all

To change a default boot target,
systemctl set-default multi-user.target

Troubleshooting

List dependencies of the service

systemctl list-dependencies httpd


Unit files are list as

systemctl list-unit files


When a service is mask, it cannot be started until it is unmask. This can be done with

systemctl unmask httpd


Wednesday, October 18, 2023

Configure L5 Swagger and documention for GET and POST

Here, I will describe usage of Swagger, list the L5 Swagger basic configurations, provide templates to document POST and GET API (Application Programming Interface).

What does L5 Swagger provide?

For PHP developers, here in particular those using Laravel framework, L5 Swagger provide the means to document your API and have it presented in the form of a web page for quick browsing of available APIs and testing its results.

Currently here are good to know facts

  1. Its is developed as a wrapper on swagger-php and swagger-api specifically for Laravel framework.
  2. It supports OpenAPI (formerly known as Swagger), a specification for documentation of RESTful API irrespective of technology, like PHP, Java or .Net.
  3. L5-Swagger currently supports OpenAPI version 3.0 and 3.1. Its project page is https://github.com/DarkaOnLine/L5-Swagger
  4. It supports at least PHP version 7.2. PHP 8.1 introduces the use of attributes.
  5. An online swagger editor is available at swagger.io
My example hinges on PHP 7.4 with darkaonline/l5-swagger version 8.5.1. Will just dump example of code and configurations here. Details will be explained at another time. Good luck.

Quick notes to setup of Swagger in a ready Laravel version 7 or 10 project;

composer require "darkaonline/l5-swagger"
php artisan vendor:publish --provider "L5Swagger\L5SwaggerServiceProvider"
php artisan l5-swagger:generate

Customisation can be done by editing config/swagger.php, which can be continued in future articles.

Security

Security options are;
  • None - no security is set to access API
  • Basic Auth - Username and password is set for each request
  • API Key - A key is set for each request
  • OATH - An authorisation scheme for each request

Example 1 - API to login

Request 

Headers:
App-Key: SOmeVeryLongKey

Body form-data:
username: example@some.email.example
password: password

API returns with HTTP code 200

{
    "user_id": 4142,
    "token": "173892|HxOQJBfDgDgDgaqgCpSS1rh7UY7HWdurtanHhq7"
}

API returns with HTTP code 400

{
    "message": "These credentials do not match our records."
}

Example 2 - API to retrieve user profile

Request 

Headers:
App-Key: SOmeVeryLongKey

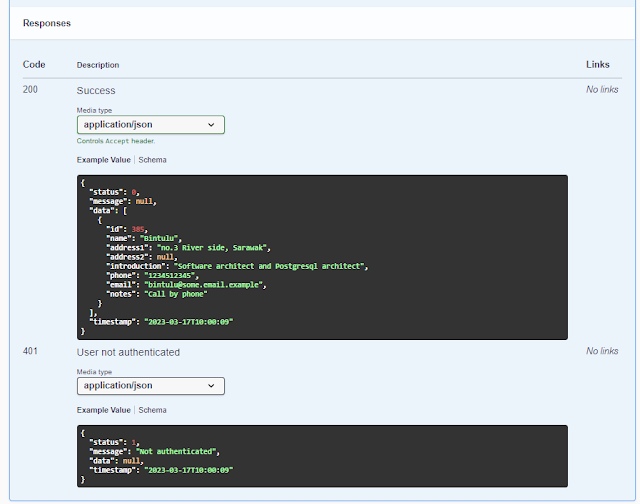
API returns with HTTP code 200

{
  "status": 0,
  "message": null,
  "data": [
    {
      "id": 385,
      "name": "Bintulu",
      "address1": "no.3 River side, Sarawak",
      "address2": null,
      "introduction": "Software architect and Postgresql architect",
      "phone": "1234512345",
      "email": "bintulu@some.email.example",
      "notes": "Call by phone"
    }
  ],
  "timestamp": "2023-03-17T10:00:09"
}

Swagger documentation

Swagger group for Login

Swagger group for login


Swagger for login

Added example to submit with multi/form-data (which is not necessary for login)


Swagger for user profile

Swagger user profile

Swagger user profile


The Code

Our example api.php and UserController.php

routes/api.php

Route::post('/login', 'API\UserController@login');
Route::get('/user/profile', 'API\UserController@login');

Function login in app/Http/Controllers/API/UserController.php

    /**
     * @OA\Post(
     *     path="/api/login",
     *      tags={"Login"},
     *      security={{"appkey":{}}},
     *      @OA\RequestBody( required=true, description="Login",
     *           @OA\MediaType(
     *             mediaType="multipart/form-data",
     *             @OA\Schema(
     *                 required={"username","password"},
     *                 @OA\Property(
     *                     property="username",
     *                     type="string",
     *                     description="user login id of type email"
     *                 ),
     *                 @OA\Property(
     *                     property="password",
     *                     type="password"
     *
     *                ),
     *             ),
     *          ),
     *
     *     ),
     *     @OA\Response(response="200", description="An example endpoint",
     *          @OA\JsonContent(
     *               @OA\Property(property="id", type="number", example="1957"),
     *               @OA\Property(property="token", type="string", example="173892|HxOQJBfDgDgDgaqgCpSS1rh7UY7HWdurtanHhq7"),
     *          ),
     *     ),
     *     @OA\Response(response="400", description="The id or password incorrect.",
     *           @OA\JsonContent(
     *               @OA\Property(property="message", type="string", example="These credentials do not match our records."),
     *           ),
     *     ),
     * )
     */

Function getUserProfile in app/Http/Controllers/API/UserController.php
    /**
     * @OA\Get(
     *     path="/api/user/profile",
     *     tags={"Login"},
     *     summary="Retrieve user profile",
     *     description="Retrieve user profile based on user auth detected. No parameters are required",
     *     operationId="getUserProfile",
     *     security={{"bearer_token":{}}},
     *      @OA\Parameter(
     *         name="App-Key",
     *         in="header",
     *         description="App-Key",
     *         example=L5_SWAGGER_APPKEY
     *      ),
     *
     *     @OA\Response(response=401, description="User not authenticated",
     *           @OA\JsonContent(
     *               @OA\Property(property="status", type="number", example="1"),
     *               @OA\Property(property="message", type="string", example="Not authenticated"),
     *               @OA\Property(property="data", type="string", example=null),
     *               @OA\Property(property="timestamp", type="string", example="2023-03-17T10:00:09"),
     *           ),
     *     ),
     *       @OA\Response(
     *         response=200,
     *         description="Success",
     *         @OA\JsonContent(
     *           @OA\Property(property="status", type="number"),
     *           @OA\Property(property="message", type="string", example=null),
     *           @OA\Property(property="data", type="array",
     *               @OA\Items(
     *                  @OA\Property(property="id", type="number", example=385),
     *                  @OA\Property(property="name", type="string", example="Bintulu"),
     *                  @OA\Property(property="address1", type="string", example="no.3 River side, Sarawak"),
     *                  @OA\Property(property="address2", type="string", example=null),
     *                  @OA\Property(property="introduction", type="string", example="Software architect and Postgresql architect"),
     *                  @OA\Property(property="phone", type="string", example="1234512345"),
     *                  @OA\Property(property="email", type="string", example="bintulu@some.email.example"),
     *                  @OA\Property(property="notes", type="string", example="Call by phone"),
     *              ),
     *           ),
     *           @OA\Property(property="timestamp", type="string", example="2023-03-17T10:00:09"),
     *         ),
     *       ),
     *  ),
     */


Tuesday, October 17, 2023

Laravel Helper class

Programming is made more systematic with a large number of helper classes in Laravel. Examples are the Arr::last, Arr::add, Arr::get, asset, route, secure_url, url, dd, collect, env)

Lots of documentations are available at Laravel (see Laravel 7). 

Example of usage

Helper url( )

Returns a fully qualified URL

$url = url('user/profile');

Creating your first helper class

The following illustrates a function named "courier" that will be available to all controllers. It typically returns data in a predefined format.

Step 1: Create a helper file in app/Helpers with the name myHelpers.php


/app/Helpers/myHelpers.php

Step 2: Create the function in the file myHelpers.php


<?php
use Carbon\Carbon;

if (! function_exists('courier')) {
function courier($status, $message, $data){
$now = carbon::now();
$status = $status??0;
$package = [
'status'=>$status,
'message'=>$message,
'data'=>$data,
'timestamp'=>$now,
];
return $package;
}
}

Step 3: Edit [autoload] in composer.json


"autoload": {
        "files": [
            "app/Helpers/myHelpers.php",
        ],

Step 4: Reload Laravel


composer dump-autoload

Usage of "courier" helper 

In any of the function in Controller classes, call the helper function. Example

public function getUsers( ){
$users = User::where('status','active')->get();
$status=0; // success
$message=null;
if(count($users)>0){
$status=1; // success but not users available
$message="None";
}
return response(courier($status, $message, $users), 200);
}


Thursday, October 12, 2023

Laravel 10 - User API authentication with Sanctum

Laravel 10 and User API authentication with sanctum

Laravel 10 is available to create restful API where it provides (1)process to issue API tokens to users AND (2)authentication of single page applications(SPA).

This tutorial requirements of system;

  • laravel/sanctum version 3.3.1
  • PHP version 8.2.11
  • Node version 18.12.1
  • Composer version 2.6.3
  • Npm version 8.19.2
  • PostgreSQL database version 15

Laravel application is successfully installed will all recommended PHP extensions.

Create the database and assign user hello assign to that database, which I name as demo. Use hello, or any other user you have created in the database.


create database demo;
grant all privileges on database demo to hello;
ALTER DATABASE demo OWNER TO hello;


Lets create the Laravel application and add sanctum support


composer create-project laravel/laravel demo
cd demo


Configure the .env file to access the database that was declared as demo.


DB_CONNECTION=pgsql
DB_HOST=127.0.0.1
DB_PORT=5432
DB_DATABASE=demo
DB_USERNAME=hello
DB_PASSWORD=

composer require laravel/sanctum
php artisan vendor:publish --provider="Laravel\Sanctum\SanctumServiceProvider"


Identify and inspect the following folders and files;


config/sanctum.php
database/migrations/2019_12_14_000001_create_personal_access_tokens_table.php


Create database for Sanctum and enable Sanctum


php artisan migrate


Edit app/Http/Kernel.php


'api' => [
    \Laravel\Sanctum\Http\Middleware\EnsureFrontendRequestsAreStateful::class,
    'throttle:api',
    \Illuminate\Routing\Middleware\SubstituteBindings::class,
],


Configure sanctum by editing model, service provider and auth config. Edit app/Models/User.php


use Laravel\Sanctum\HasApiTokens;
...
use HasApiTokens;


Add API to register and login


Edit routes/api.php


Route::controller(RegisterController::class)->group(function(){
    Route::post('register', 'register');
    Route::post('login', 'login');
});


php artisan make:controller BaseController
php artisan make:controller RegisterController


Edit RegisterController 


use App\Http\Controllers\BaseController as BaseController;
use App\Models\User;
use Illuminate\Support\Facades\Auth;
use Validator;
use Illuminate\Http\JsonResponse;


public function register(Request $request): JsonResponse
    {
        $validator = Validator::make($request->all(), [
            'name' => 'required',
            'email' => 'required|email',
            'password' => 'required',
            'c_password' => 'required|same:password',
        ]);
   
        if($validator->fails()){
            return $this->sendError('Validation Error.', $validator->errors());       
        }
   
        $input = $request->all();
        $input['password'] = bcrypt($input['password']);
        $user = User::create($input);
        $success['token'] =  $user->createToken('MyApp')->plainTextToken;
        $success['name'] =  $user->name;
   
        return $this->sendResponse($success, 'User register successfully.');
    }
   
    /**
     * Login api
     *
     * @return \Illuminate\Http\Response
     */
    public function login(Request $request): JsonResponse
    {
        if(Auth::attempt(['email' => $request->email, 'password' => $request->password])){ 
            $user = Auth::user(); 
            $success['token'] =  $user->createToken('MyApp')->plainTextToken; 
            $success['name'] =  $user->name;
   
            return $this->sendResponse($success, 'User login successfully.');
        } 
        else{ 
            return $this->sendError('Unauthorised.', ['error'=>'Unauthorised']);
        } 
    }


Retrieve the registration api 


{
    "success": true,
    "data": {
        "token": "1|R8qfygjItwjleo23QwdqqS5ZcVLZwaRH72iJjiEqd4d85583",
        "name": "admin@example.com"
    },
    "message": "User register successfully."
}


Retrieve login api


{
    "success": true,
    "data": {
        "token": "2|IyNnxOU0N1cc0s2bADqzASxzwc8kl7z5UbqZ2oARd68aa58b",
        "name": "admin@example.com"
    },
    "message": "User login successfully."
}


Ref: https://www.itsolutionstuff.com/post/laravel-10-rest-api-authentication-using-sanctum-tutorialexample.html#google_vignette

https://laravel.com/docs/10.x/sanctum#token-ability-middleware


Next, add a appkey token.

https://laravel.com/docs/10.x/middleware

Monday, October 2, 2023

MySQL group by unix timestamp

Drupal CMS includes a webform where each form has an ID. An example to retrieve number of user access of a Drupal database for a given node id. The column ws.created is stored with a unix timestamp (looks like many digits number). Use MySQL function from_unixtime to format into something like 2023-10-02. The node in this example have an ID=940.

select count(ufd.name) submissions, DATE_FORMAT(from_unixtime(ws.created), "%Y-%m-%d")
from webform_submission ws 
left join users_field_data ufd 
on ws.uid = ufd.uid
left join node_field_data nfd 
on ws.entity_id = nfd.nid
where ws.in_draft = 0
and ws.entity_type like 'node'
and ws.entity_id = 940
group by DATE_FORMAT(from_unixtime(ws.created), "%Y-%m-%d")

Here is a query to list all the associated users who accessed the webform

select ufd.name name, ufd.mail email, from_unixtime(ws.created) accepted_at, from_unixtime(ws.changed) changed_at, ws.remote_addr 
,nfd.title, ws.uri URL
from webform_submission ws 
left join users_field_data ufd 
on ws.uid = ufd.uid
left join node_field_data nfd 
on ws.entity_id = nfd.nid 
where ws.in_draft = 0
and ws.entity_type like 'node'
and ws.entity_id = 940

Tuesday, September 19, 2023

R language basics

The R programming language can be downloaded then installed from https://cran.r-project.org/index.html

Next download and install R Studio from https://posit.co/download/rstudio-desktop/

Install the R tutorial by opening R Studio, in a console install the package swirl and start the tutorial.

install.packages("swirl")

library(swirl)

swirl()

Following are the initial list of commands learnt from Swirl in lesson 1 to 4

skip(), play(), nxt(), bye(), main(), info()

c(), sqrt(), info()

help commands ?c , ?`:`

getwd(), ls(), list.files(), dir(), args(), getwd(), dir.create(), setwd(), file.create(mytest.R), file.exists(), file.info(), file.rename(from, to), file.path(),setwd(),unlink("testdir",recursive=TRUE)

seq(), seq(1,10, by=0.5), length(), rep(0, times=40),rep(c(0,1,2), times=10)

rep(c(0,1,2), each=10)


Happy R gramming!

Thursday, September 14, 2023

Centos 7 monitoring with cockpit

Monitor Centos Linux 7 servers through a web browser. On Centos Stream 8, Cockpit is installed by default on the most parts.

Steps to install cockpit and start the service

These require Linux Administrative user access at the command line.

sudo yum install cockpit cockpit-storaged

sudo systemctl enable --now cockpit.socket

sudo firewall-cmd --permanent --zone=public --add-service=cockpit

sudo firewall-cmd --reload

OR with iptables

sudo iptables -A INPUT -i eth0 -s 0/0 -p tcp --dport 9090 -j ACCEPT

sudo systemctl start cockpit

Access Cockpit

On web browser access URL http://<serverip>:9090

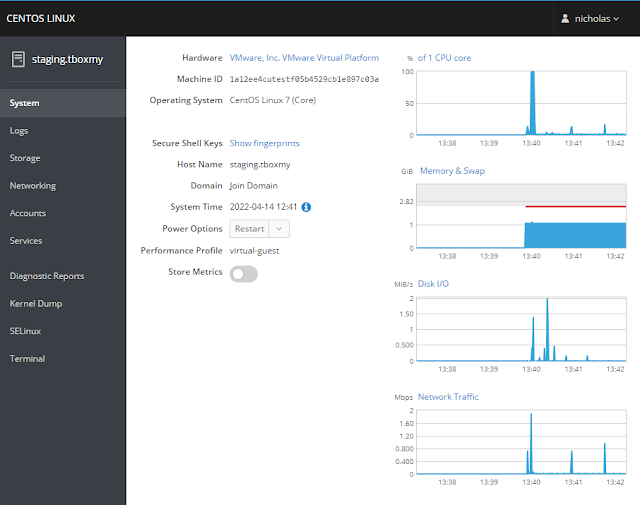
Cockpit layout


Wednesday, September 13, 2023

How to add remote MySQL user access.

Users created in MySQL should be for localhost access. In order for a user to be connected from a remote computer, the IP address must be mentioned in its user record. Removing a user access is a matter of deleting that user from the user record.

How to add remote user access

Example, user with login "developer" wants to access MySQL database at server 10.1.1.100 from a laptop at the IP address 10.1.2.23.

The network and database administrator received approval to allow any user to access remotely from the IP address 10.1.2.1 to 10.1.2.224 to the existing database name "tutorial". Here is how its done.

Step 1: Login as server administrator and ensure MySQL can accept connections from remote servers.

MySQL community , edit the file /etc/my.cnf

MariaDB community , edit the file /etc/my.cnf.d/server.cnf

Add the following line, save.

bind-address=0.0.0.0

Restart the MySQL server.

Ensure the server firewall allows access to MySQL port, where default is port 3306.

Example for Centos;

sudo firewall-cmd --new-zone=public --permanent

sudo firewall-cmd --reload

sudo firewall-cmd --permanent --zone=public --add-source=133.155.44.103

sudo firewall-cmd --permanent --zone=public --add-port=3306/tcp

sudo firewall-cmd --reload

sudo firewall-cmd --list-all-zones

sudo firewall-cmd --get-services


Step 2: Login to MySQL database as administrator. Add login for remote user and list users.

mysql -u root -p

> CREATE USER 'developer'@'10.2.%' IDENTIFIED BY 'password';

> SELECT user,host FROM mysql.user;


Step 3: Assign login to access database

> GRANT ALL PRIVILEGES ON 'tutorial'.* to 'developer'@'10.2.%';

> FLUSH PRIVILEGES;

> SHOW GRANTS FOR 'developer'@'10.2.%';


Step 4: Monitor connection;

> SELECT user,host, command FROM information_schema.processlist;


How to connect remotely

On the remote server, run the following client command 

mysql -u developer -p -h 10.1.1.100

The MySQL client, it should have the same configuration for SSL as the server to avoid SSL issues.


How to remove remote user access

Login as database administrator and delete login of user and its host as recorded in database;

> DELETE FROM mysql.user WHERE User='developer' AND Host NOT IN ('localhost', '127.0.0.1', '::1');

> FLUSH PRIVILEGES;

Monday, September 11, 2023

How to add datasource to reportserver.net?

Extracting from MySQL and PostgreSql database can be done via Reportserver.net. Other relational databases are also supported as of Reportserver.net version 4.

Configuration

Step 1: Login as administrator user

Step 2: In the menu choose "Datasources", then right click "Datasource Root" and right click to choose "Insert" ->"Relational Database".

Step 3: Enter the following and click "Apply"

  • Name
  • Description
  • Database
  • Username
  • Password
  • URL
The Permission tab provides better control for user to access.

Postgresql database URL

jdbc:postgresql://10.1.1.102/customers

MySQL database without SSL URL

jdbc:mysql://10.1.1.100:3306/customers?useSSL=false

MySQL database URL

jdbc:mysql://10.1.1.100:3306/customers


Details for other databases can be found at https://reportserver.net/en/guides/admin/chapters/Datasources/

Troubleshooting

Host 'host_name' is blocked in MySQL

Too many attempts made to the database can be caused by having or not having ssl. 
Solution:
Try to disable SSL protocol for the client.

Missing Relational Database Driver

Reportserver.net comes with several drivers. To customise datasource, 
Login as administrator and click "File System".
Click "Fileserver Root"->"etc"->"datasources"->"datasources".
Click on tab "Edit file".

It defaults to the following:
<?xml version="1.0" encoding="UTF-8"?>
<configuration>
   <datasource>
      <defaultDatasourceName>Demo Data</defaultDatasourceName>
      <!-- or access via ID -->
      <!-- <defaultDatasource>14</defaultDatasource> -->
   </datasource>
</configuration>


Friday, September 8, 2023

How to read excel data with PhpSpreadsheet

PhpSpreadsheet provides a PHP library of classes to read and write formats such as LibreOffice Calc, Microsoft Office and CSV. The default encoding uses UTF-8.

Ref: https://phpspreadsheet.readthedocs.io/en/latest/faq/

In Laravel 5, 6 and 7, this is available through the Composer. 

composer require phpoffice/phpspreadsheet niklasravnsborg/laravel-pdf mpdf/mpdf:8.1.6 league/csv

OR

composer require phpoffice/phpspreadsheet niklasravnsborg/laravel-pdf mpdf/mpdf league/csv

Here is an example of how to read the first three columns of an xlsx file, where the first row is considered as headers.

Step 1: Import the class for LibreOffice

use PhpOffice\PhpSpreadsheet\Reader\Ods;

Or for Microsoft Excel

use PhpOffice\PhpSpreadsheet\Reader\Xlsx;

Step 2: In the function that is to retrieve the data, declare object for LibreOffice

$reader = new Ods();

OR for Microsoft Excel

$reader = new Xlsx();

Step 3: Load the spreadsheet data 

$spreadsheet = $reader->load($path);
$sheet = $spreadsheet->getActiveSheet();

OR, load a sheet with specified name
$spreadsheet = $reader->setLoadSheetsOnly(["Sheet1"])->load($path);
$sheet = $spreadsheet->getActiveSheet();

Step 4: Process rows, and skip header in first row

$users = new Users();
if(!empty($sheet)) {
    foreach ($sheet->getRowIterator() as $row) {
      if ($row->getRowIndex() === 1) {
         continue; //Skip heading
      }
      $cells = iterator_to_array($row->getCellIterator("A", "H"));
      $data = [
            "Column A" => $cells["A"]->getValue(),
            "Column B" => $cells["B"]->getValue(),
            "Column C" => $cells["C"]->getValue(),
      ];
      $users->add($data);
}


The example can be said to retrieve the first 3 columns of the spreadsheet row as fields to create a new user.

Thursday, September 7, 2023

Display GIT branch in linux

It is useful to have the current Git branch appear at user prompt. This can be done for Centos Linux BASH by updating the user's configuration file .bashrc in the user's home directory.

Add these lines

git_branch() {

    git branch 2> /dev/null | sed -e '/^[^*]/d' -e 's/* \(.*\)/(\1)/'

}

export PS1="\u@\h \[\e[32m\]\w \[\e[91m\]\$(git_branch)\[\e[00m\]$ "


This will produce a user prompt like this

login@hostname current_directory(git.branch.name)$


Wednesday, September 6, 2023

How to add remote to GIT repo

Git remote provide information to sync with a Git repository to do stuff like git fetch, git push, git pull.

This information is stored in .git/config. In the case of a new directory, that does not have git, start by configuring it with the command git init. Managing remote can be done by the following commands.

Adding a remote

git remote add <name> <url>


Example

git remote add git_user1 user1@git.myserver.local/repo/package.git

git remote add ssh_user1 ssh://user1@10.1.1.100/repo/package.git


View the current remote and detailed remote information

git remote

git remote -v


Remove a remote

git remote remove <name>

git remote rm <name>


Example

git remote rm remote_user1


Push changes of the specific remote

git push <name>


Example

git push ssh_user1

or to push as a new branch

git push -u ssh_user1 new_branch


Show log of the remote

git remote show <name>


Example

git remote show ssh_user1


Show status of CURRENT branch

git status


Change url of an existing remote

git remote set-url <name> <new url>


Example

git remote set-url remote_user1 ssh://user1@10.1.1.23/repo/package.git


Thursday, August 3, 2023

Basic of SQL joins

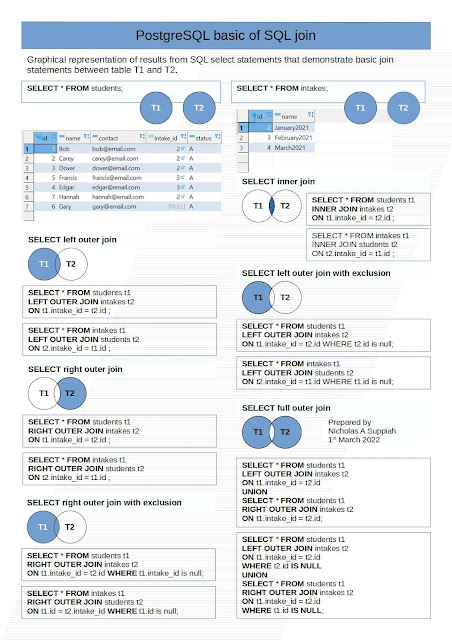
SQL join statements are used to combine rows from two or more tables, based on related column(s) between those tables.  These statements assist user to extract data from tables which have one-to-many or many-to-many relationships between them.

Here is a basic list of join command examples as used in PostgreSQL database.

SQL join command examples


Tuesday, March 28, 2023

GIT tag and retag

Working with GIT allows tagging specific points along the repository that have some importance. Commonly, tag is used when a version is released. Here are examples of listing tags, adding and deleting a tag.

List tags

List tag on local

git tag -l "v1.*"

git tag

List tag on repository

git ls-remote --tags

Display details of a tag

git show v1.0.2


Add tag to current branch

git tag -a v1.0.2 HEAD -m "Update for version 1.0.2"

git push origin --tags

Tag can be added to a specific commit.

git tag -a v1.0.2 f8c3501-m "Update for version 1.0.2" 


Retagging

This requires deleting current tag, then publish changes to remote repository.

git tag -d v1.0.2

git push origin :refs/tags/v1.0.2


Tuesday, March 21, 2023

How to create a dynamic object from standard class

 PHP provides a class to create a temporary object where no specific class and members are required.


The class stdClass is the empty class in PHP used to cast other types to object. Among the example of stdClass usage;

  1. Directly access the members by calling them
  2. Dynamic objects can be provided for temporary usage
E.g. 
An array can be treated as an object by using stdClass. 

$tmpStudent = array(
"name" => "John Doe"
);

To access data, 
$tmpStudent['name']

$tmpStudent = new stdClass;
$tmpStudent->name = "John Doe";

Using the stdClass, this can be done as an object
$tmpStudent->name


Thursday, February 16, 2023

Reportserver query with wildcards

The community edition of Reportserver.net provide a large number of useful functions. This include managing user access, download in different formats, user freedom to customise the report and access from different databases.

Here is an example of string query with wildcard and parameters. The $P{email} is a parameter where you can enter a value.


SELECT user_id, email, registration_id, date, venue, type, status

FROM student_registration

WHERE email LIKE '%'||$P{email}||'%'

Another example to apply parameter ${timezone} which is the default handling of variable, in this case to add with date from created_at

SELECT user_id, email, registration_id, created_at::timestamp + ${timezone}::interval as created_at

FROM student_registration

Wednesday, February 15, 2023

Centos Stream 8 with Selinux and high CPU

In a server with only 1 CPU, there are times where Linux service fight to gain usage of resources. However, Selinux strict policies may cause a service to repeatedly demand usage that lead to 100% CPU usage.

Several ways to diagnose, which would include to determine the max connections and process running. The commands include

To view number of connection on the web server

ss -ant | grep -E ':80|:443' 

systemctl status httpd


To view number of processes running, sorted by CPU or memory.

top

Laravel and search for json content in postgresql database

This is a note on usage of JSON in Laravel 8.

Given a Postgresql database with a table name customer, that have a column name status it would look like this

status=[
{"id": 5, "name": "registered", "description": "Registered only","date":"20221002 013600}
]

The function to search for JSON includes;

whereJsonContains

orWhereJsonContains


Laravel sample code to retrieve all rows where status is either 2, 5, or 6 would look like this;

$filter = [2,5,6];

$customers = Customers::where(function ($q) use ($filter) {

    foreach ($filter as $val) {

        $q->orWhereJsonContains('customers.status', [['id' => $val]]);

    }

})->get( );


Tuesday, January 31, 2023

Kali Linux on MS Windows 10

MS Windows 10 have been an interesting change for Microsoft operating system, and maybe MS Windows 11 will build on its capability to work with more operating systems.

Here is how to update MS Windows 10 to run Kali Linux, a Debian based Linux operating system. Its the basic system, and supports installation of additional Linux tools. Among default tools available are

  • BruteShark - Network Forensic Analysis Tool (NFAT)
  • Evil-WinRM - Ultimate WinRM shell
  • Hakrawler - Web crawler designed for easy, quick discovery of endpoints and assets
  • Httpx - Fast and multi-purpose HTTP toolkit
  • LAPSDumper - Dumps LAPS passwords
  • PhpSploit - Stealth post-exploitation framework
  • PEDump - Dump Win32 executable files
  • SentryPeer - SIP peer-to-peer honeypot for VoIP
  • Sparrow-wifi - Graphical Wi-Fi Analyzer for Linux
  • wifipumpkin3 - Powerful framework for rogue access points

On MS Windows, the WSL2 component needs to be downloaded and configured.

Firstly, open Powershell prompt as Administrator.

In the prompt type,

Enable-WindowsOptionalFeature -Online -FeatureName VirtualMachinePlatform -norestart 

dism.exe /online /enable-feature /featurename:Microsoft-Windows-Subsystem-Linux /all


Download and install (double click the file and follow the instructions) the wsl_update for your specific computer architecture. e.g. x64. Reboot the computer.

open Powershell prompt as Administrator.

In the prompt type,

wsl --set-default-version 2

Open microsoft app store and install Kali Linux (https://aka.ms/wslstore). Click get, then Open. A command prompt screen will appear and start to initialise.

Enter a default username (without spaces or special characters). Then enter the password and verify.

By default, Kali Linux installs dbus-x11 to access Linux desktop.

Install a user desktop

On debian systems, the command apt-get installs additional packages to provide more tools and features. XFCE is a light weight desktop that provide a windows like environment to run applications, instead of the command line prompt only.

Its fun to run Linux commands on the Verify that you can access internet and install additional Linux apps with the following command

sudo apt-get install wget

Lets download the XFCE desktop and install

sudo apt-get install kali-defaults kali-root-login desktop-base xfce4 xfce4-places-plugin xfce4-goodies

sudo apt install -y kali-desktop-xfce xrdp

When asked to select the “Default display manager”, choose lightdm

Now, its time to go get some coffee after the following command as the download size is over 1.2Gb. But keep an eye on the terminal as it will prompt for your input. 

Choosing different desktops

If you have other desktops, the default can be shown by

update-alternatives --config x-session-manager

After the install is done, start the desktop 


During installation, troubleshooting: 

There is an error "kali-desktop-base_2022.4.5_all.deb  404  Not Found", it may be due to the default Kali not able to find the updated URL of resources. Run the following commands;

apt-get update

apt-get install kali-defaults kali-root-login desktop-base xfce4 xfce4-places-plugin xfce4-goodies --fix-missing

Dont know which XRDP port?

sudo lsof -i -P -n | grep LISTEN

Access Linux desktop on MS Windows

On a regular Kali Linux, command to start xfce is "systemctl enable xrdp --now". But the WSL version provided doesnt support this. Lets configure xfce for larger screens, then start xfce. 

cp /etc/xrdp/xrdp.ini /etc/xrdp/xrdp.ini.backup

sed -i 's/3389/3390/g' /etc/xrdp/xrdp.ini

sed -i 's/max_bpp=32/#max_bpp=32\nmax_bpp=128/g' /etc/xrdp/xrdp.ini

sed -i 's/xserverbpp=24/#xserverbpp=24\nxserverbpp=128/g' /etc/xrdp/xrdp.ini


/etc/init.d/xrdp start

To stop the desktop

sudo /etc/init.d/xrdp stop

This will result in a port number being use for the desktop access. Refe to the file /etc/xrdp/xrdp.ini for details. E.g. port 3390.

From the Windows Start, Open up Remote Desktop (mstsc) and connect to localhost:3390

Login with the username you provided at the installation stage.

View incoming packets

Login to Kali Linux command prompt,

apt-get install pktstat

pktstat -n

Access USB device (not working)

Install the required 3rd party packages. At this moment, I have only managed to get it working on Ubuntu. Will update for Kali in future if there is a solution.

The following command should display detected disk, however Kali failed as MS Windows 10 did not have USB pass through. 

fdisk -l

Open wsl, the default ubuntu and install the usb tools

sudo apt-get update &&  apt install linux-tools-common  linux-tools-generic hwdata

Login to Kali Linux

winget install --interactive --exact dorssel.usbipd-win

apt-get install usbip

Install top 10 Kali tools

A list of top 10 tools is available, which takes over 2.2Gb storage size. The command is

apt-get install kali-tools-top10


Ref: 

Kali.org

USBIPD

XDA USB

Another XDA USB

Friday, January 27, 2023

Tinker and Controller methods

 Tinker is the tool for command line debugging in Laravel. 

To start the tool, type

php artisan tinker

Create an object from Model

In tinker command line, objects can be created and saved to database. E.g.

$user = new App\Model\User

$user->name = "Tboxmy"

$user->email = "tboxmy@yahoo.com"

$user->save()


Then to display the content of object;

$user

Finding data from model

The eloquent function find( ) allows retrieving from the database, given its default index id. e.g.

$user = App\Model\User::find(2)

Then to display the content of object;

$user

Another approach is to use the function where( ) to retrieve based on the table column names. e.g.

$user = App\Model\User::where('name','Tboxmy')->first( )

Or to retrieve all those related values

$user = App\Model\User::where('id', '>', 2)->first( )

Then to display the content of object;

$user


Introduction to app() and how to call a method in a controller?

A helper object app( ) allows access to the different functions to access a model or controller. The call( ) function is one of the app( ) functions, it is used to access a method inside a controller. e.g. in the controller have a method declared as following;

public function methodName($id=0, $name=null){

. . .

}

The function call( ) can then be used this way;

app()->call(' App\Http\Controllers\HomeController@methodName');


When working with different Controllers, its useful to declare these as variables using the make( ) function. Here is how its done;

$controller = app()->make('App\Http\Controllers\HomeController');

app()->call([$controller, 'methodName'] );

How to pass parameters to methods in a controller? 

This is done with the function call( ) where parameter 2 contains the method parameters. Using the method above, here is how its done;

app()->call([$controller, 'methodName'], [ 'id' => 2, 'name' => 'Tboxmy'] );


Wednesday, January 18, 2023

Save linux output to jpg or image file

 There are cases where from the Linux terminal, it is required to post the output as an attachment in jpg or png. If ImageMagick is installed, this can be done easily, otherwise they use the traditional command pr to provide the output to printer.

Pre-requisite

Install ImageMagick

Combine the command convert with the output. E.g. output of the route command can be saved as png

route  | convert label:@- myroutetable.png

Next to add data into the png image.

$ convert myroutetable.png \

>  -set 'Copyright' 'CC-BY-SA 4.0'\

>  -set 'Title' 'Routing Table for Linux' \

> routetable.png


The content can then be viewed by the command hexdump

hexdump -C routetable.png

Or

strings routetable.png


Tuesday, January 10, 2023

Find files by data and type in Linux

 How do I find files in a Linux system? or specifically on Centos Linus?

The command ls will list files in a specific directory. Using the asterisk (*) its possible to display list of files and directory with wildcards. 

E.g.

ls -l

ls -lt

ls -lrt

ls /etc

ls /etc/h*


Search files with command grep and ls

ls -lt /etc/ | grep filename


Search files with command find

find directory -type f -name filename


The command find provide more flexibility in search for files.


Search ordinary files that has the extension .cpp

find /home/you -iname "*.cpp" -type f


Search ordinary files that has the extension .cpp that are more than 30 days

find /home/you -iname "*.cpp" -atime -30 -type f


Search files from a given modified date

find . -type f -newermt 2023-01-01


Search files from a given access date

find . -type f -newerat 2017-09-25 ! -newerat 2017-09-26


Search files given a date range

touch --date "2007-01-01" /tmp/start.file

touch --date "2008-01-01" /tmp/end.file

find /data/images -type f -newer /tmp/start.file -not -newer /tmp/end.file


Monday, January 2, 2023

Copy Postgresql database to another server

 Notes for Postgresql 11,12

This approach allows an SQL file to be copied to a destination server and install using that sql file.

On the source server

pg_dump -C -Fp -f dump.sql -U postgres database_name


Copy the file dump.sql to the destination server. On the destination server

psql -U postgres -f dump.sql


Blog Archive