Friday, October 19, 2018

Show user permission to MySQL and MariaDb databases

User permission levels in MySQL (and MariaDb) can be drilled down into many layers. From database permission, table permission, column permission and routine permission. There could be more that I don't know of. Its great to have greater control over who have access to the database;

How do I show user permission just at database level? First step is to know where such information is stored, followed by how to retrieve the information.

Access MySQL login as admin OR root.

mysql.user and mysql.db Tables

Have a look at the following tables, as they contain the relevant information

mysql> describe * from mysql.user;
mysql> describe * from mysql.db;

Listing users

Let's say, you want to see which user to host have access

mysql> select user, host from mysql.user;

+------------+-------------+
| user       | host        |
+------------+-------------+
| oc_admin   | %           |
| auditor    | 10.1.20.204 |
| auditor    | 10.1.20.244 |
| root       | 10.1.20.44  |
| tbox       | localhost   |
| mysql.sys  | localhost   |
| oc_admin   | localhost   |
| pentaho    | localhost   |
| root       | localhost   |
+------------+-------------+

List grants for users

mysql> show grants;
+---------------------------------------------------------------------+
| Grants for root@localhost                                           |
+---------------------------------------------------------------------+
| GRANT ALL PRIVILEGES ON *.* TO 'root'@'localhost' WITH GRANT OPTION |
| GRANT PROXY ON ''@'' TO 'root'@'localhost' WITH GRANT OPTION        |
+---------------------------------------------------------------------+

List User Access to Databases, Tables and Columns

mysql> SELECT Host, Db, User from mysql.db

There are separate tables for each database, table or column specific access. Go thru and see what you need in the following tables.

mysql> SELECT Host, Db, User from mysql.db
mysql> SELECT * FROM mysql.db;
mysql> SELECT * FROM mysql.tables_priv;
mysql> SELECT * FROM mysql.columns_priv;


Wednesday, September 12, 2018

Git and undo last commit

Updating a remote git repository would mean all other users having a same source code. Sometimes, a local commit may be done and its found that there are changes that should not be push to the remote. The solution, remove not needed files then move to the previous commit on the local machine.

The command is
$ git reset --hard HEAD~1

Unstage any other files with the command
$ git reset


Wednesday, September 5, 2018

Howto install mcrypt for PHP 7.2

PHP extensions have always utilised reuse of applications to provide extra functionality to developers. One such is the use of mycrypt. As of PHP 7.1, the mcrypt is deprecated and totally removed in PHP 7.2. Unfortunately for those with application that rely on mcrypt, this means the end of the road. In my case, development of a Laravel application had dependencies on mcrypt when doing an update with the command;

$ composer update

The mcrypt is a replacement of Unix/Linux crypt( ) that encrypt files. The PHP extension is php-mcrypt, and this is used to interface between PHP application and the mcrypt utility.

However, there is a solution that use mcrypt found in the PHP Extension Community Library (PECL). In this example, its tested on

CentOS 7.5 
Apache 2.4.6 (CentOS)
PHP 7.2.5 (sp.repo.webtatic.com)

Step 1. Install mcrypt utility.

$ pecl search mcrypt
WARNING: channel "pecl.php.net" has updated its protocols, use "pecl channel-update pecl.php.net" to update
Retrieving data...0%
.Matched packages, channel pecl.php.net:
=======================================
Package       Stable/(Latest)  Local
mcrypt        1.0.1 (snapshot)       Bindings for the libmcrypt library
mcrypt_filter 0.1.0 (beta)           Applies mcrypt symmetric encryption using stream filters


Install mcrypt and its development library then update the pecl.

$ sudo pecl channel-update pecl.php.net
$ sudo yum install libmcrypt
$ sudo yum install libmcrypt-devel


Step 2. Install php-devel (or php72w-devel if you use webtatic repo)

$ sudo yum install php72w-devel


Step 3. Install mcrypt extension

Either specify specifically a channel or use default
$ sudo /usr/bin/pecl install channel://pecl.php.net/mcrypt-1.0.1
or
$ sudo /usr/bin/pecl install mcrypt-1.0.1

Create the file /etc/php.d/mcrypt.ini with the contents
; Enable mcrypt extension module from pecl
extension=mcrypt.so


Restart Web server.

Note: If for some strange reason php still doesn't detect mcrypt extension, I would give a reboot.

Done.

Thursday, August 30, 2018

Laravel, Swiftmailer and Uncaught Swift_TransportException

Writing PHP applications that deliver email notification helps to build a versatile system that uses the most basic communication media on the Internet. The Email.

Getting the Email out would require knowledge of the Email server in use to deliver 1 or thousands of email notifications. Common Email use SMTP, sendmail, postfix or a custom Transport implementation for corporate use. There are security and reliability concerns when passing to any Email server. Some of which include protection from email header injection attacks, MIME compliant, HTML/multipart emails, inline or embedded images.

Swift Mailer helps to handle most of these things. Why reinvent the wheel? In order to use it, the application should support PHP 7.0 or higher. Installation through Composer simplifies the whole process.

$ composer require "swiftmailer/swiftmailer:^6.0"

More details are found at Swift Mailer.

Purpose

Back to the original reason of this post. On a recent Laravel application, tested was carried out and checklist done on Centos Linux development server However when deployed to production Centos Linux server, email notification produced following error;

PHP Fatal error: Uncaught Swift_TransportException: Connection could not be established with host EMAILSERVER_NAME[Permission denied #13]

The full error is shown below.

[Thu Aug 30 14:35:54.225637 2018] [php7:error] [pid 18234] [client IPADDRESS:32852] PHP Fatal error: Uncaught Swift_TransportException: Connection could not be established with host EMAILSERVER_NAME[Permission denied #13] in /var/www/tboxmy/vendor/swiftmailer/swiftmailer/lib/classes/Swift/Transport/StreamBuffer.php:277\nStack trace:\n#0 /var/www/tboxmy/vendor/swiftmailer/swiftmailer/lib/classes/Swift/Transport/StreamBuffer.php(62): Swift_Transport_StreamBuffer->_establishSocketConnection()\n#1 /var/www/tboxmy/vendor/swiftmailer/swiftmailer/lib/classes/Swift/Transport/AbstractSmtpTransport.php(113): Swift_Transport_StreamBuffer->initialize(Array)\n#2 /var/www/tboxmy/vendor/swiftmailer/swiftmailer/lib/classes/Swift/Mailer.php(79): Swift_Transport_AbstractSmtpTransport->start()\n#3 /var/www/tboxmy/public/info/testemail.php(21): Swift_Mailer->send(Object(Swift_Message))\n#4 {main}\n thrown in /var/www/tboxmy/vendor/swiftmailer/swiftmailer/lib/classes/Swift/Transport/StreamBuffer.php on line 277 

 Solution

I am sure there are other possible ways to get this error, but in my case it was SELINUX. On the development selinux was on permissive and on production it was enforcing (quite strictly).

The next time this happens; here are the steps to take.

Determine selinux status and the booleans.

$ sestatus
. . .
$ getsebool httpd_can_sendmail
httpd_can_sendmail --> off
$ getsebool httpd_can_network_connect
httpd_can_network_connect --> off

Turn the permission to ON.

$ sudo setsebool -P httpd_can_sendmail 1
$ sudo setsebool -P httpd_can_network_connect 1

Restart the web server.
Done.

Thursday, July 12, 2018

Chinese Input on Linux Mint

Linux is flexible enough to support users from around the world with various types of input method.

On Linux Mint there are 2 approach or framework for input methods. They are Fcitx and Ibus. These enable users to switch between typing Latin (e.g. a b c) and others like Chinese Pin Yin (e.g. 平 阔). To get a details on these frameworks there is a 2012 article "GNOME and input method integration". Language models are developed on top of any of these frameworks, depending on the target user devices.

Do you need to have both input method frameworks? The short answer is No. Only one is needed for the operating system being used. On Linux where users can change their Desktop Managers, then all the preferred input method framework should be installed.

Sunpinyin is a popular utility for chinese input on Linux that is available on Fcitx and Ibus.It is open source licensed with LGPLv2 and CDDL dual-licenses.

I choose the approach of Ibus since doing a apt-cache search yielded the following;

ibus-sunpinyin - sunpinyin engine for ibus
libsunpinyin-dev - Simplified Chinese Input Method from SUN (development)
libsunpinyin3-dbg - Simplified Chinese Input Method from SUN (debug)
libsunpinyin3v5 - Simplified Chinese Input Method from SUN (runtime)
sunpinyin-data - Statistical language model data from open-gram
fcitx-sunpinyin - fcitx wrapper for Sunpinyin IM engine
python-sunpinyin - Simplified Chinese Input Method from SUN (Python binding)
sunpinyin-utils - Simplified Chinese Input Method from SUN (utilities)
ucimf-sunpinyin - ucimf wrapper for Sunpinyin IM engine
xsunpinyin - Standalone XIM server for Sunpinyin

Ibus was first on the list.

I might have missed some steps as I did this over several weeks. There wasn't any rush and there were other chores that needed to get done.

Here are the steps taken.

Step 1: Install Sunpinyin

Open a command line terminal and type

sudo apt-get install ibus-sunpinyin sunpinyin-utils

Step 2: Install the language

At Menubar click Applications ->Settings ->Input Method

Choose Language tab then click Install/Remove Languages...
Click Add.
Choose Chines, China (UTF8), then click Install.

Back to the Language Settings window, click "Input method" tab. In Input method, choose "IBus".

In Language support, Simplified Chinese click the Install button. Follow the instructions.


Step 3: Load it.

Logout and log back in.

At the Menubar, appears the Input Method applet with the text "EN".


Click on "EN" and select "Simplified Chinese".

Open a text editor or web browser and try out typing in Chinese.

Done.

Note: If this disrupts special keys on the keyboard, try to setup and use fcitx, instead. You can only use either one at a time.

Thursday, June 14, 2018

Install dwm window manager and C Programming on Centos 7

Here are notes on getting dwm and C programming to work with Centos 7. Started project on recompiling the kernel and dwm, a windows manager that required editing of C codes and the existing computer did not have C installed.

Its a good note on working with RPMS and how to get started in C programming.

What is DWM?

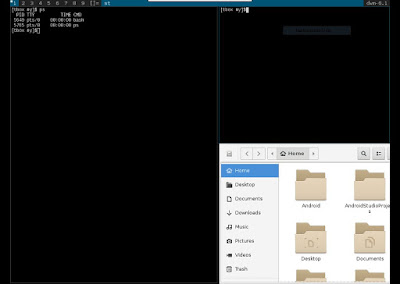
The dwm is a windows manager on Linux. Its advantage is having a window environment, without a mouse and allows easy rearranging of windows across the screen. Here is an example on Nautilus with 2 ST terminals.

DWM Window Manager Screen with 3 panels


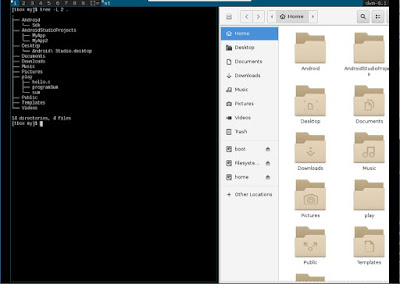
Each window can be expanded across other windows as shown below.

DWM Window Manager Screen with 2 panels

Installation, build and finally creating the required rpm will create the minimum files and folders as shown below.
RPMBUILD folder structure

Step 1: Install C compiler and minimum libraries


$ sudo yum install gcc gcc-c++ kernel-devel kernel-header make rxvt-unicode

This will include the following packages;
  cpp.x86_64 0:4.8.5-28.el7_5.1                          
  gcc-gfortran.x86_64 0:4.8.5-28.el7_5.1                      
  gcc-gnat.x86_64 0:4.8.5-28.el7_5.1                        
  gcc-objc.x86_64 0:4.8.5-28.el7_5.1                        
  gcc-objc++.x86_64 0:4.8.5-28.el7_5.1                       
  libgcc.i686 0:4.8.5-28.el7_5.1                          
  libgcc.x86_64 0:4.8.5-28.el7_5.1                         
  libgfortran.x86_64 0:4.8.5-28.el7_5.1                      
  libgnat.x86_64 0:4.8.5-28.el7_5.1                        
  libgnat-devel.x86_64 0:4.8.5-28.el7_5.1                     
  libgomp.x86_64 0:4.8.5-28.el7_5.1                        
  libobjc.x86_64 0:4.8.5-28.el7_5.1                        
  libquadmath.x86_64 0:4.8.5-28.el7_5.1                      
  libquadmath-devel.x86_64 0:4.8.5-28.el7_5.1                   
  libstdc++.i686 0:4.8.5-28.el7_5.1                        
  libstdc++.x86_64 0:4.8.5-28.el7_5.1                       
  libstdc++-devel.x86_64 0:4.8.5-28.el7_5.1  

Alternatively is to install the whole development tools suite. This can be done with the command
yum groupinstall "Development Tools" --setopt=group_package_types=mandatory,default,optional

Step 2: Test C environment

Create a file hello.c with following contents

1:  #include<stdio.h>  
2:  int main()
3:  {  
4:      int a, b, c;  
5:      printf("Enter two numbers to add: ");  
6:      scanf("%d %d",&a,&b);  
7:      c = a + b;  
8:      printf("The sum is %d\n",c);  
9:      return 0;  
10: }  

Open the command line terminal (CLI), compile and run

$ gcc hello.c -o programSum
$ ./programSum

Hint: For larger projects, it will compile faster with ccache. E.g.
$ ccache gcc hello.c -o programSum

Step 3: Install graphical development libraries 

Applications that is graphical in nature mostly are group as X11. In order to create some sense of uniformity in the chaos world of Linux, LSB is a standard adopted and through which the use of these libraries ensure better compatibilities of an application across an Linux systems.

  • libXft is a runtime library. In this case to use the X Free Type Library where drawing of fonts and the application window is defined by LSBfor X11.
  • libXinerama is a library to support desktops that run across multiple displays on X11. It is more common to use RandR which does the similar work in more modern applications. In modern systems, libXinerama is an interface to RandR library.
  • fontpackages-devel contains templates and macros used to create font packages. The initial problem many years ago is that there were no standard to package fonts. This fedora project library reduces poor quality implementations and allow application developers to focus on their applications better.

sudo yum install -y libXft-devel libXinerama-devel fontpackages-devel

Step 4: Retrieve the source with SRPMS

Create a file getdwm.sh with following contents
1:  # Download archives from Fedora 22 repository.  
2:  SOURCE=http://archives.fedoraproject.org/pub/archive/fedora  
3:  F26=${SOURCE}/linux/releases/26  
4:  wget ${F26}/Everything/source/tree/Packages/d/dwm-6.1-4.fc26.src.rpm  
5:  wget ${F26}/Everything/source/tree/Packages/d/dmenu-4.7-1.fc26.src.rpm  
6:  wget ${F26}/Everything/source/tree/Packages/t/terminus-fonts-4.40-6.fc26.src.rpm  
7:  wget ${F26}/Everything/source/tree/Packages/s/st-0.7-2.fc26.src.rpm  

Save the file and execute.
$ chmod u+x getdwm.sh
$ ./getdwm.sh

Hint:  to edit the dwm source, extract the SRPMS then extract dwm-6.1.tar.gz
$ rpm -i dwm-6.1-4.fc26.src.rpm
$ cd ~/rpmbuild/SOURCES

The package dwm-6.1.tar.gz contain the files;
1:  BUGS  
2:  config.def.h  
3:  config.mk  
4:  drw.c  
5:  drw.h  
6:  dwm.1  
7:  dwm.c  
8:  dwm.png  
9:  LICENSE  
10:  Makefile  
11:  README  
12:  TODO  
13:  transient.c  
14:  util.c  
15:  util.h  

Step 4. Build packages and install

$ rpmbuild --rebuild dwm-6.1-4.fc26.src.rpm
$ rpmbuild --rebuild dmenu-4.7-1.fc26.src.rpm
$ rpmbuild --rebuild terminus-fonts-4.40-6.fc26.src.rpm
$ rpmbuild --rebuild st-0.7-2.fc26.src.rpm

$ cd ~/rpmbuild/RPMS/SPECS/
$ rpmbuild -ba st.spec

$ cd ~/rpmbuild/RPMS/noarch/
$ sudo yum localinstall -y terminus-fonts-4.40-6.el7.centos.noarch.rpm terminus-fonts-console-4.40-6.el7.centos.noarch.rpm 

$ cd ~/rpmbuild/RPMS/x86_64/
$ sudo yum localinstall -y dwm-6.1-4.el7.centos.x86_64.rpm dwm-user-6.1-4.el7.centos.x86_64.rpm dmenu-4.7-1.el7.centos.x86_64.rpm st-0.7-2.el7.centos.x86_64.rpm st-user-0.7-2.el7.centos.x86_64.rpm

The dwm is installed at /usr/bin/dwm and the session is created in a file /usr/share/xsessions/dwm.desktop.

Logout and choose dwm as the window manager to login. Alternatively in xstartup, change the desktop manager to use dwm.

Troubleshoot
If any of the library is not detected during a run or build, ensure that its in the
linux system's path. This can be done by
  • Add a file to /etc/ld.so.conf.d that contains path to the library (mine defaults to /usr/lib64/)
Do a list of library dependencies comparison with what I have here;
1:  $ ldd `which dwm`  
2:       linux-vdso.so.1 => (0x00007ffd1b1b0000)  
3:       libX11.so.6 => /lib64/libX11.so.6 (0x00007fbf79baf000)  
4:       libXinerama.so.1 => /lib64/libXinerama.so.1 (0x00007fbf799ac000)  
5:       libfontconfig.so.1 => /lib64/libfontconfig.so.1 (0x00007fbf7976e000)  
6:       libXft.so.2 => /lib64/libXft.so.2 (0x00007fbf79558000)  
7:       libc.so.6 => /lib64/libc.so.6 (0x00007fbf79195000)  
8:       libxcb.so.1 => /lib64/libxcb.so.1 (0x00007fbf78f6c000)  
9:       libdl.so.2 => /lib64/libdl.so.2 (0x00007fbf78d68000)  
10:       libXext.so.6 => /lib64/libXext.so.6 (0x00007fbf78b56000)  
11:       libfreetype.so.6 => /lib64/libfreetype.so.6 (0x00007fbf788af000)  
12:       libexpat.so.1 => /lib64/libexpat.so.1 (0x00007fbf78685000)  
13:       libpthread.so.0 => /lib64/libpthread.so.0 (0x00007fbf78469000)  
14:       libXrender.so.1 => /lib64/libXrender.so.1 (0x00007fbf7825d000)  
15:       /lib64/ld-linux-x86-64.so.2 (0x000056545bb82000)  
16:       libXau.so.6 => /lib64/libXau.so.6 (0x00007fbf78059000)  

References

http://dwm.suckless.org/tutorial/
https://www.hiroom2.com/2016/09/01/install-dwm/#sec-1-3
http://ratfactor.com/dwm.html
https://rhunter.org/blog/2012/04/17/dwm-a-tutorial-for-beginners/

https://wiki.centos.org/HowTos/RebuildSRPM


Monday, May 21, 2018

Shut Down Dialog Box

First time all apps froze on MS Windows 10 and a popup appears to shutdown.


After a long 1 minute pause the standard screen Closing 4 apps, appears. Luckily the usual process to confirm save each application appears.

However, shutdown did not happen. Everything just so laggy. What happen Win10?

Tuesday, May 8, 2018

Android Studio and Cannot Resolve Symbol 'R'

It is one of the error message that appears as Android Studio is used more frequently is,

Cannot resolve symbol 'R'


In the source code, it will show all usage of R as red in colour.


From what I know, here are two situations that cause this error to appear.
  1. Copy of a source file into the project. This include copying of Modules from another existing project.
  2. During one of the build, there was a problem

 Solution

 This is how I did it on Android Studio 3.1.2.

Step 1: Rebuild the project.

Open the Java files that was just copied or the problematic files. Remove any reference of import to the 'R'. In the manifest/AndroidManifest.xml, correct the package name if it is not the same as the current project.

On the Menu bar click Build ->Clean Project.


Step 2: Sync files in the project.

On the Menu bar click Files ->Sync Project with Gradle Files. Close and restart Android Studio.


This will solve the error on most cases. However, if there are still any errors, gradle will not be able to update with the rectified pointer to R references. Read the list of errors as it will indicate the problem areas that you can easily rectify. Once you have fixed the error, or in my case most of the time I just delete them, just repeat Step 1.

Works all the time.

Wednesday, April 18, 2018

Create a Fragment App with Android Studio 3.1

This is a follow up from my previous Android Fragments in an Activity.

This example, demonstrates how Fragments are created and loaded by an Activity class. Android Studio 3.1.1 is the IDE with Java 1.8.0 and an emulator is created with API 23. All this is running on Centos 7.

Step 1: Create an Empty project with vertical orientation

Open Android Studio and create a new project.
Application name: My Fragment
Click Next

Click Checked for Phone and Tablet
Minimum SDK: choose API 23:Android 6.0 (Marshmallow)
Click Next

Choose "Basic Activity"
Click Next

Activity Name: MainActivity
Layout Name: activity_main
Title: MainActivity

Click checked Use a Fragment

Click "Finish"

This will provide a template to quickly create the rest of Fragments to be used with this Activity.

A total of 23 files are created in the app/src/main folder. By the time all steps are completed, there should be 29 files created in app/src/main folder.
=== Listing of 25 files at start of the project===
app/src/main/res/drawable/ic_launcher_background.xml
app/src/main/res/values/colors.xml
app/src/main/res/values/strings.xml
app/src/main/res/values/dimens.xml
app/src/main/res/values/styles.xml
app/src/main/res/mipmap-anydpi-v26/ic_launcher.xml
app/src/main/res/mipmap-anydpi-v26/ic_launcher_round.xml
app/src/main/res/drawable-v24/ic_launcher_foreground.xml
app/src/main/res/mipmap-hdpi/ic_launcher_round.png
app/src/main/res/mipmap-hdpi/ic_launcher.png
app/src/main/res/mipmap-mdpi/ic_launcher_round.png
app/src/main/res/mipmap-mdpi/ic_launcher.png
app/src/main/res/mipmap-xhdpi/ic_launcher_round.png
app/src/main/res/mipmap-xhdpi/ic_launcher.png
app/src/main/res/mipmap-xxhdpi/ic_launcher_round.png
app/src/main/res/mipmap-xxhdpi/ic_launcher.png
app/src/main/res/mipmap-xxxhdpi/ic_launcher_round.png
app/src/main/res/mipmap-xxxhdpi/ic_launcher.png
app/src/main/res/layout/content_main.xml
app/src/main/res/layout/activity_main.xml
app/src/main/res/menu/menu_main.xml
app/src/main/java/com/example/nicholas/myfragment/MainActivity.java
app/src/main/AndroidManifest.xml
===
Project Structure of application - Newly create project


A default project contains the following layouts
activity_main.xml
  • CoordinatorLayout
    • AppBarLayout
    • Toolbar
    • an include layout tag
    • FloatingActionButton
content_main.xml
  • ConstraintLayout 
  • TextView.
Edit the layout/activity_main.xml
In the CoordinatorLayout tag, insert following line before tools:context

tools:orientation="vertical"

Step 2: Add the buttons

Edit the file values/strings.xml and add within the <resources> tag

<string name="digital">Digital</string>
<string name="analog">Analog</string>

<string name="textclock">Text Clock</string>

Edit content_main.xml and remove the whole TextView tag. Replace with 2 buttons where you can just drag and drop the buttons from the widget list. Add a FrameLayout where we will position our Fragment layouts. Edit the button code as follows

<Button
        android:id="@+id/button_analog"
        android:layout_width="wrap_content"
        android:layout_height="wrap_content"
        android:text="@string/analog"
        />
<Button
        android:id="@+id/button_digital"
        android:layout_width="wrap_content"
        android:layout_height="wrap_content"
        android:layout_marginTop="8dp"
        android:text="@string/digital"
        app:layout_constraintTop_toBottomOf="@+id/button_analog"
        />

<Button
        android:id="@+id/button_text"
        android:layout_width="wrap_content"
        android:layout_height="wrap_content"
        android:layout_marginTop="8dp"
        android:text="@string/textclock"
        app:layout_constraintTop_toBottomOf="@+id/button_digital"
        />

<FrameLayout
        android:id="@+id/fragment_container"
        android:layout_width="280dp"
        android:layout_height="495dp"
        android:layout_marginStart="8dp"
        app:layout_constraintStart_toEndOf="@+id/button_analog"
>
    </FrameLayout>


Let build and run the project.

Click the Run App button (green play button) or press Shift+F10. I am using an API 23 emulator for my test applications. Create the Android emulator if it is not done yet.


Step 3: Create Analog Fragment

Click File ->New ->Fragment ->Fragment (Blank). Fill following values
Fragment Name: AnalogFragment
Fragment Layout Name: fragment_analog

Leave all other options checked.
Click Finish

In AnalogFragment.java, replace import android.support.v4.app.Fragment with

import android.app.Fragment;

I plan to provide support only to Android API 23 and above.

Lets explore the Design editor.
Edit layout/fragment_analog.xml and click the tab Design. Notice that the default is FrameLayout.


On the left is the Palette, in the middle is the screen design + blueprint, on the right is the Attributes list. In the Design area, click the menu to choose API 23. Right click any where on the design and choose Convert FrameLayout to ConstraintLayout. Click "Ok".

Delete the default TextView in the design.


From the Palette, notice there is no AnalogClock which means it will have to be manually added. Click the Text tab and insert the following

<AnalogClock
        android:id="@+id/analogClock"
        android:layout_width="wrap_content"
        android:layout_height="wrap_content"
        android:layout_marginEnd="8dp"
        android:layout_marginStart="8dp"
        android:layout_marginTop="8dp"
        app:layout_constraintEnd_toEndOf="parent"
        app:layout_constraintStart_toStartOf="parent"

        app:layout_constraintTop_toTopOf="parent"
         />


Step 4: Connect MainActivity with Analog Fragment

I have broken down the steps further in this step. Edit MainActivity class.

1. Add following member variables

Button analogButton;

2. Edit protected void onCreate(Bundle savedInstanceState), add after the line setSupportActionBar(toolbar)

analogButton = (Button) findViewById(R.id.button_analog);
analogButton.setOnClickListener(this);


There should be a wriggly red line at the text "this", click once then press Alt+Enter. Choose "Make MainActivityFragment implement android,view.View.OnClickListener". Choose "onClick(v:View):void" and press "OK".

3. Add onClick(View v) method
FragmentManager manager = getFragmentManager();
FragmentTransaction transaction = manager.beginTransaction();
if(v==analogButton){
        f = new AnalogFragment();
}
transaction.replace(R.id.fragment_container, f);

transaction.commit();

4. Edit the class declaration with the AnalogFragment

public class MainActivity extends AppCompatActivity implements View.OnClickListener,
        AnalogFragment.OnFragmentInteractionListener  {


Implement AnalogFragment's OnFragmentInteractionListener, add the method near the end of the class.

public void onFragmentInteraction(Uri uri) {
        //
}


Compile and run.

Step 5: Create Digital Fragment

Repeat steps 3 and 4 above but change the Analog to Digital. Below is the code to display a digital clock

<DigitalClock
    android:id="@+id/analogClock"
    android:layout_width="wrap_content"
    android:layout_height="wrap_content"
    android:layout_marginEnd="8dp"
    android:layout_marginStart="8dp"
    android:layout_marginTop="8dp"
    android:background="#9a0"
    android:padding="24dp"
    android:textColor="#eff"
    android:textSize="25sp"
    android:textStyle="bold"
    app:layout_constraintEnd_toEndOf="parent"
    app:layout_constraintStart_toStartOf="parent"

    app:layout_constraintTop_toTopOf="parent"
    />


Step 6: Create TextClock Fragment

Repeat steps 3 and 4 above but change the Analog to TextClock. Below is the code to display a digital clock

<TextClock
    android:id="@+id/analogClock"
    android:layout_width="wrap_content"
    android:layout_height="wrap_content"
    android:layout_marginEnd="8dp"
    android:layout_marginStart="8dp"
    android:layout_marginTop="8dp"
    android:background="#9a0"
    android:padding="24dp"
    android:textColor="#eff"
    android:textSize="25sp"
    android:textStyle="bold"
    android:format12Hour="HH:MM:ss EEEE"
    android:format24Hour="EE H:mm:ss"
    app:layout_constraintEnd_toEndOf="parent"
    app:layout_constraintStart_toStartOf="parent"

    app:layout_constraintTop_toTopOf="parent" 
    />


Here is the complete source code for MainActvity.java

1:  package com.example.nicholas.myfragment;  
2:  import android.app.Fragment;  
3:  import android.app.FragmentManager;  
4:  import android.app.FragmentTransaction;  
5:  import android.net.Uri;  
6:  import android.os.Bundle;  
7:  import android.support.design.widget.FloatingActionButton;  
8:  import android.support.design.widget.Snackbar;  
9:  import android.support.v7.app.AppCompatActivity;  
10:  import android.support.v7.widget.Toolbar;  
11:  import android.view.View;  
12:  import android.view.Menu;  
13:  import android.view.MenuItem;  
14:  import android.widget.Button;  
15:  public class MainActivity extends AppCompatActivity implements View.OnClickListener,  
16:      AnalogFragment.OnFragmentInteractionListener, DigitalFragment.OnFragmentInteractionListener,  
17:      TextClockFragment.OnFragmentInteractionListener {  
18:    Button analogButton, digitalButton, textClockButton;  
19:    Fragment f;  
20:    @Override  
21:    protected void onCreate(Bundle savedInstanceState) {  
22:      super.onCreate(savedInstanceState);  
23:      setContentView(R.layout.activity_main);  
24:      Toolbar toolbar = (Toolbar) findViewById(R.id.toolbar);  
25:      setSupportActionBar(toolbar);  
26:      analogButton = (Button) findViewById(R.id.button_analog);  
27:      analogButton.setOnClickListener(this);  
28:      digitalButton = (Button) findViewById(R.id.button_digital);  
29:      digitalButton.setOnClickListener(this);  
30:      textClockButton = (Button) findViewById(R.id.button_textclock);  
31:      textClockButton.setOnClickListener(this);  
32:      FloatingActionButton fab = (FloatingActionButton) findViewById(R.id.fab);  
33:      fab.setOnClickListener(new View.OnClickListener() {  
34:        @Override  
35:        public void onClick(View view) {  
36:          Snackbar.make(view, "Replace with your own action", Snackbar.LENGTH_LONG)  
37:              .setAction("Action", null).show();  
38:        }  
39:      });  
40:    }  
41:    @Override  
42:    public boolean onCreateOptionsMenu(Menu menu) {  
43:      // Inflate the menu; this adds items to the action bar if it is present.  
44:      getMenuInflater().inflate(R.menu.menu_main, menu);  
45:      return true;  
46:    }  
47:    @Override  
48:    public boolean onOptionsItemSelected(MenuItem item) {  
49:      // Handle action bar item clicks here. The action bar will  
50:      // automatically handle clicks on the Home/Up button, so long  
51:      // as you specify a parent activity in AndroidManifest.xml.  
52:      int id = item.getItemId();  
53:      //noinspection SimplifiableIfStatement  
54:      if (id == R.id.action_settings) {  
55:        return true;  
56:      }  
57:      return super.onOptionsItemSelected(item);  
58:    }  
59:    @Override  
60:    public void onClick(View v) {  
61:      FragmentManager manager = getFragmentManager();  
62:      FragmentTransaction transaction = manager.beginTransaction();  
63:      if(v==analogButton){  
64:        f = new AnalogFragment();  
65:      } else if (v==digitalButton){  
66:        f = new DigitalFragment();  
67:      } else if (v==textClockButton) {  
68:        f = new TextClockFragment();  
69:      }  
70:      transaction.replace(R.id.fragment_container, f);  
71:      transaction.commit();  
72:    }  
73:    @Override  
74:    public void onFragmentInteraction(Uri uri) {  
75:      //  
76:    }  
77:  }  

Done.

Tuesday, April 17, 2018

Upgrade Android Studio to 3.1

New in Android Studio v3.1.1 on Stable channel are
  • For those who use C++, there is a CPU performance profiler that troubleshoot codes with the  simpleperf tool. 
  • Better lint support to check quality of codes for Kotlin (an alternative JAVA language). From the command line, lint can be accessed with the tool gradlew lint.
  • Improved  SQLite's and Room's table query and creation.
  • The default compiler uses D8 dexer which have the capability to make codes much smaller and more accurate step debugging.
  • Improved build output window to trace errors in a tree view.
  • Upgrade to the IntelliJ Idea 3.3 platform. This is the base platform of which Android Studio IDE is built.
  • Improved network profiler to trace network request on multi-threaded traffic.
The new version patch size is 456MB. Can hardly spot any difference from previous versions but its running much more smoother.

Android Studio 3.1.1 Workspace


Here is the current PC setup
  • Android Studio version: 3.0.1 (build 171.4443003) 
  • Centos 7.4 (64 bits) Linux 3.10.0 x86_64 amd64
  • OpenJDK 64-bit v1.8.0_161
  • Gradle 4.3.1
  • Apache Ant 1.9.6

This is how I upgraded to Android Studio 3.1.1

Check for updates


Canary or Stable channels can be check with the following steps.
Open Android Studio menu and click File ->Settings ->Preferences. On left panel choose Appearance & Behavoir ->System Setting ->Updates. Choose the Stable Channel from Automatically check updates for.

Click Check Now. This should retrieve latest update on the Stable Channel.

Step 1: Update Android Studio

Choose to update from the popup window when Android Studio is open.


Do the steps above if you have not retrieved the updates information. Click Update and Restart.


Alternatively, at the bottom of the Android Studio start page, click "Check" if you do not find the update option.

Once update starts, this will begin with download of the required files.

Step 2: Configuration

After it has installed the update, choose to import my settings from a previous version (keep existing configuration) from the window Import Studio Settings from: choose the option below and click "Ok"

Previous version (~/.AndroidStudio3.0/config)

Step 3: Update Plugin and other components

Close all emulators then open an existing project. This will have the usual build checks, once the gradle has started processing, the following window will appear.


Click Update to update Android Gradle Plugin to version 3.1.1 and Gradle to version 4.4. Wait until the Gradle project sync in progress... is completed.

At the window IDE and Plugin Updates, click "update". To update currently installed SDK and it tools, click "Update now".


Once completed download, click Finish. In my case it took 1.5GB of downloads.


Next up: Will write on creating a Fragment type application with Android Studio 3.1.
Done.

Friday, April 13, 2018

Howto Install Evernote on Linux Mint


One of the tools to capture my notes on a PC and Android mobile device is Evernote. Searching online today, it is clear that Evernote is not available on Linux (Mint), however it has been implied that their API is sufficient for anyone to develop a version of Evernote (Evernote on Linux). This means no Evernote application on Linux. Good news for the Linux community as the API documentations are available at https://dev.evernote.com/

Nixnote by baumgarr provides you access to Evernote on Linux Mint along with a user manual in PDF. Download the version suitable for you at https://sourceforge.net/projects/nevernote/files

Nixnote2 on Linux Mint


My set up (inxi -S)
Kernel: 4.10.0-38-generic x86_64 (64 bit)
Distro: Linux Mint 18.3 Sylvia
Desktop: Cinnamon 3.6.7


Step 1: Download nixnote

Locate the file online from Sourceforge and download. The file I downloaded to my Download folder is

nixnote2-2.0.2_amd64.deb

Step 2: Install from command prompt


$ cd ~/Download
$ sudo apt install ./nixnote2-2.0.2_amd64.deb
$ apt install libcurl3 libcurl3-nss

This installed the dependency packages libcurl3, libpoppler-qt5-1 and tidy.

Troubleshoot: Error

QSqlDatabase: QSQLITE driver not loaded
QSqlDatabase: available drivers:
ERROR 2018-04-13 00:50:37.788 ( sql/databaseconnection.cpp @ 44 ) Error opening database:  QSqlError(-1, "Driver not loaded", "Driver not loaded")


Solution: At CLI type

$ apt install lua5.2-sql-sqlite3
$ apt install libqt4-sql-sqlite

Step 3: Run Nixnote

At the Desktop Menu ->Internet ->Nixnote2

Troubleshoot: Nothing appears after click Nixnote2.

At CLI the error shows:

nixnote2: error while loading shared libraries: libpoppler-qt4.so.4: cannot open shared object file: No such file or directory

Solution: Open CLI and type


$ apt install libpoppler-qt4-4
$ nixnote2

Usage

Once its started, Click in the menu File ->Add another user. Key in your new user name.
Click File ->User Account Maintenance. Choose the new user.
Click Tools ->Synchronised

Wait for it to download from Evernote.

Friday, March 16, 2018

VNC Troubleshoot Cannot access vdagent virtio channel /dev/virtio-ports/

On Centos 7, the vncserver started for each service is able to launch and users can login remotely. Within 1 minute, this service crashes and the usual command (see below) to start the vncserver fails.

$ sudo systemctl start vncserver@:1

The reason for this failure is capture in the command;

$ sudo systemctl status vncserver@:1

There were 2 items to take note,
  1. Users were launching the vncviewer almost immediately upon the server boot up.
  2. The following error appears "Cannot access vdagent virtio channel /dev/virtio-ports/" upon checking the status.

Whats on the Linux?

Centos Linux version 7.4.1708 (Core)
Tigervnc version 1.8.0

Spice [reference Fedora]

Spice aims to provide a complete open source solution for interaction with virtualized desktop.  The Simple Protocol for Independent Computing Environments (SPICE) is used for client-server communication. Spice adds a QXL display device to QEMU and provides drivers for this device for both X and Windows. It also provides a Spice server and VDAgent to handle connections and transmit the information via the SPICE protocol to clients. The Spice project provides a Linux, Windows, and HTML5 client. There are experimental Mac OS X and Android clients as well.

This /dev/virtio-ports is created in this feature that modifies the current single-port virtio-console device to guests running on top of qemu and kvm. It exposes multiple ports to the guest in the form of simple char devices for simple IO between the guest and host userspaces. It also allows for multiple such devices to be exposed, lifting the current single device restriction.

Somehow, these were installed on the server.

$ rpm -qa \*spice\*
spice-vdagent-0.14.0-14.el7.x86_64
spice-server-0.12.8-2.el7.1.x86_64
spice-gtk3-0.33-6.el7_4.1.x86_64
spice-glib-0.33-6.el7_4.1.x86_64

The RPM documentation on spice-vdagent states
"* Client mouse mode (no need to grab mouse by client, no mouse lag)
this is handled by the daemon by feeding mouse events into the kernel via uinput. This will only work if the active X-session is running a spice-vdagent process so that its resolution can be determined.
* Automatic adjustment of the X-session resolution to the client resolution
* Support of copy and paste (text and images) between the active X-session and the client"

I make an assumption that if no virtualisations are needed on the server, its a matter of deleting these packages. However, I have an Android Emulator that have dependency on the virtio-ports. Its still a question mark if VNC depends on spice-vdagent.

Solution

Step 1. Start SPICE agent.

At the command line on the host server, start the spice agent.
$ sudo systemctl start spice-vdagentd.service

Check and ensure that this service runs at boot up.
$ sudo systemctl show spice-vdagentd |grep enable
UnitFileState=enabled
UnitFilePreset=enabled

Step 2. Give host server time

Allow the Linux server to fully boot up all processed before attempting to start a VNC client session.


Done

Monday, March 12, 2018

Laravel 5 and Error key was too long

The server was running PHP applications without any fuss, everyone is happy on this 12th March 2018. Laravel 5 came in that one day and a simple application was launched to show the default Laravel welcome screen. The next step was to create a CRUD application with storage to the local database.

A Model is created of a simple Task object. The room fell silence after the command, php artisan migrate

SQLSTATE[42000]: Syntax error or access violation: 1071 Specified key was too long; max key length is 767 bytes (SQL: alter table users add unique users_email_uniq(email))


What was wrong? Never mind that, lets see whats on the server!

  • Centos version 7.4.1708
  • Apache httpd  version Apache/2.4.6 (CentOS)
  • Mariadb (MySQL fork) version 5.5.56-MariaDB
  • PHP version 7.2.2 (cli) with Zend Engine v3.2.0
  • Laravel 5.6.7
  • Composer versioon 1.6.3
  • npm version 3.10.10

All of above are tested and working on its own. Going back to analyse the error, its database related. The respective tables of migrate, users were generated in the database, but the new model "task" isn't.The related code is in the file <laravel5>/database/migrations/2014_10_12_000000_create_users_table.php


On the database side, changed Collation to utf8mb4_unicode_ci but the error is still there. This is a 4-byte UTF-8 Unicode Encoding and as described in MySQL 5.5, it is
  1. In UTF8 it uses 3 bytes per character, containing only BMP characters. Utf8mb4 supports maximum 4 bytes per character and includes supplementary characters. 
  2. Utf8mb4 is a superset of Utf8.
  3. To save space, utf8mb4 is to use VARCHAR instead of CHAR type for BMP characters. 
 Changing a table from utf8 to utf8mb4 can be done with
ALTER TABLE table_name CONVERT TO CHARACTER SET utf8mb4 COLLATE utf8mb4_unicode_ci;

e.g.
ALTER TABLE `users` CONVERT TO CHARACTER SET utf8mb4 COLLATE utf8mb4_unicode_ci;

Solution

Make the whole Laravel application and the database server utf8mb4 aware.

Step 1. Edit file  <laravel5>/config/database.php

'charset' => 'utf8mb4',
'collation' => 'utf8mb4_unicode_ci',
'engine' => 'InnoDB ROW_FORMAT=DYNAMIC',
DYNAMIC allows to store of long key indexes.

Step 2.  Edit file /etc/my.cnf


[mysqld]
# default character set and collation
collation-server = utf8mb4_unicode_ci
character-set-server = utf8mb4

# utf8mb4 long key index
innodb_large_prefix = 1
innodb_file_format = barracuda
innodb_file_format_max = barracuda
innodb_file_per_table = 1

 Step 3. Edit file /etc/my.cnf.d/client.cnf


[mysql]
default-character-set=utf8mb4

Step 4. Restart database server

Stop then start the database server with

$ sudo systemctl stop mysqld
$ sudo systemctl start mysqld

Done.

Points to note

The error states maximum key length is 767 bytes for the email field. In Laravel 5 the migration file for "Users" declared a string that gets created in the Mariadb database. Problem in question is adding the "unique" string that get generated in the database "Users" for field "email" with type VARCHAR(255) and collation utf8mb4. MySQL has to actually index the whole value to complete the operation. This calculates to give maximum size of

255 characters x 4 bytes = 1,020 bytes (MAXIMUM BYTES)

This looks like sufficient space, but why the error?
When Laravel writes/reads data to MySQL, it utilises a call to the local MySQL client/server that takes this as default of uf8 which is having maximum 3 bytes per character (due to the mysql default client/server settings). A little bit of calculation gives

255 characters x 3 bytes = 765 bytes (MAXIMUM BYTES)

In the above solution, there is access to modify the database configurations. What if you do not have such an access? The solution is to reduce the default string length sent by Laravel. Taking 191 as maximum characters, we get

191 characters x 4 bytes = 764 bytes

Edit file <laravel5>/app/Providers/AppServiceProvider.php

Add after the "use .... \ServiceProvider;"
use Illuminate\Support\Facades\Schema;

Add in the "public function boot( )"
Schema::defaultStringLength(191);

Save and from the project's main folder, run migration
$ php artisan migrate

OR
Alternatively, changed the field "email" that was declared unique to collation "utf8". It worked for me, but some people have mentioned it didn't work for them.

Done

Monday, February 26, 2018

Installing Nodejs and NPM

Nodejs provides JavaScript with a way to optimise single threaded and single CPU core processing. 
NPM is a package manager to deliver applications. Its like yum on Centos linux.

In this case, I am installing Cordova for Android development on Centos 7.4 and it required nodejs along with npm. Hence, this article came along the way.

Step 1: Install Epel repository

$ sudo yum install epel-release  
$ sudo yum info nodejs
It shows nodejs version 6.12.3


Step 2: Install nodejs

Install the development environment then nodejs. This will install together the npm (version 3.10.10)
$ sudo yum --setopt=group_package_types=mandatory,default,optional groupinstall "Development Tools"
$ sudo yum install nodejs

Check installed version
$ node -v
$ npm -v

Step 3: Run Hello World

Create this script and name it as helloworld.js to test on a command line and the web browser.

var http = require('http');

http.createServer(function (req, res) {
    res.writeHead(200, {'Content-Type': 'text/html'});
    res.end('<p>This is <b>Hello World</b></p>');
}).listen(8080);
console.log('This example is my world!');


At a command line, type
$ node helloworld.js

This should display the output on the command line.
Next, open a web browser and type the following url

localhost:8080

Continue with Cordova installation from previous article.

Remove Defunct or Zombie processes

On Linux systems (Centos, Fedora, Ubuntu, Mint, Puppy), a running application is identified by one or more processes. Example when running a document with LibreOffice Writer, the process thats related is oosplash and soffice.bin as can be seen below.

tboxmy  5262  0.3  0.0 299672  3272 ?        Sl   10:17   0:00 /usr/lib64/libreoffice/program/oosplash --writer
tboxmy  5277  3.1  1.1 1273804 89564 ?       Sl   10:17   0:01 /usr/lib64/libreoffice/program/soffice.bin --writer --splash-pipe=5

Shown in bold, the unique process identification (id) are 5262 and 5277 for the two processes. Upon using the command ps xl, it can be seen that process 5277 is spawned by process 5262. Making 5262 a parent to 5277.


What is a defunct process?

A "defunct" processes is referred as a dead process that still hogs memory resources. Its not much a problem having a defunct process, but when the system starts to have more defunct processes, the system can slow down and affect applications.

This defunct or dead process that still lingers on the system is also known as zombie process. Most appropriate, like in a horror flick! You can't kill a zombie that is already dead, so what can you do? Watch the next zombie show and try figuring that out. Luckily, on Linux systems, a zombie doesn't go around attacking or destroying resources. It only lingers on, hogging on to resources once given to it when it was a live process, at one time.

What brings about this zombie? On Linux its mostly due to bad programming that lead to errors and bugs that are not handled by the application itself.


Dealing with defunct process

Don't attempt to bring back to live a zombie process. Seek out the zombie and terminate from the system. Here are commands to handle an example zombie processes (defunct) with process id 5277.

Where are the zombie processes?
$ ps ef |grep defunct
5277 ?        Z      0:01 [example-app] <defunct>

Notice the word "defunct" and status as Z (for zombie) for the process 5277. That, is our zombie. Did you find any zombie's in your system?

The command kill is used to terminate any process and free system resources such a memory (RAM). The problem with zombie processes is that, they are dead, and can't be killed (not most of the time). What is done however, is to identify the parent process (the one responsible for creating the zombie) and terminate that process.

Identify the parent process id (5262) and terminate it.
$ ps -o ppid 5277
 PPID
 5262

$ kill -9 5262
$ ps ef |grep defunct

That is the end of the zombie. In some cases, a zombie might be holding on to a resource and it will take sometime for it to detach (give it a bit of a wait).

There are other methods to look for zombies. E.g. the ps command provides a method of displaying the parent hierarchy as follows;
$ ps xlf |grep defunct

Or in the command top, look at the second line for number of zombie processes.

What if the zombie keeps appearing on a daily basis for the same process? 

This is a problem, but sometimes its not apparent as zombie's live among the running processes without bothering anyone. Let me know if you have other than the suggestions I have list below.
  • See if there is a newer version of the application or an alternative (such as different architecture, from a different source) and install. 
  • It is possible that the application itself is not the problem. Identify any other related applications or module that is causing this zombie. Then update or find an alternative application to use.
  • Report to the application project team for a solution.

Friday, February 23, 2018

Cannot open display Error when using VNC

After opening VNC Viewer on MS Windows 10 and connecting to the Centos 7, the desktop appears as planned. However, there is an error when running some apps such as system-config-printer. The error is

Gtk-WARNING **: cannot open display:1

Good to note that the VNC server was providing the session at display 1 on port 5901. If you are running the display on another port, it wouldn't matter.

Solution:

At the user's terminal (AND as that user NOT sudo or root), add localhost to the xhost permission. Type

$ xhost +localhost

And this allows system-config-printer to run.


Wednesday, February 14, 2018

Cordova: Accepting user input

What would be the first thing in programming? A simple use of variable and user text input comes to mind. Following the previous post (link here), the Cordova programming environment is set up for Android. The existing files will be edited to do the following;

The HelloWorldApp when started, will prompt the user to enter a city name.


The user enters a city name and press "OK" button. The city name will be displayed on the app.


Step 1. Position the text to display user response.

Using a text editor, open the file index.html in HelloWorld/www and replace the previous <p> tag with the text "Hello World" with;

<div id="answer"></div>

Save the file.

Step 2. Prompt user at apps startup and display the reply.

Open the file index.js in HelloWorld/www/js

Add our function called getAnswer to the end of the file;
function getAnswer() {
    var ans = prompt("Name your city");
    if (ans.length > 0) {      
        document.getElementById('answer').innerHTML = "";      
        document.getElementById('answer').innerHTML = ans + " is a great place.";
    } else {      
        getAnswer();
    }
}


Activate the getAnswer function in the initialize:function( )by adding after document.addEventListener(...);

getAnswer( );

Step 3. Build and launch the app.

At the command line interface (CLI) or the command terminal, type

$ cordova build android
$ cordova run android

This will launch the default emulator.

In order to test the app, at any time after editing to the source files, just follow this Step 3.

Troubleshooting

Android emulator error: 
The connection to the server was unsuccessful. (file:///android_assets/www/index.html)

Edit the file config.xml in HelloWorld folder. Add the following line after the </platform> tag.

<preference name="loadUrlTimeoutValue" value="700000" />

Build and launch the app.

Blog Archive