The problem
I have just update Firefox (via Ubuntu Gnome update tools). Problem occured when I tried to edit my web content using Joomla 1.0 and the text editor choosen was;
TinyMCE result: The editor menu buttons dont appear at all
JoomlaFCK result: The pop up box for links, anchor, insert image and others appear blank
In previous Firefox 2.0.0.12, things look fine for TinyMCE and JoomlaFCK editor.
I am using Firefox 2.0.0.13 on Ubuntu 7.10:
Mozilla/5.0 (X11; U; Linux i686; en-US; rv:1.8.1.13) Gecko/20080325 Ubuntu/7.10 (gutsy) Firefox/2.0.0.13
Solution
Upgrade to Firefox 2.0.0.14 or newer. Firefox 3 at the moment is still in beta, so I decided to give it a pass for now.
Tuesday, April 29, 2008
Saturday, April 26, 2008
Found some info on OOo standards at OpenOffice.org website
Basically it includes:
Its a good read on what is OOo.
Basically it includes:
- OASIS
- Java -B3, JabRef, Synapsen, DAFFODIL
- Perl, Python - Pbib, RISImport.py
Its a good read on what is OOo.
Installing OpenOffice.org 2.4
OpenOffice.org 2.4 is out for almost a month now. Finally got a chance to install it on CentOS 5.1 and Ubuntu 7.10 Linux. I have not been using the OOo that comes with either distros, so lets uninstall the previous OOo 2.3.1 (mainstream) from both distros.
STEP 1: Download OOo 2.4 from http://www.openoffice.org
note: The are different downloads for CentOS (RPM) and Ubuntu (DEB) distros.
STEP 2: Uninstall OOo 2.3.1 (from openoffice.org website)
STEP 3: Install OOo 2.4
At first glance;
STEP 1: Download OOo 2.4 from http://www.openoffice.org
note: The are different downloads for CentOS (RPM) and Ubuntu (DEB) distros.
STEP 2: Uninstall OOo 2.3.1 (from openoffice.org website)
- Change to the OOo install folder and run setup
cd /opt/openoffice.org2.3
sudo ./setup - When OOo Installation screen opens, select to uninstall OOo complete.
STEP 3: Install OOo 2.4
- Change to the Desktop or wherever you downloaded the OOo 2.4
cd ~/Desktop - Extract the OOo 2.4 by right click as choose "Extract here" or type
tar -xzvf OOo_2.4.0_LinuxIntel_install_en-US_deb.tar.gz - Open a terminal and enter into the extracted directory (mine was called OOH680_m12_native_packed-1_en-US.9286)
- Run the setup programme at a terminal
- in Ubuntu
sudo ./setup - in CentOS
su -
./setup - Follow the installation instructions and when you are done, better re-login.
At first glance;
- It looks just like OOo 2.3.1
- Screen refresh rates are much better than OOo 2.3.1
- I have done a training session using OOo 2.3.1 materials and all works fine
- I have tried with some prev templates and all seems good. The templates include;
- calendrier
- OOOP-templates
- OOOP-accessories
- In Impress (on CentOS), I used the wizard to create and save a new presentation. Closed the presentation, then reopen with the slide names all reset to slide1, slide 2, slide 3. Arrgh where did all the slide names go to? I could not repeat this event so didnt file a bug.
Friday, April 25, 2008
Using Apache to forward request
I am getting complaints from users that the mail server is not accessible from outside the local network due to the port number being block at other networks. My mail server is using port 8383 for webmail. Following steps allow my webmail to be accessed without needing to change the mail server settings.
The Plan
I need to setup an apache 2 on Linux and later reroute the DNS to use this new sever. All this using mod proxy in Apache.
What is mod proxy? see Apache site
"A typical usage of a forward proxy is to provide Internet access to internal clients that are otherwise restricted by a firewall. "
In this example my mail server details:
servername: mail.myserver.com.my
serverip: 192.93.20.3
STEP 1: Setting up the mod proxy on 192.93.20.4
My proxy is on CentOS 5.1 with Apache 2 (httpd-2.2.3-11.el5_1.centos.3)
LoadModule proxy_balancer_module modules/mod_proxy_balancer.so
LoadModule proxy_http_module modules/mod_proxy_http.so
LoadModule proxy_connect_module modules/mod_proxy_connect.so
Go to section three of the file and add
ServerName mail2.myserver.com.my
ProxyPass / http://firewall.myserver.com.my/
ProxyPassReverse / http://firewall.myserver.com.my/
RewriteEngine On
RewriteRule ^/$ http://mail.myserver.com.my:8383/ [P]
STEP 2: Redirect DNS
The Plan
I need to setup an apache 2 on Linux and later reroute the DNS to use this new sever. All this using mod proxy in Apache.
What is mod proxy? see Apache site
"A typical usage of a forward proxy is to provide Internet access to internal clients that are otherwise restricted by a firewall. "
In this example my mail server details:
servername: mail.myserver.com.my
serverip: 192.93.20.3
STEP 1: Setting up the mod proxy on 192.93.20.4
My proxy is on CentOS 5.1 with Apache 2 (httpd-2.2.3-11.el5_1.centos.3)
- Install a Linux with Apache 2 and open the httpd.conf file
vi /etc/httpd/conf/httpd.conf - Make sure you have the following LoadModule lines (it waas there)
LoadModule proxy_balancer_module modules/mod_proxy_balancer.so
LoadModule proxy_http_module modules/mod_proxy_http.so
LoadModule proxy_connect_module modules/mod_proxy_connect.so
Go to section three of the file and add
ProxyPass / http://firewall.myserver.com.my/
ProxyPassReverse / http://firewall.myserver.com.my/
RewriteEngine On
RewriteRule ^/$ http://mail.myserver.com.my:8383/ [P]
STEP 2: Redirect DNS
- Configure the DNS to accept mail2.myserver.com at the new server 192.93.20.4 which defaults to port 80
Thursday, April 17, 2008
Evolution vs Thunderbird vs Outlook
Intrduction to emails
Mail User Agent (MUA) is also known as an Email client. MUA is used to request email
from a Mail Transfer Agent (MTA). The request can be made in 2 forms:
from a Mail Transfer Agent (MTA). The request can be made in 2 forms:
- Post Office Protocol (POP3): Messages on the server cannot be flagged (as seen or
forwarded) and messages are removed by default from the server to the MUA. - Internet Message Access Protocol (IMAP): Messages on the server can be flagged and
directories are used to managed emails on the server.
MUA must meet formating of email header ( To, CC, BCC, Reply-To) and footer as
described in RFC2822.
For firewall settings, MUA access a standard MTA via port 25 (SMTP). Currently
Transport Layer Security (TLS) is being used in many MTA for connection and transfer
security. Other ports of importance (plain/encrypted):
POP3 (110/995)
IMAP4 (143/993)
HTTP (80/443)
Anyone can read the contents or body of an email moving across MTA and MUA. Therefore
encryption of the Email content is used to protect the sensitive data. This can be in
two forms:S/MIME: requires a trusted body to recognise the userOpenPGP: users can recognise each other (no third party needed)
encryption of the Email content is used to protect the sensitive data. This can be in
two forms:S/MIME: requires a trusted body to recognise the userOpenPGP: users can recognise each other (no third party needed)
(T) PluginsLightning: Calendar tool support for WebDav and iCalendarEnigmail: adds OpenPGP message encryption and authentication to your email client. It features automatic encryption, decryption and integrated key management functionality. Enigmail requires GnuPG (www.gnupg.org) or Gpg4win for the cryptographic functions. Note: GnuPG and Gpg4win is not part of the installation.
(O) Viruses
(E) Support ServersMS Exchange, POP3, IMAP, Lotus
(E) clientGmail, Yahoo, AOL, Hotmail
(E) License: LGPL
(T) License: MPL, MPL/GNU GPL/GNU LGPL
(O) License: part of MS Office
(T) Calendar: iCalendar, WebDav
(O) Calendar: iCalendar, WebDav
(E) Calendar: iCalendar, WebDav
Platforms
Linux (E),(T)
MS Windows (T),(O)
Links:
Wednesday, April 16, 2008
Email Signatures and address book in Thunderbird 2
After having some issues with Evolution 2.12.1 on Gnome, I decided to have Thunderbird replace the Evolution Email client. After installing Thunderbird 2.0.0.12 from the mozilla.com website I needed to transfer the Addressbook from Evolution and add my Email signature. So here are the steps I took.
What is Thunderbird?
No, there is no direct import for Thunderbird. Thunderbird support import of addressbook in the form of LDIF, csv and tabs. Evolution could only export addresses with the tool evolution-addressbook-export but this continued to give unexplainable errors that seem rather familiar in previous versions. For the record, here is how the command is used
evolution-addressbook-export --format=csv > ~/Desktop/contacts.evolution.csv
You can add a VCard or a text/HTML file as a signature.
What is Thunderbird?
- Handles junk mail using Bayesian filtering and detects scams
- Handle Emails with views, tags, filters, search and virtual folders help
- Provide reader for RSS feeds like streams of email with filters, search and labeling
No, there is no direct import for Thunderbird. Thunderbird support import of addressbook in the form of LDIF, csv and tabs. Evolution could only export addresses with the tool evolution-addressbook-export but this continued to give unexplainable errors that seem rather familiar in previous versions. For the record, here is how the command is used
evolution-addressbook-export --format=csv > ~/Desktop/contacts.evolution.csv
- So, what I did in the end was to export the Evolution address with the menu
File ->Save Address Book as VCard
Select the Desktop and saved as contactlist.vcf - Use a converter to convert VCard to LDIF. For this example I accessed the site http://labs.brotherli.ch/vcfconvert and uploaded the VCard file. No big deal as there was nothing sensitive. However there were some converters that could be installed on the PC for more peace of mind about sensitivity of the data. I saved the file back as contactlist.ldif
The idea is to convert VCF to LDIF - In Thunderbird, open the addressbook and choose the menu
Tools ->Import
Select the contaclist.ldif file
You can add a VCard or a text/HTML file as a signature.
- Adding text signature. Create a textfile with your signature and store it on your harddrive. For example save as signature.nicholas.txt
- In Thunderbird choose
Edit ->Account Settings - Choose a profile and checked
Attach this signature - Click the Choose button and select the signature file signature.nicholas.txt
- Click OK
Friday, April 11, 2008
Backup files to rsync server
There are days when I have to make sure that the laptop and PC files are backup file by file. If you have a server to hold all the files, it can be made into a networked backup server. There are many ways to do this but today I will write on the rsync server for CentOS 5.1 Linux.
The rsync does transfer of file by sending just the differences in the files across the link, without requiring that both sets of files are present at one of the ends of the link beforehand. At
first glance this may seem impossible because the calculation of diffs between two files normally requires local access to both files.
1. Setting up the rsync server
I will add more details on other aspects of rsync when I have more time. This includes public/private key pair and automated backup.
--
The rsync does transfer of file by sending just the differences in the files across the link, without requiring that both sets of files are present at one of the ends of the link beforehand. At
first glance this may seem impossible because the calculation of diffs between two files normally requires local access to both files.
1. Setting up the rsync server
- Edit the file /etc/xinit.d/rsync where the yes is changed to no.
disabled = no - Restart the rsync service
service rsync restart
chkconfig rsync on - Ensure that the firewall allows rsync through
- Ensure that clients can ssh to the server
- Login to the localhost and open a terminal. Type the command
rsync -avz --delete --timeout=999 -e ssh /home/nicholas/documents/ nicholas@192.168.1.100:/mnt/backup/ - -a is to archive
- -v is verbos
- -z is to compress
- -e is to use a secure SSH instead of rsh connection
- --delete to remove any files on server that does not exist locally
- Type the password for the user nicholas when requested for password.
- To create a file to store the filter rules, open up a text editor. The format of the file is
RULE FILENAME
Where RULE + (plus) means include and - (minus) is exclude. An ** means include into sub directories. Example create a file called mylist.txt with the contents as below.
+ files.dir/
+ *.odt
+ **.ods - To make rsync recursively find files in /home based on the rules in mylist.txt
rsync -avz --exclude-from=mylist.txt --timeout=999 -e ssh /home nicholas@192.168.1.100:/mnt/backup
I will add more details on other aspects of rsync when I have more time. This includes public/private key pair and automated backup.
--
Monday, April 7, 2008
OpenOffice.org Impress broken file links
One problem I encountered today when I copied the the Impress presentation to another computer was that the graphics showed broken links. What happened was that the images in the presentations was not embedded into the copied Impress document. This meant that the document was looking for the source file.
Since it is a common problem (I have heard of this too many times), I will briefly explain a solution on this.
1. Open the original Impress document where all files (example graphics) can appear.
2. Choose Index ->Links
3. Select all the source files and click the "Break Link" button.
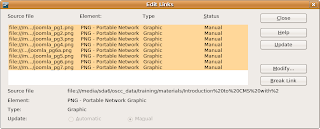
4. Click "Close" button.
The Impress file may appear larger after embedding the graphics and other files.
Thursday, April 3, 2008
Copying cells in OpenOffice.org Calc
Moving or copying cells in OpenOffice.org may seem rather strange for MS Office users. One of the problems is that the cursor remains as an "I-bar". In yesterday's training session, how to move single and multiple cells came up. I will explain the steps with an example of contents from cell C6 to C7 or also known as C6:C7.

1. Copying multiple cells.
Aim: To copy cells C6:C7 to B12:
- Highlight the cells. Do this by left click on cell C6 and drag to C7.
- Release the left button.
- Move cursor over the highlighted area (default is black) and left click. Drag cursor over to B12. Release the left button.
2. Copying or moving a single cell
Aim: To copy cells C6 to B12
- Highlight the cells. Do this by triple (i.e. 3 times) left click on cell C6. Note that when the cursor is over the selected cell, it is an “I” bar shape.
- Drag cell C6 over to B12. Release the left button.
Note: To move the cell, press the Control (i.e. Ctrl) button while dragging.
Subscribe to:
Posts (Atom)