Flash development on Linux is done with Flex SDK. Some nice people started at FB4LINUX have provided a GUI to develop Flash on Linux and this can be integrated into Eclipse IDE.
This article is an update to my other
article. Additionally,
Adobe placed a notice that they will no longer continue with the Flex Builder development. This means that you can only use command lines to work on future version of Flex. I guess this will affect FB4LINUX.
Following is a reference to install Flex SDK 4.0 on Eclipse Galileo 3.5.2.
Pre-installation checks: Have you installed Eclipse 3.5+ and Java Development Kit 1.6+
Step 1. Download the fb4linux filesDownload in 4 parts from http://code.google.com/p/fb4linux/downloads/list
FB4Linuxaa
FB4Linuxab
FB4Linuxac
FB4Linuxad
Merge them together into a BZIP2 format and extract using the command prompt at the terminal. At the folder where you downloaded the 4 files, just type
cat FB4Linux* >FB4Linux.tar.bz2 bunzip2 FB4Linux.tar.bz2 tar -xvf FB4Linux.tarI renamed the folder “Adobe Flash Builder 4” to “AFB4” since I did not want spaces between the folder name.
Copy contents of AFB4/eclipse/plugins to ~/.eclipse/[eclipse user folder]/plugins/
Step 2. Install Flex SDKDownload Flex 4.0/4.1 from http://opensource.adobe.com/wiki/display/flexsdk/Download+Flex+4
Extract a copy of the Flex SDK from Adobe into a folder, example ~/.eclipse/flex4.0
Step 3. Configure Eclipse with the Flash Builder ApplicationStart Eclipse, from menu choose
Help → Software update → Find and install
Search for new features to install
Choose the folder AFB4/eclipse
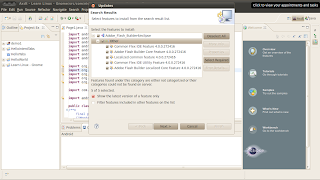
Click Finish.
A new window will open,
Select the features to install → Others
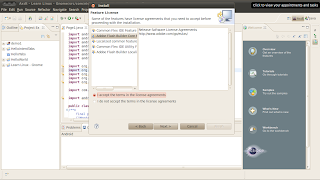
Accept the license agreements.
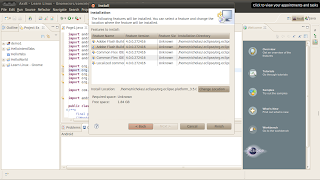
5 new applications for Flash Builder / Flex will be installed.
Restart Eclipse
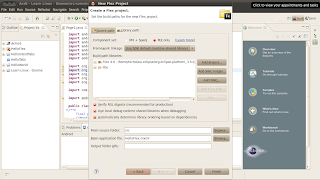
Step 4. Apply the SDK to a projectIn Eclipse, create a new Flex project
File → New → Other...
Choose Flash Builder ->Flex Project → Click 'Next'
Enter a project name, example “HelloFlex” and click on “Configure Flex SDKs”
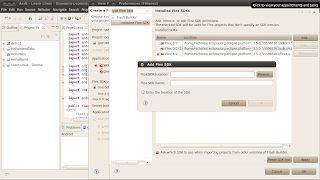
Click “Add”
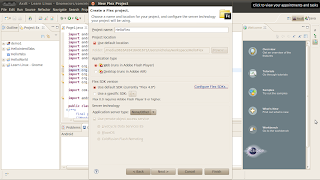
Browse to the Flex SDK directory, e.g. ~/.eclipse/flex4.0 (See step 2)
Check on Flex 4.0 (or Flex 4.1), choose Apply then OK.
Choose Next, Next then confirm the library path (no changes required, normally).
Accept to switch to Flex perspective.
Step 5. Test with HelloFlexDouble click HelloFlex.mxml
Enter following code before the last line
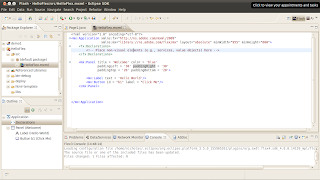
<mx:panel title="Welcome" color="blue" paddingleft="30" paddingright="30" paddingtop="20" paddingbottom="20">
<mx:label text="Hello World">
<mx:button id="b1" label="Click Me">
</mx:button>
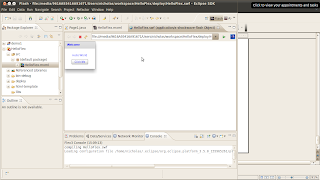
Right click HelloFlex.mxml and choose Run as ->Run Swf
These are notes just for references.


