Thursday, February 12, 2015

What causes Mozilla Thunderbird to Freeze constantly?

The last 1 month after a re-installation of MS Windows 8 and Mozilla Thunderbird, some productivity have drop and temper going up. One of the reasons is due to Thunderbird 31.4 freezing constantly.

Thunderbird email client, have always been on my Linux and MS Windows PC for years. But somehow, something changed that caused a lot of difficulties for me to work with emails. It is not clear when this started but its about the time I re-installed the computer.


Thunderbird setup:

  1. Thunderbird updated to version 31.4.0
  2. Email profile uses IMAP with the SMTP server in the same local network. There are few folders apart from the standard INBOX, SENT, which is less than 12 folders. Check for new messages is set to every 10 minutes and at startup.
  3. Address book includes sync with Google contacts
  4. Calendar includes Lightning sync with Google calendars
  5. Local folder is contains standard folders, which is less than 5 folders.
  6. The Profile folder is in the onedrive folder

Symptoms;

  1. After login, every 1 to 10 minutes Thunderbird freezes rather randomly. This "freeze" last about 30 seconds to 3 minutes and its not predictable.
  2. After I stop onedrive sync, problem still persist.
  3. Disconnect network and problem still persist.
Findings (to some extend)
Its unfortunate that I could not exactly identify the problem but I found 2 steps taken that have made this "freeze" vanish. In rush to resolve the problem, I did both at the same time.
  1. Using the Windows Explorer, access the C:\users\username and right click "appdata" folder, click "Advanced". UNCHECK Allow files in this folder to have contents indexed in addition to file properties, click "OK". Click "Apply" and choose to include subfolders.
  2. Open McAfee Internet Security Suite, it the default antivirus on the computer. Click on Real-Time Scanning (status is ON). Click "Real-Time Scanning:", current status is again On. Click "Settings", UNCHECK Email attachments. CHECK Strike a balance between the scan throroughness and my PC's speed (Recommended). Go back to the antivirus main screen, and turn off the "Scheduled Scans:"
If you encounter the same problem, do test and see which works for you.

Monday, February 2, 2015

Install Android Studio on Microsoft Windows 8

Android SDK is used for the development of Android mobile application and it utilises Java Technology. There are a number of ways to develop Android application but using command line, notepad or IDE, they will all require the basic system requirements;

  1. Java development Kit (JDK)
  2. Android SDK Tools. Alternatively, the Android Studio can be installed which comes with all the required SDK.
Following are steps to prepare for Android development on MS Windows 8 64-bit.

Step 1: 

Read information provided at the Android developer site. Then read up installation at Java site. More materials on JDK 7 is at docs.oracle.com/javase/7/docs
Good point to note is that Oracle has declared that the year 2015 is the end of public updates for JDK 7.

Following steps are just additional guide in case you prefer not to read fully the official installation guides.

Step 2:

Download JDK and install. At the point of writing, JDK 7 (jdk-7u25-windows-x64.exe) is downloaded from Oracle. Uccess MS Windows with Administration right to install and double click to start installation. This will have the JDK installed at C:\Program Files\Java\jdk1.7.0_25 which also installs a public JRE at C:\Program Files\Java\jre7 directory.

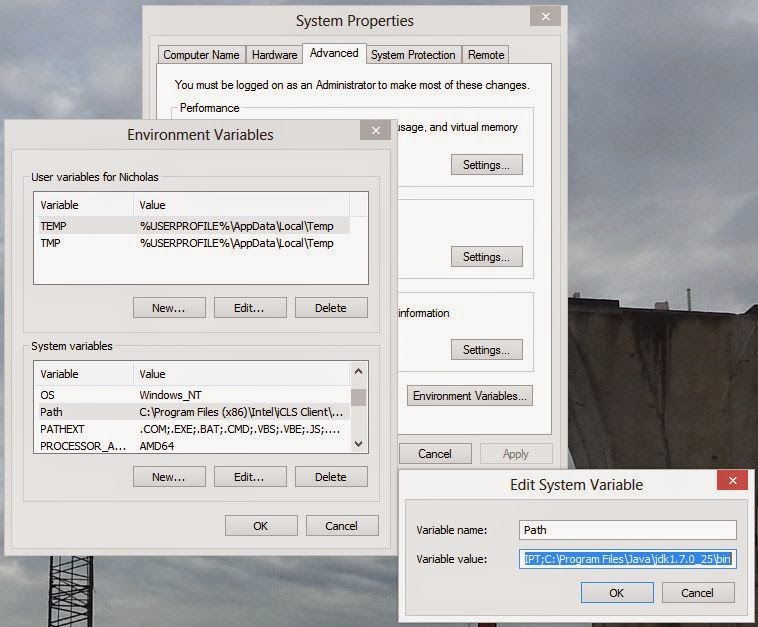
Click the Windows 8 search icon ->Settings, and type "Variable". Click on option to edit the system environment variables, then click "Environment variables", locate the system variables area, click the Variable "Path", then click "Edit". Append to the end of the "Variable value:"

;C:\Program Files\Java\jdk1.7.0_25\bin

Then click "OK".

Next, in  System variables, click "New..." and enter following values;
name: JAVA_HOME
value: C:\Program Files\Java\jdk1.7.0_25

Then click "OK" until all the window closes.

Step 3:

Download and install the Android studio bundle from developer.android.com. Double click and follow the installation instructions.

Note: this install at C:\Program Files\Android\Android Studio
and the SDK location: C:\Users\tboxmy\AppData\Local\Android\sdk

There is an option to manually install Android SDK Tools which is at revision 24.0.2. Ignore it.

Step 4:

Start Android Studio, start a new project and click
Tools-> Android-> SDK Manager.

It should recommend to install several basic packages to compile using the latest SDK (or Android). If you intend to compile for the Android 3.0 API, then check the box for "Android 3.0 (API 11)".

Click on the "Install ... packages..." button. Click on the accept license, then "Install".

Post Installation


  1. If your PC have the Intel Virtualization Technology feature, install Intel HAXM (see link) to speed up the Android Emulator. 
  2. Update the Android Studio (see My past post).
  3. Access the Android command line with ADB (see Debug Android App in Android Studio)


Post install notes:

These are just ramblings and just for personal reference.

As a minimum when setting up the Android SDK, download the latest tools and Android platform:

1. Open the Tools directory and select:
        Android SDK Tools
        Android SDK Platform-tools
        Android SDK Build-tools (highest version)
2. Open the first Android X.X folder (the latest version) and select:
        SDK Platform
        A system image for the emulator, such as
        ARM EABI v7a System Image


Finally

Proceed to create the first application from https://developer.android.com/training/basics/firstapp/index.html

Ref https://developer.android.com/sdk/installing/adding-packages.html


Howto Update to Android Studio 1.1

The Android Studio 1.1 Preview 2 is released to address bug fixes. Many new Android developers will benefit lots from the bug fixes and will have better experience on Android development with this powerful IDE.

Look for details on the update at android.com. One nice feature is having the AVD Manager on a separate window. This is great for multi display set ups.


Blog Archive