- Java development Kit (JDK)
- Android SDK Tools. Alternatively, the Android Studio can be installed which comes with all the required SDK.
Following are steps to prepare for Android development on MS Windows 8 64-bit.
Step 1:
Read information provided at the Android developer site. Then read up installation at Java site. More materials on JDK 7 is at docs.oracle.com/javase/7/docs
Good point to note is that Oracle has declared that the year 2015 is the end of public updates for JDK 7.
Following steps are just additional guide in case you prefer not to read fully the official installation guides.
Step 2:
Download JDK and install. At the point of writing, JDK 7 (jdk-7u25-windows-x64.exe) is downloaded from Oracle. Uccess MS Windows with Administration right to install and double click to start installation. This will have the JDK installed at C:\Program Files\Java\jdk1.7.0_25 which also installs a public JRE at C:\Program Files\Java\jre7 directory.
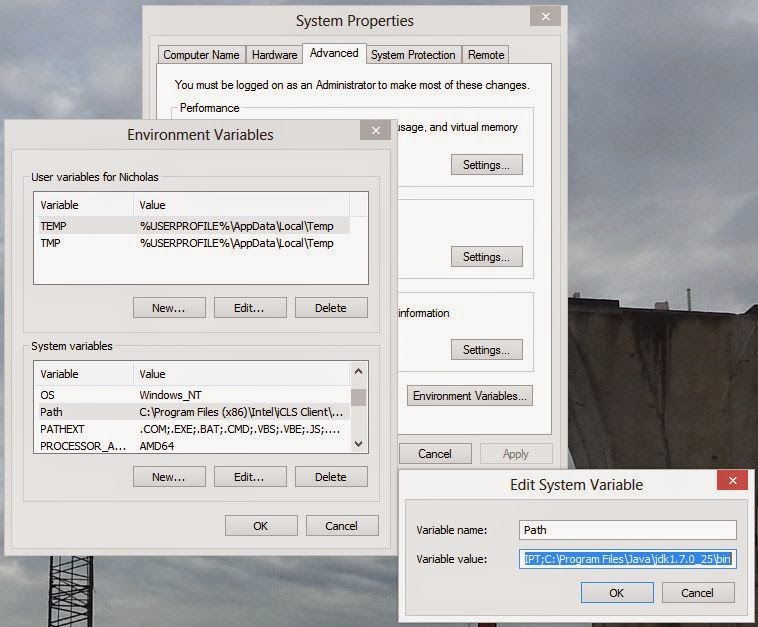
Click the Windows 8 search icon ->Settings, and type "Variable". Click on option to edit the system environment variables, then click "Environment variables", locate the system variables area, click the Variable "Path", then click "Edit". Append to the end of the "Variable value:"
;C:\Program Files\Java\jdk1.7.0_25\bin
Then click "OK".
Next, in System variables, click "New..." and enter following values;
name: JAVA_HOME
value: C:\Program Files\Java\jdk1.7.0_25
Then click "OK" until all the window closes.
Step 3:
Download and install the Android studio bundle from developer.android.com. Double click and follow the installation instructions.
Note: this install at C:\Program Files\Android\Android Studio
Note: this install at C:\Program Files\Android\Android Studio
and the SDK location: C:\Users\tboxmy\AppData\Local\Android\sdk
There is an option to manually install Android SDK Tools which is at revision 24.0.2. Ignore it.
Step 4:
Start Android Studio, start a new project and clickTools-> Android-> SDK Manager.
It should recommend to install several basic packages to compile using the latest SDK (or Android). If you intend to compile for the Android 3.0 API, then check the box for "Android 3.0 (API 11)".
Click on the "Install ... packages..." button. Click on the accept license, then "Install".
Post Installation
- If your PC have the Intel Virtualization Technology feature, install Intel HAXM (see link) to speed up the Android Emulator.
- Update the Android Studio (see My past post).
- Access the Android command line with ADB (see Debug Android App in Android Studio)
Post install notes:
These are just ramblings and just for personal reference.
As a minimum when setting up the Android SDK, download the latest tools and Android platform:
As a minimum when setting up the Android SDK, download the latest tools and Android platform:
1. Open the Tools directory and select:
Android SDK Tools
Android SDK Platform-tools
Android SDK Build-tools (highest version)
2. Open the first Android X.X folder (the latest version) and select:
SDK Platform
A system image for the emulator, such as
ARM EABI v7a System Image
Finally
Proceed to create the first application from https://developer.android.com/training/basics/firstapp/index.html
Ref https://developer.android.com/sdk/installing/adding-packages.html
No comments:
Post a Comment