Friday, May 28, 2021

How to clone a git branch

These notes are for Centos Linux version 7 (git 1.8) and 8 (git 2.7). 

Git is used as a repository to maintain source codes. Its advantage is in being able to manage source codes and files in a distributed way. This allow each one author to have the history and control of the source codes and files that are in their own access. 

A repository is commonly stored at a server and is accessed commonly through secure shell (SSH) or web (HTTP, HTTPS). Programmers, testers and others may clone (make a copy) of the repository OR a branch of the repository to their local machine.

Example of the command to clone by SSH where the username is git, the server URL is github.com 

git clone git@github.com:tboxmy/laraveljsonapi.git

When a repository is created, it is common to have the default branch name "master". From there, source code for development or testing is created in a new branch. 
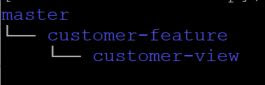
git branch listing


Example it can be name by functionality "customer-feature". From that branch, another new branch can even be created, for example "customer-view".

git checkout -b customer-feature
git checkout -b customer-view

To switch between branches, use the command checkout

git checkout customer-feature

Then this new branch can be added to the repository with the option "-u".

git push -u origin customer-feature

Further changes to the branch can be easily added to the repository with the command

git push origin customer-feature


Most of the commands listed here should require administration rights.

Installation

yum install git
OR
dnf install git

Clone the whole repository

git clone git@github.com:tboxmy/laraveljsonapi.git

cd laraveljsonapi

Then list the branches in local and at remote server.

git branch -a

View activity at remote branch

git remote show origin

Clone a branch from repository

Start from a directory where the branch should be created.

git clone -b customer-feature git@github.com:tboxmy/laraveljsonapi.git

cd customer-feature

View log activity of that branch

git log

Thursday, March 11, 2021

Backup Postgresql Database

Here are the basic steps to backup and restore Postgresql database. At this point of writing, I am using Postgresql 10 and 11 on Centos Linux 8. 

In this article, backup database is inventory_system and restore of the backup is to another database that I will call cupboard.

Singles Database

Step 1: Login as postgres user

su - postgres

or 

sudo su postgres -

Step 2: Dump the database content to a file using the tool pg_dump

pg_dump inventory_system >  inventory_system-20210312.bak

or when database is located at IP 10.1.1.123 with port 5432

pg_dump -h 10.1.1.123 -p 5432 inventory_system >  inventory_system-20210312.bak

Step 3: Create the new database

createdb cupboard

Step 4: Restore the database file with psql

psql cupboard <  inventory_system-20210312.bak


On MS Windows 10 prompt that is provided through Laragon, the postgres user login is required

pg_dump -U postgres cm2020_1 > test.bak


Schedule backup

Cron job is suitable to automate the backup process mentioned above. To schedule a cron job, use the command

crontab -e

Then save the following instruction to run at midnight of every Saturday

0 0 * * 6 pg_dump -U postgres inventory_system > ~/postgres/backups/inventory_system-20210312.bak

Save and exit from the text editor.


Refer to Cron activities in the file /var/log/cron

For automated backup, there is a good note with the scripts at Postgresql wiki.

Sunday, February 28, 2021

Raspberry Pi display problems

Having successfully installed a new Raspberry Pi with Raspbian OS, it is common that the next reboot the screen display just leaves a blank screen. You just know its the display setting run when at the boot screen the system messages can be seen.

Firstly, the most important file you must know is the /boot/config.txt

This contains many configuration, that require the file to be save and RPi to be restarted. 

If your display is working, but the resolution is wrong, then access the start menu And look for Configuration, or directly access the resolution setting, type 

raspi-config


When the display is a touch screen, it would be a good idea to install a virtual keyboard. Do this by

sudo apt install florence

Back to troubleshooting a display that's not showing. Always check your display is powered, and that system messages appear at boot before proceeding here.


Step 1.

Ensure RPi is connected to your local network, then SSH to your RPi. On MS Windows there is a software named Putty. 


Step 2. 

Determine your device supported resolutions. Use either of following commands;

tvservice -m CEA

tvservice -m DMT

Depending on whether you are connected to a TV (CEA) or computer monitor (DMT). Generally, a TV with VGA cable will use CEA. 


Step 3.

Edit the file /boot/config.txt

Use the settings identified in Step 2. If you are using CEA then the value of hdmi_group=1,

if its DMT then hdmi_group=2. 


Eg 1. when connected to a monitor with resolution 1280×720 and frequency 60Hz, these are the settings;

hdmi_safe=1

hdmi_group=2

hdmi_mode=85

Eg 2. when connected to a TV through HDMI with resolution 640x480 and frequency 60Hz. Since the TV have a standard HDMI connector, hdmi_safe will be commented out. These are the settings;

#hdmi_safe=1

hdmi_group=2

hdmi_mode=4


Reference: Raspberry site

Thursday, February 18, 2021

How to alter Postgresql table owner

 All this while I have been changing table owners individually in a specific schema. One fine day, there was a requirement to transfer all tables to another owner without changing the database ownership.


The existing tables where having owner as "postgres", but to allow other application to access, a separate user is created and allowed access. Here is how its done to assign the user;

\c mydatabase;

ALTER TABLE public.users OWNER TO contractors;


In the case where ALL tables are to have a new owner, then following can be done

select 'ALTER TABLE ' || table_name || ' OWNER TO contractors;' from information_schema.tables where table_schema = 'public' \gexec ;

Wednesday, February 10, 2021

Select Query with JSON column in Postgresql

 Recently I encountered a problem to use JSONB type column with Reportserver and log it in their forum. Since I have made the example, why not post it here? 

Here is an example to use JSONB type column in Postgresql 10 and newer.

Step 1: Create the sample database

CREATE TABLE public.products (
    id int4 NOT NULL PRIMARY KEY,
    "name" varchar NOT NULL,
    "product" jsonb NULL
);

Step 2: Add sample data


id|name       |product                                                               |
--|-----------|----------------------------------------------------------------------|
1|Orange bod |[{"id": 18, "name": "Orange Gala", "value": "1Bll-1-99-aaa"}]         |
2|Chicken Pie|[{"id": 4, "name": "Downtown Chicken Pie", "value": "1Bll-1-201-aaa"}]|
3|Apple Pie  |[{"id": 5, "name": "Apple Pie", "value": "1All-1-1000-xzp"}]          |

Step 3: Run an SQL query

SELECT name, jsonb_agg(t->'name') AS brand, jsonb_agg(t->'value') AS code 
FROM products, jsonb_array_elements(products.product) t GROUP BY name; 

The results


name       |brand                   |code               |
-----------|------------------------|-------------------|
Apple Pie  |["Apple Pie"]           |["1All-1-1000-xzp"]|
Orange bod |["Orange Gala"]         |["1Bll-1-99-aaa"]  |
Chicken Pie|["Downtown Chicken Pie"]|["1Bll-1-201-aaa"] |


Another method is to include a WHERE clause as shown below;

SELECT name, jsonb_agg(t->'name') AS brand, jsonb_agg(t->'value') AS code 
FROM products, jsonb_array_elements(products.product) t
WHERE t->>'name'='Orange Gala'
GROUP BY name


I hope this simple example will benefit you. 

Friday, January 22, 2021

SQL to replace username field with user id

The scenario is, a table called assets was loaded through a script, but the column updated_by which should contain the user id, is stored with the user name instead. How to replace the updated_by field with the user id?


Here is an example of the table structure;

assets(id, name, description, updated_by)

users(id, name)


Solution 

Through the SQL command;

UPDATE assets t2

SET    updated_by = t1.id

FROM   users t1

WHERE  t2.updated_by = t1.user_id;

Wednesday, January 13, 2021

How to install Docker ReportServer Community

 ReportServer for Community is a Java based application that is available through Docker. There are options to install manually but some knowledge on Tomcat and Java is required.

The Docker (version 20.10.1) option installs on an image with Debian release 10 (Buster) with ReportServer version 3.3.0. 

The ReportServer for community image is available at https://bitnami.com/stack/reportserver/containers

Pre-requisite:

  • Installed Docker version 20+
  • You have create an account with docker and Docker is running with your signin.


On Windows, open powershell and go to your install folder. In my case its C:\users\tboxmy

Retrieve from the server required image

docker pull bitnami/reportserver

Yet to know if this line was useful, as I did not run docker-compose up -d

curl https://raw.githubusercontent.com/bitnami/bitnami-docker-reportserver-community/master/docker-compose.yml > docker-compose.yml


Configure network and database

docker network create reportserver-tier

docker run -d --name mariadb -e ALLOW_EMPTY_PASSWORD=yes -e MARIADB_USER=bn_reportserver -e MARIADB_DATABASE=bitnami_reportserver --net reportserver-tier --volume C:\Users\nasbo\mariadb-persistence:/bitnami bitnami/mariadb:latest


List the images

docker images


Start ReportServer

docker run -d --name reportserver-community -p 80:8080 -e ALLOW_EMPTY_PASSWORD=yes -e REPORTSERVER_DATABASE_USER=bn_reportserver -e REPORTSERVER_DATABASE_NAME=bitnami_reportserver --net reportserver-tier bitnami/reportserver:latest


Access ReportServer from a web browser

http://localhost/reportserver

Use default username user and password as bitnami


Friday, November 13, 2020

Laravel quick commands for Artisan

 Laravel utilise Artisan to help make working with development faster. This allow programmers to focus more on the development than the management of packages and some repeated workflows.


Here I list the top few commands that I use;

For scaffolding

  • make:controller
    • Create a controller file in app/Http/Controllers
    • php artisan make:controller ArticleController
  • Create a default model
    • php artisan make:model Article
  • Create a model along with migration and factory
    • php artisan make:model Article -crmf
  • Create migration file
    • php artisan make:migration create_articles_table
  • Process all the migration file that haven't been run before
    • php artisan migrate
  • Create Seeder file
    • php artisan make:seeder CustomerTableSeeder
  • Process seeder file
    • php artisan db:seed
    • php artisan db:seed --class=CustomerTableSeeder
  • List command help
    • php artisan list
  • Routing
    • php artisan route:list
  • Debugging
    • php artisan tinker
  • Front-end user interface
    • php artisan ui bootstrap|vue|react
  • Remove Front-end user interface
    • php artisan preset none
  • Create front-end with user authentication
    • php artisan ui vue --auth
  • A stand alone server start, maintenance mode, normal mode
    • php artisan serve
    • php artisan down
    • php artisan up
  • Refresh laravel optimisation files
    • php artisan dump-autoload

Tuesday, November 10, 2020

Laravel and logging of errors

During the course of development, there are many tools and approaches to debug a programme. In Laravel there is a default logging that supports RFC 5424 and here is how to apply it in a Laravel 7 based application.

As a point of reference, this article is for default Laravel 7 on a Apache2 webserver. Which means, if PHP-FPM is used, check the webserver log files. Additionally, there are many more advanced logging by Laravel, for example use of Rollbar, if you have time to explore.

What is Laravel logging? 

Withing Laravel framework, its config/app.php determines classes that does logging. Monolog logging library is used to provide the classes that can be called from the framework. Its flexibility allows logging across different files and even disk. 

The default logging uses a channel known as stack and is configured as

 'default' => env('LOG_CHANNEL', 'stack'),

This provides logging in several levels of severity that range from in the following order;

  • info
  • debug
  • notice
  • warning
  • error
  • critical
  • emergency

Context data is provided for a more consistent format as described in PSR-3.

How to enable default logging? 

Edit the file .env and have this line to enable debug mode;

APP_DEBUG=true

Where is the default logging done? It all in the file laravel.log found in <project_folder>/storage/logs. Ensure the application have correct permission to write app/storage and all its subfolders. When using Selinux, also ensure its allowed to write.

When is logging done?

This can be done practically any where, such as within the controller, views and any other executable.

How to do the logging? 

Taking that you have by now enabled debug mode.

Lets look at how its done within a Controller.

  1. Ensure top of the controller file contains the line
    • use Illuminate\Support\Facades\Log;
  2. Write the code to log your message
    • Log::info('This is where the code runs');

Once when you run the application and the Log::info( ) gets triggered, have a look at the end of file storage/logs/laravel.log to find the message.

Will consider to write further on formatting of the log in order for logging tools to pull data and generate reports or monitoring

Wednesday, November 4, 2020

Laravel ErrorException file_put_contents

After working on any Laravel project for a period of time, its possible that you would change the project folder to another location or drive. Lets say I have a Laravel project called employeeManagement in C:\users\tboxmy\employeeManagement and I make a copy of this to Z:\tboxmy\workspace\project while renaming the project name. 


Problem

For some strange reason, the pages are not loading properly and the following error appears.

ErrorException

file_put_contents(Z:\tboxmy\workspace\project\storage\framework/sessions/c34niIDr5qyV8Fyf0qXFLXSF1IlOv3yOulSC9sHI): failed to open stream: No such file or directory 

I have also noticed that the same problem causing that ErrorException SOMETIMES doesn't appear but it is actually loading pages from the original folder location. So when I edit my codes in Z:\tboxmy\workspace\project the changes just doesn't appear in the application. To determine this, just try to rename the original project folder and this error WILL appear.

There are 2 aproches to solve this, which does the same thing.

Solution 1

Step 1

Open a command line and ensure you are in the same folder as the project, in this case Z:\tboxmy\workspace\project\
 

Step 2

Type the command 

php artisan config:cache 


Step 3 : Update the cache in all installed plugins/libraries

composer install
npm install
npm run dev

Solution 2

Step 1

Using a file manager, or at the command prompt, open the project folder and go to the folder bootstrap\cache
In this case Z:\tboxmy\workspace\project\bootstrap\cache
 

Step 2

Delete the file config.php

Repeat Step 3 above.

Saturday, September 12, 2020

Binding Mouse Buttons on Linux Mint Tricia

 Following describes how was the mouse buttons response and configured for

Tinytech GM-924 on Linux Mint 19.3 Tricia.


Initial response

A. Firefox web browser

Within the Firefox web browser, the left and right mouse buttons functioned as normal. The center scroll button caused the audio volume to increase or decrease. When scroll button was clicked, an X appeared.

At the left side were 2 buttons. Both only showed an X when clicked.

Hold down Left+Right button, the auto scroll appears. If this doesn't appear in Firefox web browser, you can set it up in Firefox menu.

Menu ->Preferences. Search for scroll.

Enable "Auto Scrolling", restart Firefox web browser.

Sometimes, there isn't any response to the mouse after I touched the USB connection. I have not found any reason for this. However, you can enable the mouse again by pressing the button above the scroll button.

B. Command prompt window

On the command line terminal window.

Left click on a text line, will highlight a word.

Left double click on a text line, will highlight the whole sentence.

Left+Right button click will paste the last highlight text. 

Right button will open the options windows.

Scroll button works the same as Left+Right button click.

Scroll front and back scrolls up and down the screen window.


How does Linux mint detect these buttons? 

Open command line terminal and run a simple test by clicking each of the button. 

 xev -event button

Here are the results I got;

  • Left button - Button 1, state 0x100
  • Right button - Button 3, state 0x400
  • Left+Right button - Button 2, state 0x200
  • Scroll button - Button 2, state 0x200
  • Scroll button push forwxbindkeys - Associate a combination of keys or mouse buttons with a shell commandard - Button 5, state 0x1000
  • Scroll button pull backwards - Button 4, state 0x800
  • Side forward button - Button 9, state 0x0
  • Side back button - Button 8, state 0x0

How to program the side forward and back buttons?

Install the package xbindkeys and xvkbd, from the description it says;

xbindkeys - xbindkeys is a program that allows you to launch shell commands with
 your keyboard or your mouse under the X Window System.
It links commands to keys or mouse buttons, using a configuration file.
It's independent of the window manager and can capture all keyboard keys

xvkbd - xvkbd is a virtual (graphical) keyboard program for X Window System
 which provides facility to enter characters onto other clients
 (software) by clicking on a keyboard displayed on the screen.  This
 may be used for systems without a hardware keyboard such as kiosk
 terminals or handheld devices.  This program also has facility to
 send characters specified as the command line option to another
 client.

I refer to syntax at http://xahlee.info/linux/linux_xvkbd_tutorial.html

The configuration here is per user. It means, the file must be configured for each user in the system.

  1. Edit the file ~/.xbindkeys 
  2. Restart xbindkeys service

pkill -f xbindkeys

xbindkeys

Here are 2 example of the file ~/.xbindkeys

Example 1: Launch xed and nemo

In order launch nemo file manager, with the side front button AND to lauch xed text editor with the side back button.

# bind side left forward button
"xed"
  m:0x0 + b:8
"nemo"
  m:0x0 + b:9


Example 2: Supertuxkart 

Use the numpad 4 is view from left and numpad 6 is view from right. This is for laptops that doesn't have the side full numeric keypad that is normally found on desktop keyboards.

Lets program the side front for numpad 4, side back button for numpad 6.

"xvkbd -text '\[KP_4]' "
  m:0x0 + b:8
"xvkbd -text '\[KP_6]' "
  m:0x0 + b:9


Thursday, July 16, 2020

Create a local Git Repository

How to create a remote GIT repository and connect to it.

Git Repository provides storage of project files managed by git. There is a set of notes maintained at Notes on Git.

To setup a project with support for Git, use the following command, in the same folder as the project root folder.

git init

The basic configuration for a username and email is required, to access any remote git repositories. 

git config --global user.name "Tboxmy"
git config --global user.email "username@gmail.com"

There are many more configurations. Another example, for MS Windows PC that wants to preserve its end of line format, we can use

git config --global core.autocrlf false

In order to have a centralised repository, where one or many users can send changes to their files from other computers, we use a remote repository. This centralised repository is known as Bare Repository where users can send their project files over. Use the following command.

git init --bare <repo_name>.git

Then users can connect to this remote repository, and keep their files updated there.
git remote add <remote_name> <remote_repo_url>

In order to update remote repository with changes in files, a user can PUSH files there

git push -u <remote_name> <local_branch_name>


Sunday, June 14, 2020

Install Postgresql 12 on Linux Mint

Overview

Linux mint is a Linux distro based on a popular debian based Linux known as Ubuntu. One reason this Linux is popular, is that it fits on many older computers with lower end hardware specifications, and have support for a wide array of monitors. At the same time, this Linux supports many of the modern hardware drivers.

The current Linux Mint is version 19.3 with the code name "Tricia", is released on 18th December 2019. This is developed from Ubuntu version named Bionic. Among the features that one should know about Tricia includes:

  • It is a long term support (LTS) which means, patches will be maintained till 2023.
  • Installation of Linux Mint have better hardware detection and supports modern BIOS installation to utilise password at BIOS.
  • Include a movie player that utilises hardware optimisation.
  • Its Linux desktop environment called Cinnamon, is light weight enough for many lower spec computer. Computers with lower speed hard disk have always suffered in a windows environment, Cinnamon greatly improves any windows experience.
  • Higher level of security for those who are paranoid about PC security.

Postgresql 12

Among the world's most popular open sourced relational database management system (RDBMS) is Postgresql. Default installation will also create a database called postgres and a user with the same name, postgres. Installation comes with a separate application for the server, and a client. A tool, psql is to manage the server from the command line. There are many other applications that can manage Postgresql with a graphical point and click approach.

Version 12 is released on 3rd October 2019 with the following features:
  • Improved table indexing features. Such as rebuild index table without blocking writes to an index, and this reduces down time.
  • Partitioning of tables to improved queries from a limited set of data.
  • JSON document query support.
  • Just-in-time compilation to process large data (data warehouse) more efficiently.

Installation

Linux Mint 19.x by default installs Postgresql version 10. In order to install version 12, Linux Mint must have the latest packages installed to reduce chances of package dependency errors. These are summary of steps in order to install Postgresql version 12.

  1. Add Postgresql repository
  2. Update existing system
  3. Install Postgresql 12 server. This includes the server (postgresql-12) and client (postgresql-client-12) application.
sudo sh -c 'echo "deb http://apt.postgresql.org/pub/repos/apt/ bionic-pgdg main" > /etc/apt/sources.list.d/postgresql.list'
wget --quiet -O - http://apt.postgresql.org/pub/repos/apt/ACCC4CF8.asc | sudo apt-key add -
sudo apt update
sudo apt upgrade

sudo apt install postgresql-12


Once installed, it will prompt

pg_ctlcluster 12 main start

Following are among the files and locations at default install.

  • The database will be stored at /var/lib/postgresql/12/main
  • Logging information at /var/log/postgresql/postgresql-12-main.log
Documentation can be display with the command;

man postgresql

Accessing the server

Default installation includes the user postgres. Access the server using this user.

sudo -u postgres psql

Here are a list of psql commands to get you started.

Once in psql, here are several commands to browse the database;

Display server version (the Uppercase is a matter of good practice)
SELECT version();

List database schema
\l

Switch database schema
\c database_name

Describe a table
\d table_name

Get the last command
\g

Show history of commands
\s

Help with a command
\h command_name

Exit Postgresql client
\q

You can refer to previous posting "Create database and user" to further try the database.

* Install PHP 7.4 notes (not related to postgresql)
sudo apt-get install -y php7.4-{bcmath,bz2,intl,gd,mbstring,pgsql,zip}
sudo apt-get install -y php7.4-{curl,common,xml,xsl}

Friday, June 5, 2020

Install Tensorflow and Keras on Centos 7 Linux

Tensorflow (available in github) provides a version that utilise the GPU of a server to perform much more heavier computations. Tensorflow version 1.6 onwards are optimimsed to use AVX instructions that is not available in older CPUs. These versions are installed via pip, uses the AVX instruction set at compile time and require CPU that support the AVX instruction set. This instruction set is supported from the second generation of Intel Core CPUs (codenamed SandyBridge).

Pre-requisite: 
Centos 7 Linux updated
Installed Python (see previous posting)
Created a project directory called tensorflow

Default steps are to install Tensorflow 2.x (see tensorflow), but server environments that does not support AVX, they need to install Tensorflow 1.5 (see article and blog). To determine if AVX support is available, run the following command and look for AVX or AVX2.

more /proc/cpuinfo | grep flags

My output shows no AVX.
flags           : fpu vme de pse tsc msr pae mce cx8 apic sep mtrr pge mca cmov pat pse36 clflush mmx fxsr sse sse2 syscall nx lm constant_tsc rep_good nopl eagerfpu pni monitor ssse3 lahf_lm

Optional:
Configure the project directory for python:

python3 -m venv my_env

Step 1: Install Tensorflow (Or tensorflow-gpu)

cd tensorflow
source my_env/bin/activate

Install Tensorflow application, then print its version

pip install --upgrade tensorflow

Or for server that doesn't have AVX support,

pip install tensorflow==1.15

pip show tensorflow

Step 2: Test Tensorflow install

Create a script file hello.py with following contents;

import tensorflow as tf
hello = tf.constant('Hello, World')
session = tf.Session()
print( session.run(hello) )

Run the script

python hello.py

Step 3: Install Keras

pip install --upgrade scikit-learn pillow
pip install --upgrade keras keras-utils

Or for server that doesn't have AVX support,

pip install --upgrade scikit-learn pillow
pip install keras==2.1.6

pip show keras

Configuration file will be at ~/.keras/keras.conf
{
    "floatx": "float32",
    "epsilon": 1e-07,
    "backend": "tensorflow",
    "image_data_format": "channels_last"
}

Test install by editing hello.py

import tensorflow as tf
from tensorflow import keras
hello = tf.constant('Hello, World')
session = tf.Session()
print( session.run(hello) )


The above instructions are meant to provide the platform prior to my learning chatbot at site and colab.

Thursday, June 4, 2020

Install Python on Centos 7 Linux

Python is a programming language that can be used for:
  1. Back-end web application
  2. Desktop application
  3. Processing huge amount of data
  4. Control a computer
Example of a basic Python command:

print("Hello, world!")

Install Python

Pip is a tool to manage packages/libraries within Python. On Centos 7, the default pip is version 9.0.3 and it should be upgraded once python is installed.

Following are notes to install Python 3 on Centos 7 Linux. All these are at the command prompt.

sudo yum install python3  python3-devel

Check the installed version

python3 -V

Create directory for python projects

mkdir projects

cd projects

python3 -m venv my_env

Initiate the python project environment

source my_env/bin/activate

Create your first programme in a file called hello.py and save the following line.

print("Hello, World")

Run the programme.

python hello.py

Upgrade pip package manager.

pip install --upgrade pip

Once done with Python, leave the project environment.

deactivate


Extra pip example 

Install setuptools to install applications from source

pip install --upgrade setuptools wheel

Install Tensorflow application, then print its version

pip install --upgrade tensorflow
pip show tensorflow


Saturday, May 16, 2020

Postgresql 10: Create database and user

Postgresql provides creation of database schemas with a specific role or user assigned to it. This is great where there will be a few users who need to access one or another database on the same server.

Default user created by Postgresql is named postgres, that can be used to create any database schema and user roles. For this tutorial, Postgresql is installed on Centos Linux 7. To start postgresql client and access the default user, at the terminal type;
sudo -u postgres psql

Steps to create the database are as follows;
  1. Create the database. In this case we call it student_management.
  2. Create user and assign password for login. We call out user student and password is 123456
  3. Assign the access to the database. We give full privileges to read, write.
  4. Enable the user to login.
  5. Exit from client (optional)
CREATE DATABASE student_management;
CREATE ROLE student WITH PASSWORD '123456';
GRANT ALL PRIVILEGES ON DATABASE student_management TO student;
ALTER ROLE student WITH LOGIN;

Next, test by login with that user account and password.

There is an alternative approach for a dedicated database server that require users to have their own databases. This approach doesn't require you to use the psql client. It is useful when you plan to have scripts that auto generate the process.

sudo -u postgres createdb developer
sudo -u postgres createuser --interactive
sudo adduser developer
sudo passwd developer

The user "developer" can login and get connected to the default database with the same name as the user. In this case the database name is "developer".

Login as the user.
sudo -i -u developer psql

Friday, May 15, 2020

Laravel: Getting started

Notes on getting started with Laravel, on Centos Linux 6,7,8.

In order to get started with Laravel, there are required software to run composer and laravel that needs to be installed. This includes;
  1. Web server
  2. PHP
  3. Composer
  4. Node JS

Step 1. Install PHP 7.3 or newer.

If you havent installed PHP, follow notes from previous post.
After installing PHP, install all the regular extensions. Ensure PHP is working with the web browser.
sudo yum install php-cli php-zip wget unzip  php-dom php-posix php-shmop  php-xsl php-xmlrender

Step 2. Web server.

In this case, I am using Apache HTTPD. Install this and test that the php is working.
sudo yum install httpd

Step 3. Composer

Download the installer.
php -r "copy('https://getcomposer.org/installer', 'composer-setup.php' ");
sudo php composer-setup.php --install-dir=/usr/local/bin --filename=composer

Step 4. Node JS


sudo yum install nodejs

You are ready to work with Laravel projects. Here are links to the remainder tutorials
Part 1, Part 2,


Thursday, May 14, 2020

Install Postgresql 10 database on Centos 7

Installation and configuration of Postgresql 10 on Centos 7

Installation

Centos Linux 7 by default installs Postgresql version 9. These are summary of steps in order to install Postgresql version 10, the following steps can be taken.
  1. Yum manages the installation of software, and utilises a list of repositories of there to locate its repository. It is highly advised to update existing software with yum before proceeding with software installations. Add the additional repository site must be added for Postgresql 10 from postgresql.org
  2. Install the version of Postgresql database client software that is needed to open the database.
  3. Install the version of Postgresql database server software. This will hold the database files and controlling software.
  4. Initialise Postgresql database files. This will create the username "postgres" where it is configured to run all the client commands.
  5. Start Postgresql database server.
  6. Test the server by requesting info.
  7. Configure Centos 7 to automatically start at boot up.

At a terminal, execute the commands

# yum install https://download.postgresql.org/pub/repos/yum/reporpms/EL-7-x86_64/pgdg-redhat-repo-latest.noarch.rpm
# yum install postgresql10
# yum install postgresql10-server
# /usr/pgsql-10/bin/postgresql-10-setup initdb
# systemctl start postgresql-10
# /usr/pgsql-10/bin/postgres -V
# systemctl enable postgresql-10

Using the client

For those who wish to use the postgres clients, here are commands to get started.

Login as user "postgres" and use the Postgresql client.

# sudo -u postgres psql

Once in psql, here are several commands to browse the database;

Display server version (the Uppercase is a matter of good practice)
SELECT version();

List database schema
\l

Switch database schema
\c database_name

Describe a table
\d table_name

Get the last command
\g

Show history of commands
\s

Help with a command
\h command_name

Exit Postgresql client
\q

Remote access and firewall

In development databases, many users may require to access the database from remote computers. On the default Centos 7, with firewall running this require some configuration. The steps involved;


  1. Add httpd and postgresql service rule to the firewall. The httpd is an additional web service I am demonstrating here.
  2. Restart firewall
  3. Configure postgresql to listen from incoming networks, or all networks. Replace the line listen_addresses = 'localhost'
  4. Allow user authentication from incoming networks, or all networks. Replace the line with 127.0.0.1/32
  5. Restart postgresql
At a terminal, execute the commands

# sudo firewall-cmd --add-port=8080/tcp --permanent
# sudo firewall-cmd --add-service=postgresql --permanent
# sudo firewall-cmd --reload
# sudo vi /var/lib/pgsql/10/data/postgresql.conf

listen_addresses = '*'

# sudo vi /var/lib/pgsql/10/data/pg_hba.conf

host    all             all             0.0.0.0/0            md5

# sudo systemctl restart postgresql-10

Tuesday, May 5, 2020

Laravel 6 Step by Step Tutorial Part 2

Laravel 6 provides an advanced framework for programmers to quickly create enterprise on a wide number of PHP platforms. Part 2 of this Laravel guide can be found at Laravel 6 Part 2

In order to proceed with part 2 of the tutorial, please complete part 1 as posted in
First of Laravel 6 step by step guide.

The tutorial can be followed by having your copy of PHP 7.3 onwards and a database. Notes are provided for MySQL and Postgresql database.

This demonstrates how to implement data relationships of has one. In Laravel this is implemented with the function belongsTo. The idea is to maintain a list of articles where each have one author. That author could essentially have written many articles.

Saturday, January 18, 2020

Install MongoDB database on Centos 7


MongoDB is a noSQL database and is available on Centos Linux 7. Ensure that SElinux is only on permissive.

For cases SElinux is enforcing, additional steps need to be taken which is outside of this installation note.

Step 1: Configure the repository

Create the file /etc/yum.repos.d/mongodb-org.repo

[mongodb-org-4.2]
name=MongoDB Repository
baseurl=https://repo.mongodb.org/yum/redhat/$releasever/mongodb-org/4.2/x86_64/
gpgcheck=1
enabled=1
gpgkey=https://www.mongodb.org/static/pgp/server-4.2.asc

Step 2: Install and start

sudo yum install -y mongodb-org
sudo systemctl start mongod

If all is running good, then allow it to start at boot time.

sudo systemctl enable mongod

Step 3: Verify


mongo
db.version()
exit

Further configuration can be done with the file /etc/mongod.conf

Allow database through the firewall

sudo firewall-cmd --zone=public --add-port=27017/tcp --permanent
sudo firewall-cmd --reload

Those with Selinux in mode Enforcing, allow the default mongodb port.

sudo semanage port -a -t mongod_port_t -p tcp 27017

Blog Archive