Thursday, October 29, 2009
MyGOSSCON 2009 on theStar
The latest promotion on the Malaysian Government Open Source Software Conference 2009 or MyGOSSCON is on the theStar newspaper today, see "A Vision Becomes Reality"


Tuesday, October 13, 2009
Upcoming MyGOSSCON 2009 Conference
The 3rd in the series of conference for the Malaysian Government on OSS will be coming this 5-6th October 2009 at PICC, Putrajaya.
To kick off the conference, following events have been scheduled:
-x-

To kick off the conference, following events have been scheduled:
- OpenOffice.org contest (for primary students to show off their skills on OSS presentation tools)
- OSS Case Study Award (Government and Institution of Higher Learnings share their OSS experiences through a write up of their implementations)
- 24-Hour WebDev Contest (Allow groups of programmers to compete heads on to grab a chance to show-off their skills)
-x-
Sunday, September 20, 2009
[Jaunty] Firefox Foxtab
Firefox provides a large number of extensions that enhances the user experience. The extension to increase its fancy tab switching is called FoxTab. Install this and on the superb KDE display, things get even better. I have version 1.2.1 on Firefox 3.0.14.
Once installed, use the F12 key to view multiple tabs.
I dont use a mouse that much but if you do, make full use of its mouse gestures. E.g. Hold the left mouse button, then hit the right mouse to launch the Interactive mode of Foxtab. The next time you need to do a presentation on web apps, try it with Foxtab. In terms of memory usage, when Firefox with 6 tabs (includes images) an average of 105,120k memory is used. Launching the Foxtab this increased to 108,492k on average. This is about 3,000k of extra memory is used.
Once installed, use the F12 key to view multiple tabs.
I dont use a mouse that much but if you do, make full use of its mouse gestures. E.g. Hold the left mouse button, then hit the right mouse to launch the Interactive mode of Foxtab. The next time you need to do a presentation on web apps, try it with Foxtab. In terms of memory usage, when Firefox with 6 tabs (includes images) an average of 105,120k memory is used. Launching the Foxtab this increased to 108,492k on average. This is about 3,000k of extra memory is used.
[Kubuntu] Upgrade OOo 3.1.1
Just did an OpenOffice.org upgrade to 3.1.1 and it seems to be working fine on Jaunty. Additionally, I had to install the openoffice.org-kde and openoffice.org-style-oxygen.
The install provides OOo310m19 (build 9420).
For those who have been struggling with the slide transition preview, will now find it is much smoother. Same goes for the custom animations, great improvement. On the status bar of Impress, Calc and Writer it indicates when the document have been edited and needs to be saved.
The sliderbar to zoom is available for all 3 main components and you can also double click the zoom display to bring up the zoom dialog box.
Tried the overlining of text features, cool. Now, when will I ever need this?
There are a whole bunch of other features listed at OpenOffice.org
The install provides OOo310m19 (build 9420).
For those who have been struggling with the slide transition preview, will now find it is much smoother. Same goes for the custom animations, great improvement. On the status bar of Impress, Calc and Writer it indicates when the document have been edited and needs to be saved.
The sliderbar to zoom is available for all 3 main components and you can also double click the zoom display to bring up the zoom dialog box.
Tried the overlining of text features, cool. Now, when will I ever need this?
There are a whole bunch of other features listed at OpenOffice.org
Monday, August 24, 2009
London Stock Exchange to consider Linux?
The concern for performance in time sensitive financial environments is very real when the London Stock Exchange (LSE) had a system fault in Sept 2008. The TradElect system in place was MS Windows based and may be considered to be replaced as interviewed by Computerweekly and finextra.com.
During the recent visit by Redhat to Malaysia, the New York Stock Exchange (NYSE) was mentioned as an example of financial systems using Linux. The trading speed of 0.4 milliseconds have been mentioned in the same article. This is almost double the speed of the TradElect but will the investment of billion of Pounds justify replacing it with another new system like Linux? Anyone knows what KLSE is using?
Financial systems world wide looking at the future of their architecture might learn a lesson or two with how the LSE takes charge of their investment and business needs.
During the recent visit by Redhat to Malaysia, the New York Stock Exchange (NYSE) was mentioned as an example of financial systems using Linux. The trading speed of 0.4 milliseconds have been mentioned in the same article. This is almost double the speed of the TradElect but will the investment of billion of Pounds justify replacing it with another new system like Linux? Anyone knows what KLSE is using?
Financial systems world wide looking at the future of their architecture might learn a lesson or two with how the LSE takes charge of their investment and business needs.
Monday, August 17, 2009
[kubuntu] Rename FAT label
The Kubuntu Jaunty did not allow me to change the USB diskdrive label. This I found was because it is FAT32 formated. Why would I want to change the label and maintain it as FAT32 format?
Step 1: Install mtools if not already done.
$ sudo apt-get install mtools
Step 2: Identify the USB diskdrive (or partition) to be formatted.
Plug in the USB diskdrive. Then identify the USB device in a terminal, type:
$ tail /var/log.messages
I found mine as /dev/sdb1
Step 3: Rename the label with 11 characters maximum
$ sudo mlabel -i /dev/sdb1 ::0161234567
Test the results by unplugging the device, then plug back in to see the difference. Thank to the reference at Ubuntu.com website.
- If someone finds my disk and would care to return it, they can mount it and find my phone num ber as the label.
- The FAT32 allows me to plug the USB diskdrive to MS Windows and Linux operating system interchangeably.
- I backup to this disk for both operating system.
Step 1: Install mtools if not already done.
$ sudo apt-get install mtools
Step 2: Identify the USB diskdrive (or partition) to be formatted.
Plug in the USB diskdrive. Then identify the USB device in a terminal, type:
$ tail /var/log.messages
I found mine as /dev/sdb1
Step 3: Rename the label with 11 characters maximum
$ sudo mlabel -i /dev/sdb1 ::0161234567
Test the results by unplugging the device, then plug back in to see the difference. Thank to the reference at Ubuntu.com website.
Tuesday, July 28, 2009
Yahoo Messenger upgrades its servers
Early this month I failed to connect the Kopete 0.70.2 to Yahoo Messenger. There were several suggestions to use alternate messenger server IP manually. Initially it worked, but soon all of the suggested servers failed.
This was due to Yahoo upgrading their servers. Matt Rogers, the maintainer for Kopete soon received info from Pidgin maintainers on the authentication changes. Yahoo have upgraded its authentication to version 15 from version 13 and this is now resolved. But the KDE 4.2 based distros may well have to wait for a package on this. In the mean time, revert to Pidgin or compile from Kopete SVN.
Howto on installing from SVN
Step 1: Install svn client from a terminal.
Step 2: Install the tools to compile (generate the executables) from a terminal
Step 3: Follow are instructions from kopete.kde.org in a terminal
If you get errors below on building, then it may require the other libraries to build the KDE source.
CMake Error at /usr/share/cmake-2.6/Modules/FindPackageHandleStandardArgs.cmake:57 (MESSAGE):
Could NOT find KdepimLibs (missing: KdepimLibs_CONFIG)
Call Stack (most recent call first):
/usr/share/kde4/apps/cmake/modules/FindKdepimLibs.cmake:73 (find_package_handle_standard_args)
CMakeLists.txt:33 (find_package)
Solution: Read the KDE4 build instructions and at a terminal type following before you resume where you left off in step 3. This will take a good 270Mb+ but you can install any future source from KDE easily.
sudo apt-get install kdepimlibs5-dev
Test Kopete with the Yahoo Messenger account. The package can be removed with the command
sudo make uninstall kopete
This was due to Yahoo upgrading their servers. Matt Rogers, the maintainer for Kopete soon received info from Pidgin maintainers on the authentication changes. Yahoo have upgraded its authentication to version 15 from version 13 and this is now resolved. But the KDE 4.2 based distros may well have to wait for a package on this. In the mean time, revert to Pidgin or compile from Kopete SVN.
Howto on installing from SVN
Step 1: Install svn client from a terminal.
sudo apt-get install subversion subversion-tools
Step 2: Install the tools to compile (generate the executables) from a terminal
sudo apt-get install cmake
sudo apt-get install libqt4-dev kdelibs5-dev  [36Mb +]
sudo apt-get install libqimageblitz-dev [33Mb+]
Step 3: Follow are instructions from kopete.kde.org in a terminal
svn co -N svn://anonsvn.kde.org/home/kde/trunk/KDE/kdenetwork
cd kdenetwork
svn up kopete cmake
mkdir ../kdenetwork-build
cd ../kdenetwork-build
cmake ../kdenetwork
make
sudo make install
If you get errors below on building, then it may require the other libraries to build the KDE source.
CMake Error at /usr/share/cmake-2.6/Modules/FindPackageHandleStandardArgs.cmake:57 (MESSAGE):
Could NOT find KdepimLibs (missing: KdepimLibs_CONFIG)
Call Stack (most recent call first):
/usr/share/kde4/apps/cmake/modules/FindKdepimLibs.cmake:73 (find_package_handle_standard_args)
CMakeLists.txt:33 (find_package)
Solution: Read the KDE4 build instructions and at a terminal type following before you resume where you left off in step 3. This will take a good 270Mb+ but you can install any future source from KDE easily.
sudo apt-get install kdepimlibs5-dev
Test Kopete with the Yahoo Messenger account. The package can be removed with the command
sudo make uninstall kopete
Sunday, June 14, 2009
[Jaunty] Configure program at system boot up
The tpb services can be started from the command line as follows
/etc/init.d/tpb start
This allowed the interaction with some of the Thinkpad laptop special function keys. Now, how can I get this activated automatically during bootup?
Previously, KDE provided KControl where I can choose the various programs available to start or not during system boot. In Jaunty and KDE 4.2, its gone! Here I list 3 alternative ways to manage this. First 2 require users to have a basic knowledge of the runlevels.
METHOD 1: Back to old debian school!
Step 1. Install the sysv-rc-conf from a terminal
sudo apt-get install sysv-rc-conf
Step 2. Run the program, choose what you want activated at each Runlevel.
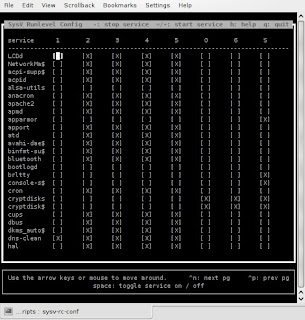
To select the next page press Control+n or p. Other than that just use the cursor arrows to move to different services.
METHOD 2: Use Gnome Bum. Better to also understand scripts priority that begin with "K" means to shutdown, "S" to start up.
Step 1: Install the Bum with the terminal.
sudo apt-get install bum
Step 2: Start the Bum.
From the KMenu ->Application ->System ->Bootup Manager
Since its menu driven, should be easier to figure out.
METHOD 3: Start a script during login, with KDE Autostart
Step 1: In KDE systems, all scripts located in ~/.kde/Autostart will automatically run when a user logs in (Where the ~ means your home directory). Create a new file called mytpb.sh with the following contents to start thinkpad sound mixer;
#!/bin/sh
export LD_LIBRARY_PATH=/usr/local/lib:$LD_LIBRARY_PATH
tpb -m on
Step 2: Save the file.
Step 3: Change the mode to executable
$ chmod u+x ~/.kde/Autostart/mytpb.sh
Step 4: Logout, then log back in.
You can then try the Thinkpad's volume control. This should produce the on screen display (OSD) of the volume bar. Other settings can be configured in the /etc/tpbrc or ~/.tpbrc
/etc/init.d/tpb start
This allowed the interaction with some of the Thinkpad laptop special function keys. Now, how can I get this activated automatically during bootup?
Previously, KDE provided KControl where I can choose the various programs available to start or not during system boot. In Jaunty and KDE 4.2, its gone! Here I list 3 alternative ways to manage this. First 2 require users to have a basic knowledge of the runlevels.
METHOD 1: Back to old debian school!
Step 1. Install the sysv-rc-conf from a terminal
sudo apt-get install sysv-rc-conf
Step 2. Run the program, choose what you want activated at each Runlevel.

To select the next page press Control+n or p. Other than that just use the cursor arrows to move to different services.
METHOD 2: Use Gnome Bum. Better to also understand scripts priority that begin with "K" means to shutdown, "S" to start up.
Step 1: Install the Bum with the terminal.
sudo apt-get install bum
Step 2: Start the Bum.
From the KMenu ->Application ->System ->Bootup Manager
Since its menu driven, should be easier to figure out.
METHOD 3: Start a script during login, with KDE Autostart
Step 1: In KDE systems, all scripts located in ~/.kde/Autostart will automatically run when a user logs in (Where the ~ means your home directory). Create a new file called mytpb.sh with the following contents to start thinkpad sound mixer;
#!/bin/sh
export LD_LIBRARY_PATH=/usr/local/lib:$LD_LIBRARY_PATH
tpb -m on
Step 2: Save the file.
Step 3: Change the mode to executable
$ chmod u+x ~/.kde/Autostart/mytpb.sh
Step 4: Logout, then log back in.
You can then try the Thinkpad's volume control. This should produce the on screen display (OSD) of the volume bar. Other settings can be configured in the /etc/tpbrc or ~/.tpbrc
Friday, June 5, 2009
[Jaunty] Managing sound device
The recent Kubuntu 9.04 Linux uses the Pulseaudio to manage its sounds device selection. To enable all sound devices to use the Pulseaudio sound server, open a terminal and type
asoundconf set-pulseaudio
Any application that need to access the audio, including the ALSA will be sent to the Pulseaudio server. The settings can be configured at
/usr/share/alsa/pulse-alsa.conf
Open or play a movie or sound and test if it works. If this does not work, reset back to use the default ALSA system with the command;
asoundconf reset-default-card
I am still trying to figure out the significant benefit of using Pulseaudio.
asoundconf set-pulseaudio
Any application that need to access the audio, including the ALSA will be sent to the Pulseaudio server. The settings can be configured at
/usr/share/alsa/pulse-alsa.conf
Open or play a movie or sound and test if it works. If this does not work, reset back to use the default ALSA system with the command;
asoundconf reset-default-card
I am still trying to figure out the significant benefit of using Pulseaudio.
Wednesday, June 3, 2009
[Jaunty] Firefox can use apt://
Some URLs accessed by Firefox is used to install packages for Linux. For example the URL to add the canonical cloud client.
apt://ubuntuone-client?refresh=yes
I get the following message.
Firefox doesn't know how to open this address, because the protocol (apt) isn't associated with any program.
Solution.
I started synaptic and added the package apturl, searched for Ubufox extension for Firefox. Restarted Firefox and now I can access the URL.
apt://ubuntuone-client?refresh=yes
I get the following message.
Firefox doesn't know how to open this address, because the protocol (apt) isn't associated with any program.
Solution.
I started synaptic and added the package apturl, searched for Ubufox extension for Firefox. Restarted Firefox and now I can access the URL.
Monday, May 25, 2009
Reset MySQL 5 password
I am running a Joomla training this week. One of the main items is getting the password assignment for root and database user. As a reference here is to resetting root password and assigning user to have full access to a database.
Reset root password
Step 1: Restart the MySQL server without using the user restrictions and access to the network.
#/etc/init.d/mysql stop
#mysqld --skip-grant-tables --skip-networking&
Step 2: Open another terminal and reset your password
# mysql mysql -u root
mysql> UPDATE user SET password=PASSWORD('NewPassword') WHERE user="root";
mysql> FLUSH PRIVILEGES;
# /etc/init.d/mysql restart
Assigning user access to database
Step 1: Login a root to mysql
Step 2: Assign the user joe to use from localhost the database somedatabase.
mysql> GRANT ALL privileges ON somedatabse.* TO joe@localhost IDENTIFIED BY 'SomePassword';
mysql> FLUSH PRIVILEGES;
Reset root password
Step 1: Restart the MySQL server without using the user restrictions and access to the network.
#/etc/init.d/mysql stop
#mysqld --skip-grant-tables --skip-networking&
Step 2: Open another terminal and reset your password
# mysql mysql -u root
mysql> UPDATE user SET password=PASSWORD('NewPassword') WHERE user="root";
mysql> FLUSH PRIVILEGES;
# /etc/init.d/mysql restart
Assigning user access to database
Step 1: Login a root to mysql
Step 2: Assign the user joe to use from localhost the database somedatabase.
mysql> GRANT ALL privileges ON somedatabse.* TO joe@localhost IDENTIFIED BY 'SomePassword';
mysql> FLUSH PRIVILEGES;
Friday, May 22, 2009
Backup Thunderbird2
Just after installing the Kubuntu Jaunty 9.04 Linux, its time to restore some of my stuff. Firstly, I need communications and this is via my Thunderbird.
Backup:
I found it necessary to disable some of the extensions to allow the new Thunderbird to run properly.
Copy the Thunderbird directory profile (usually it goes with some crazy name followed by your profile name to the backup device. Example
cp ~/.mozilla-thunderbird/izwvasdx.default /media/backupdisk
Restore:
Step 1:
Copy the directory profile back to the new system
Step 2:
In the terminal create an email profile that uses the old directory, type
thunderbird -profilemanager
Ref: Mozilla
Backup:
I found it necessary to disable some of the extensions to allow the new Thunderbird to run properly.
Copy the Thunderbird directory profile (usually it goes with some crazy name followed by your profile name to the backup device. Example
cp ~/.mozilla-thunderbird/izwvasdx.default /media/backupdisk
Restore:
Step 1:
Copy the directory profile back to the new system
Step 2:
In the terminal create an email profile that uses the old directory, type
thunderbird -profilemanager
Ref: Mozilla
Wednesday, May 20, 2009
Install Moodle on CentOS 5
Following are steps to install Moodle 1.9 on CentOS 5.
Step 1
Install mysql-server-5.0.45, mysql-5.0.45 and php-5.1.6
Install other PHP library php-mbstring-5.1.6, php-xmlrpc-5.1.6
Step 2
Add the user name "user1" and database "mymoodle" to MySQL with the correct privilege.
Step 3
Download the moodle and extract to /var/www/html/moodle
Create and assign the permission of the webserver to the data directory at /var/www/moodledata
Step 4
In a start the moodle installation via web browser, use the location
http://localhost/moodle
Copy the script into a file named config.php within the root directory of Moodle.
Follow the rest of the instruction to complete.
Step 5
Install lynx to activate the cron. Edit the crontab to run every 30 minutes.
$ crontab -e
*/30 * * * * wget -q -O /dev/null http://localhost/moodle/admin/cron.php
See http://docs.moodle.org/en/Installing_Moodle
http://docs.moodle.org/en/Administration_FAQ
Step 1
Install mysql-server-5.0.45, mysql-5.0.45 and php-5.1.6
Install other PHP library php-mbstring-5.1.6, php-xmlrpc-5.1.6
Step 2
Add the user name "user1" and database "mymoodle" to MySQL with the correct privilege.
Step 3
Download the moodle and extract to /var/www/html/moodle
Create and assign the permission of the webserver to the data directory at /var/www/moodledata
Step 4
In a start the moodle installation via web browser, use the location
http://localhost/moodle
Copy the script into a file named config.php within the root directory of Moodle.
Follow the rest of the instruction to complete.
Step 5
Install lynx to activate the cron. Edit the crontab to run every 30 minutes.
$ crontab -e
*/30 * * * * wget -q -O /dev/null http://localhost/moodle/admin/cron.php
See http://docs.moodle.org/en/Installing_Moodle
http://docs.moodle.org/en/Administration_FAQ
Tuesday, May 19, 2009

Friday, May 8, 2009
[Jaunty] Adding mp3 into OpenOffice.org Impress presentations
One of the popular format for music is the MP3 where a form of lossy compression algorithm is used. A typical music CDROM would hold only a few songs but when saved as MP3, almost a hundred music and song can be saved on a single CDROM. MP3 allows a smaller sized file that still provided an acceptable quality in audio.
On Kubuntu 9.04 with OpenOffice.org (OOo) 3.0.1, adding of the MP3 to play audio during a presentation is simple. Default audio support is on MIDI, AIF, AU and WAV format. The Linux system needs to have gstreamer from fluendo installed for OOo to play MP3s. So this is to all my friends who is trying to get their presentation done with audio and still hanging on to OOo, here are the steps.
Step 1: This is a one time step.
Open a terminal and with an internet connection, type
$ sudo apt-get install gstreamer0.10-fluendo-mp3
Step 2:
Open the Impress presentation and choose the slide where you want to start the audio. Select the "Slide transition" tab.
Step 3:
In the Modify transition section, choose Sound and select "Other Sound..." then choose the file containing the desired music. In this case, it should be a working MP3. And check the option for "Loop until next sound".
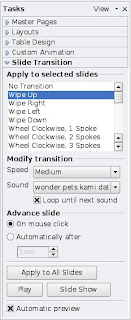
Warning: Do not click the button "Apply to All Slides", as this will force the MP3 to restart after each slide. Volume is controlled by the PC speakers or you could remake the audio.
On Kubuntu 9.04 with OpenOffice.org (OOo) 3.0.1, adding of the MP3 to play audio during a presentation is simple. Default audio support is on MIDI, AIF, AU and WAV format. The Linux system needs to have gstreamer from fluendo installed for OOo to play MP3s. So this is to all my friends who is trying to get their presentation done with audio and still hanging on to OOo, here are the steps.
Step 1: This is a one time step.
Open a terminal and with an internet connection, type
$ sudo apt-get install gstreamer0.10-fluendo-mp3
Step 2:
Open the Impress presentation and choose the slide where you want to start the audio. Select the "Slide transition" tab.
Step 3:
In the Modify transition section, choose Sound and select "Other Sound..." then choose the file containing the desired music. In this case, it should be a working MP3. And check the option for "Loop until next sound".

Warning: Do not click the button "Apply to All Slides", as this will force the MP3 to restart after each slide. Volume is controlled by the PC speakers or you could remake the audio.
Sunday, May 3, 2009
[Jaunty]Installing scanning and photo editing tools on Kubuntu 9.04
In a fresh install of Kubuntu Jaunty 9.04, the next best thing to do is try out its scanning and photo editing capabilities.
$ sudo apt-get install gimp gimp2.0-quiteinsane gimp-gutenprint gimp-data-extras
This install GIMP the popular photo editor and the SANE tools for scanning.
$ sudo apt-get install gimp gimp2.0-quiteinsane gimp-gutenprint gimp-data-extras
This install GIMP the popular photo editor and the SANE tools for scanning.
[Jaunty]Adding the VLC video player
Kubuntu Linux 9.04 supports the VLC video player very well. In a fresh install, open the terminal and type
$ sudo apt-get install vlc videolan-doc mozilla-plugin-vlc vlc-plugin-sdl libvcdinfo0
$ sudo apt-get install vlc videolan-doc mozilla-plugin-vlc vlc-plugin-sdl libvcdinfo0
[Jaunty]Installing Thunderbird 2 on Kubuntu Linux 9.04
Just after installing Kubuntu Linux 9.04 and all seems well, the email client is the next stop.
Install Thunderbird 2.0 from a terminal
$ sudo apt-get install thunderbird thunderbird-dispmua mozilla-thunderbird-bidiui lightning-extension enigmail
The installation included the following packages:
calendar-google-provider calendar-timezones
Install Thunderbird 2.0 from a terminal
$ sudo apt-get install thunderbird thunderbird-dispmua mozilla-thunderbird-bidiui lightning-extension enigmail
The installation included the following packages:
calendar-google-provider calendar-timezones
Saturday, May 2, 2009
First look at Kubuntu 9.04 Jaunty
I have just completed a number of fresh install of Kubuntu Jaunty 9.04 Linux on a
Lenovo R60 (9459BF8) 32 bits
CPU T5600 @ 1.83GHz
L1 64KiB
L2 Cache 1984KiB
RAM 1Gb
Here are some quick comments:
The KMenu
This is the KDE Start Menu. One of its main menu options is the Favourites. This contain the Konqueror, Kontact, System Settings, Dolphin, Kopete and Amarok menu. Users should add frequently used programs here.
Desktop
There is a desktop that takes only a small place on dashboard. There are Plasmoid widgets that can be added to the dashboard to increase user experience. to view only the Dashboard, press Ctrl+F12 (or press the Show Dashboard Applet in thebottom panel) to dim all applications and view only the widgets and Desktop.
Workspace
Default Kubuntu had only 2 workspace and no keyboard shortcut to switch betweenmany workspaces. I can only return to 1st workspace with Ctrl+F1.
1. Right click Pager applet (in the bottom panel) and choose "Configure Desktop", increase to 4 workspace.
Screen
The screen is sharp and nice, which is why I have always choosen KDE when Looks matter.
Quick look at accessing applications
Web browser: Konqueror 4.2.2
Office: OpenOffice.org 3.0.1
Print screen: Ksnapshot 0.8.1 (The PrtSc button problem have been fixed)
Terminal: Konsole 2.2.2
System process: (Ctrl + Esc)
Software installer: KPackageKit
Desktop: KDE 4.2.2 (Ctrl + F12) One cool and futuristic desktop for all.
Compression tool: Ark 2.12 (Integrated well with Dolphin)
Others:
Post installation recommendations
At the terminal run
$ sudo apt-get install flashplugin-installer msttcorefonts
Open Konqueror, when it ask to install the Flash plugin this will now be successful.
$ sudo apt-get install kubuntu-restricted-extras
This will add JRE, mp3, mpeg, odbc, unrar and other useful support.
$ sudo apt-get install tpb
This will allow the Thinkpad special keys to be available. To install this package, the following package is removed:
hotkey-setup
$ sudo apt-get install gdecrypt password-gorilla
This allows the disk to be encrypted and manage passwords.
$ sudo apt-get install wine wine-gecko
This will allow installation of standard MS Windows based applications.
$ sudo apt-get install ssh sshfs ksshaskpass kdessh
Allow secure SSH connection to and from SSH servers.
Conclusion
Jaunty is a great Linux distro, but those who cannot accept the KDE4 changes should continue with Gnome on Ubuntu Linux.
Lenovo R60 (9459BF8) 32 bits
CPU T5600 @ 1.83GHz
L1 64KiB
L2 Cache 1984KiB
RAM 1Gb
Here are some quick comments:
The KMenu
This is the KDE Start Menu. One of its main menu options is the Favourites. This contain the Konqueror, Kontact, System Settings, Dolphin, Kopete and Amarok menu. Users should add frequently used programs here.
Desktop
There is a desktop that takes only a small place on dashboard. There are Plasmoid widgets that can be added to the dashboard to increase user experience. to view only the Dashboard, press Ctrl+F12 (or press the Show Dashboard Applet in thebottom panel) to dim all applications and view only the widgets and Desktop.
Workspace
Default Kubuntu had only 2 workspace and no keyboard shortcut to switch betweenmany workspaces. I can only return to 1st workspace with Ctrl+F1.
1. Right click Pager applet (in the bottom panel) and choose "Configure Desktop", increase to 4 workspace.
Screen
The screen is sharp and nice, which is why I have always choosen KDE when Looks matter.
Quick look at accessing applications
Web browser: Konqueror 4.2.2
Office: OpenOffice.org 3.0.1
Print screen: Ksnapshot 0.8.1 (The PrtSc button problem have been fixed)
Terminal: Konsole 2.2.2
System process: (Ctrl + Esc)
Software installer: KPackageKit
Desktop: KDE 4.2.2 (Ctrl + F12) One cool and futuristic desktop for all.
Compression tool: Ark 2.12 (Integrated well with Dolphin)
Others:
- Initially I could not login to my home wireless network. Had to manually use the iwconfig, it could load automatically there onwards. So, if you have the same problem, open a terminal and type the following to detect your wireless network (e.g. mywireless)
$ sudo iwlist wlan0 scanning essid looney - I could resize the KPanel to a smaller size easily.
- First site I went with Konqueror was the blogspot.com and all looks good. Only problem is that the default menus during editing of post did not allow me to change the fonts. Only option allowed was spelling, Add image and Preview. A pop-up appeared with the need to install Shockwave Flash plugin but it keeps failing to install. See below for the resolution.
- Konqueror did not refresh properly when used as a web browser.
- The Amarok did not have any sound when playing an mp3. The midi file was not supported at all.
- The add/remove software manager did not seem to function. I cant get a list of software and it kept crashing. I needed to choose "Software Updates" ->Refresh. First thing I did is to install Kubuntu-restricted-extras package.
Post installation recommendations
At the terminal run
$ sudo apt-get install flashplugin-installer msttcorefonts
Open Konqueror, when it ask to install the Flash plugin this will now be successful.
$ sudo apt-get install kubuntu-restricted-extras
This will add JRE, mp3, mpeg, odbc, unrar and other useful support.
$ sudo apt-get install tpb
This will allow the Thinkpad special keys to be available. To install this package, the following package is removed:
hotkey-setup
$ sudo apt-get install gdecrypt password-gorilla
This allows the disk to be encrypted and manage passwords.
$ sudo apt-get install wine wine-gecko
This will allow installation of standard MS Windows based applications.
$ sudo apt-get install ssh sshfs ksshaskpass kdessh
Allow secure SSH connection to and from SSH servers.
Conclusion
Jaunty is a great Linux distro, but those who cannot accept the KDE4 changes should continue with Gnome on Ubuntu Linux.
Tuesday, April 28, 2009
Laptop connecting to Internet via K810i phone
Almost all mobile phones have internet connection today. In cases where the laptop need to access the internet and the only network device available is the mobile phone, I can run a script and have the mobile service provider charge me pay as you use style.
Here I describe how Kubuntu Intrepid with Kde 4.3 is used to access a Sony Ericsson K810i mobile phone via USB cable. The service provider is DIGI and I have verified that the phone can be used to access the internet.
Step 1:
Ensure that the USB cable connects the K810i to the laptop. On the phone choose "Use mobile phone"
Step 2:
Install wvdial package then use wvdial to setup the basic connection file and detect the mobile phone.
$ sudo apt-get install wvdial
$ wvdialconf
Found an USB modem on /dev/ttyACM0.
Modem configuration written to /etc/wvdial.conf.
ttyACM0: Speed 460800; init "ATQ0 V1 E1 S0=0 &C1 &D2 +FCLASS=0"
Step 3:
Try to dial using the default script. This verifies that the call can be made but setting to the service provider is not working.
$ sudo wvdial
Step 4: Set the K810i to allow usage of the internet.
In K810i choose the menu ->Settings ->Connectivity ->USB ->USB Internet ->Turn on
Step 5:
Edit the script found in /etc/wvdial.conf
[Dialer Defaults]
Init1 = ATZ
Init2 = ATQ0 V1 E1 S0=0 &C1 &D2 +FCLASS=0
Modem Type = USB Modem
ISDN = 0
Phone = /dev/ttyACM0
Username = digi
New PPPD = yes
Password = digi
Modem = /dev/ttyACM0
Baud = 460800
OR configure the script to be able to access bluetooth and USB with different settings
[Dialer Defaults]
Phone =
Username =
Password =
New PPPD = yes
[Dialer Digiusb]
Modem = /dev/ttyACM0
Baud = 460800
Init = ATZ
Init2 = ATQ0 V1 E1 S0=0 &C1 &D2 +FCLASS=0
Init3 = AT+CGDCONT=1,"IP","diginet"
Phone = *99#
Dial Command = ATDT
Username = digi
Password = digi
Ask Password = off
Auto DNS = on
Check Def Route = off
Carrier Check = off
Stupid Mode = on
Auto Reconnect = off
Idle Seconds = 0
Abort on Busy = off
Abort on No Dialtone = off
Dial Attempts = 1
[Dialer DigiBluetooth]
Modem = /dev/rfcomm0
Baud = 460800
Init = ATZ
Init2 = ATQ0 V1 E1 S0=0 &C1 &D2 +FCLASS=0
Init3 = AT+CGDCONT=1,"IP","diginet"
Phone = *99#
Dial Command = ATDT
Username = digi
Password = digi
Ask Password = off
Auto DNS = on
Check Def Route = off
Carrier Check = off
Stupid Mode = on
Auto Reconnect = off
Idle Seconds = 0
Abort on Busy = off
Abort on No Dialtone = off
Dial Attempts = 1
Final step:
Log off then log back in (optional). At the prompt, start the Digiusb configuration
$ sudo wvdial Digiusb
Here I describe how Kubuntu Intrepid with Kde 4.3 is used to access a Sony Ericsson K810i mobile phone via USB cable. The service provider is DIGI and I have verified that the phone can be used to access the internet.
Step 1:
Ensure that the USB cable connects the K810i to the laptop. On the phone choose "Use mobile phone"
Step 2:
Install wvdial package then use wvdial to setup the basic connection file and detect the mobile phone.
$ sudo apt-get install wvdial
$ wvdialconf
Found an USB modem on /dev/ttyACM0.
Modem configuration written to /etc/wvdial.conf.
ttyACM0
Step 3:
Try to dial using the default script. This verifies that the call can be made but setting to the service provider is not working.
$ sudo wvdial
Step 4: Set the K810i to allow usage of the internet.
In K810i choose the menu ->Settings ->Connectivity ->USB ->USB Internet ->Turn on
Step 5:
Edit the script found in /etc/wvdial.conf
[Dialer Defaults]
Init1 = ATZ
Init2 = ATQ0 V1 E1 S0=0 &C1 &D2 +FCLASS=0
Modem Type = USB Modem
ISDN = 0
Phone = /dev/ttyACM0
Username = digi
New PPPD = yes
Password = digi
Modem = /dev/ttyACM0
Baud = 460800
OR configure the script to be able to access bluetooth and USB with different settings
[Dialer Defaults]
Phone =
Username =
Password =
New PPPD = yes
[Dialer Digiusb]
Modem = /dev/ttyACM0
Baud = 460800
Init = ATZ
Init2 = ATQ0 V1 E1 S0=0 &C1 &D2 +FCLASS=0
Init3 = AT+CGDCONT=1,"IP","diginet"
Phone = *99#
Dial Command = ATDT
Username = digi
Password = digi
Ask Password = off
Auto DNS = on
Check Def Route = off
Carrier Check = off
Stupid Mode = on
Auto Reconnect = off
Idle Seconds = 0
Abort on Busy = off
Abort on No Dialtone = off
Dial Attempts = 1
[Dialer DigiBluetooth]
Modem = /dev/rfcomm0
Baud = 460800
Init = ATZ
Init2 = ATQ0 V1 E1 S0=0 &C1 &D2 +FCLASS=0
Init3 = AT+CGDCONT=1,"IP","diginet"
Phone = *99#
Dial Command = ATDT
Username = digi
Password = digi
Ask Password = off
Auto DNS = on
Check Def Route = off
Carrier Check = off
Stupid Mode = on
Auto Reconnect = off
Idle Seconds = 0
Abort on Busy = off
Abort on No Dialtone = off
Dial Attempts = 1
Final step:
Log off then log back in (optional). At the prompt, start the Digiusb configuration
$ sudo wvdial Digiusb
Subscribe to:
Posts (Atom)