Finally an announcement for upgrade of the X10.
See Sony Ericsson Blog
Saturday, October 30, 2010


MyGOSSCON 2010
The major open source conference in Malaysia is on 2-3 Nov 2010. Registration as participant and exhibitor is on going...see you there!

Monday, October 25, 2010
Setting up Flex on Eclipse for Linux
Flash development on Linux is done with Flex SDK. Some nice people started at FB4LINUX have provided a GUI to develop Flash on Linux and this can be integrated into Eclipse IDE.
By the time I wrote this rticle, Adobe placed a notice that they will no longer continue with the Flex Builder development. This means that you can only use command lines to work on Flex. I guess this will affect FB4LINUX.
I refer to a number of sites before starting the installation and found one worth mentioning here. Matthew wrote with clarity and did cover what most other instructions provided and maybe a bit more.
Pre-installation checks: Have you installed Eclipse 3.5+ and Java Development Kit 1.5+
Step 1. Download the fb4linux files in 4 parts from http://code.google.com/p/fb4linux/downloads/list
cat FB4Linux* >FB4Linux.tar.bz2
bunzip2 FB4Linux.tar.bz2
tar -xvf FB4Linux.tar
I renamed the folder to Adobe_Flash_Builder4 since I did not want spaces between the folder name.
Step 2. Download the eclipse plugin for FB4Linux from http://www.brighthub.com/hubfolio/matthew-casperson/media/p/78806.aspx
Unzip the file ecplise and copy the plugins to /usr/lib/eclipse/plugins
The plugins are;
com.adobe.coldfusion.rds.client_1.0.266425.jar
javax.wsdl_1.6.2.v200806030405.jar
org.apache.commons.lang_2.3.0.v200803061910.jar
org.apache.xerces_2.8.0.v200803070308.jar
org.apache.xml.resolver_1.1.0.v200806030311.jar
Step 3. Start Eclipse and apply the plugins.
In Eclipse select Window->Preferences->General->Capabilities and make sure that the Classic Update option is checked.
Click Help->Software Updates->New Feature to Install.
Click the New Local Site button, and type in the location where you extracted FB4Linux in step 1 (you will need to specify the eclipse subdirectory to be specific).
With the Adobe Flash Builder 4 site selected, click the Finish button. You will be asked which features to install. Tick the Adobe Flash Builder 4 feature and click Next.
Accept the terms and click the Next button and click Finish button.
Restart Eclipse.
Step 4: Install the Flex SDK from http://opensource.adobe.com/wiki/display/flexsdk/Download+Flex+4
Download and extract a copy of the Flex SDK from Adobe into a folder flex4.1.0
Set Eclipse to use the Flex SDK by right clicking on your Flash project and selecting Properties. Select the ActionScript Compiler option.
Click the Add button to add the location of the Flex SDK you have extracted.
Click on the Run toolbar menu item and select the External Tools Configuration option.
Right click on the Program option and select the New option. Then fill out the Location and Arguments settings to point to your Flash standalone player and SWF file respectively.
Done...next to look for more flash tutorials.
By the time I wrote this rticle, Adobe placed a notice that they will no longer continue with the Flex Builder development. This means that you can only use command lines to work on Flex. I guess this will affect FB4LINUX.
I refer to a number of sites before starting the installation and found one worth mentioning here. Matthew wrote with clarity and did cover what most other instructions provided and maybe a bit more.
Pre-installation checks: Have you installed Eclipse 3.5+ and Java Development Kit 1.5+
Step 1. Download the fb4linux files in 4 parts from http://code.google.com/p/fb4linux/downloads/list
- FB4Linuxaa
- FB4Linuxab
- FB4Linuxac
- FB4Linuxad
cat FB4Linux* >FB4Linux.tar.bz2
bunzip2 FB4Linux.tar.bz2
tar -xvf FB4Linux.tar
I renamed the folder to Adobe_Flash_Builder4 since I did not want spaces between the folder name.
Step 2. Download the eclipse plugin for FB4Linux from http://www.brighthub.com/hubfolio/matthew-casperson/media/p/78806.aspx
Unzip the file ecplise and copy the plugins to /usr/lib/eclipse/plugins
The plugins are;
com.adobe.coldfusion.rds.client_1.0.266425.jar
javax.wsdl_1.6.2.v200806030405.jar
org.apache.commons.lang_2.3.0.v200803061910.jar
org.apache.xerces_2.8.0.v200803070308.jar
org.apache.xml.resolver_1.1.0.v200806030311.jar
Step 3. Start Eclipse and apply the plugins.
In Eclipse select Window->Preferences->General->Capabilities and make sure that the Classic Update option is checked.
Click Help->Software Updates->New Feature to Install.
Click the New Local Site button, and type in the location where you extracted FB4Linux in step 1 (you will need to specify the eclipse subdirectory to be specific).
With the Adobe Flash Builder 4 site selected, click the Finish button. You will be asked which features to install. Tick the Adobe Flash Builder 4 feature and click Next.
Accept the terms and click the Next button and click Finish button.
Restart Eclipse.
Step 4: Install the Flex SDK from http://opensource.adobe.com/wiki/display/flexsdk/Download+Flex+4
Download and extract a copy of the Flex SDK from Adobe into a folder flex4.1.0
Set Eclipse to use the Flex SDK by right clicking on your Flash project and selecting Properties. Select the ActionScript Compiler option.
Click the Add button to add the location of the Flex SDK you have extracted.
Click on the Run toolbar menu item and select the External Tools Configuration option.
Right click on the Program option and select the New option. Then fill out the Location and Arguments settings to point to your Flash standalone player and SWF file respectively.
Done...next to look for more flash tutorials.
Tuesday, October 5, 2010
Installing Libre Office 3.3
Wow,
Open source licensing is now showing how main stream OSS products can be shifted if those in control is not respected. The OpenOffice.org (I hope this name wont be part of power tussle) is now looking at a branch off called Libre Office. Though its in Beta but I expect lots of the bugs I am facing with the present OpenOffice.org provided by the long term support version of Ubuntu 10.04 to be fixed.
Most notable is the page numbering of the slide handout in Impress. Impress is still showing page 1 in the footer for all pages in OpenOffice.org 3.2.1.
Currently all testing packages of the first Libre Offfice can be found at http://download.documentfoundation.org/libreoffice/testing/
From what I have read, looks like this will override the OOo in Windows but should co-exist with OOo in Linux. I will update this page with progress I make in installing the Libre Office(beta) 3.3. The Java Runtime Environment (JRE) 6 (size of upto 92Mb) needs to be installed before installing the Libre Office. This can be done with synaptic or at the command prompt type
sudo apt-get install openjdk-6-jre sun-java6-fonts icedtea6-plugin
Step 1: open a terminal prompt. Download the Libre Office (LO) which is about 150Mb with either of these commands;
wget http://download.documentfoundation.org/libreoffice/testing/LO_3.3.0-beta1_Linux_x86_install-deb_en-US.tar.gz
OR
wget http://ftp.yz.yamagata-u.ac.jp/pub/tdf/libreoffice/testing/LO_3.3.0-beta1_Linux_x86_install-deb_en-US.tar.gz
Step 2: Extract the tar.gz
Step 3: Switch to the folder en-US then install the DEB packages
cd en-US
sudo dpkg -i DEBS/*.deb
sudo dpkg -i DEBS/desktop-integration/*.deb
Internet crawling so slow. Will Unifi change things?
Open source licensing is now showing how main stream OSS products can be shifted if those in control is not respected. The OpenOffice.org (I hope this name wont be part of power tussle) is now looking at a branch off called Libre Office. Though its in Beta but I expect lots of the bugs I am facing with the present OpenOffice.org provided by the long term support version of Ubuntu 10.04 to be fixed.
Most notable is the page numbering of the slide handout in Impress. Impress is still showing page 1 in the footer for all pages in OpenOffice.org 3.2.1.
Currently all testing packages of the first Libre Offfice can be found at http://download.documentfoundation.org/libreoffice/testing/
From what I have read, looks like this will override the OOo in Windows but should co-exist with OOo in Linux. I will update this page with progress I make in installing the Libre Office(beta) 3.3. The Java Runtime Environment (JRE) 6 (size of upto 92Mb) needs to be installed before installing the Libre Office. This can be done with synaptic or at the command prompt type
sudo apt-get install openjdk-6-jre sun-java6-fonts icedtea6-plugin
Step 1: open a terminal prompt. Download the Libre Office (LO) which is about 150Mb with either of these commands;
wget http://download.documentfoundation.org/libreoffice/testing/LO_3.3.0-beta1_Linux_x86_install-deb_en-US.tar.gz
OR
wget http://ftp.yz.yamagata-u.ac.jp/pub/tdf/libreoffice/testing/LO_3.3.0-beta1_Linux_x86_install-deb_en-US.tar.gz
Step 2: Extract the tar.gz
Step 3: Switch to the folder en-US then install the DEB packages
cd en-US
sudo dpkg -i DEBS/*.deb
sudo dpkg -i DEBS/desktop-integration/*.deb
Internet crawling so slow. Will Unifi change things?
Wednesday, September 29, 2010
[Kubuntu] Updating OpenOffice.org 3.2.1
I have installed OOo 3.2.0 but there are a number of issues that seems to persist on Kubuntu 10.04 (LTS). For example;
Backup all of the extensions you have for OpenOffice.org 3.2.0, if you intend to use it in the future. Now, the steps to upgrade to OOo 3.2.1
Method 1:
- When I create a macro to delete selected cells, it does not work. (Solved on 3.2.1)
- Impress printout of handouts, I do not get the page foot numbers. All pages display as number 1.
Backup all of the extensions you have for OpenOffice.org 3.2.0, if you intend to use it in the future. Now, the steps to upgrade to OOo 3.2.1
Method 1:
- Download OOo 3.2.1 from
ftp://mirror.upm.edu.my/openoffice/stable/3.2.1/OOo_3.2.1_Linux_x86_install-deb_en-US.tar.gz - Open a terminal line and extract the tar.gz file
tar -xzvf OOo_3.2.1_Linux_x86_install-deb_en-US.tar.gz - Remove existing OOo 3.2.0
sudo apt-get remove openoffice*.* - Enter the extracted directory and install the .deb files
cd OOO320_m18_native_packed-1_en-US.9502/DEBS
sudo dpkg -i *.deb
sudo dpkg -i desktop-integration/
- In the software sources, enable the "software Sources"
- Update packages and install OpenOffice.org-3.2.1
Tuesday, September 28, 2010
Reset user desktop for CentOS
On CentOS, after installing the Oracle OpenOffice.org (OOo), everything works fine. Since by default the PCs have auto update enabled, the users tend to update and this causes the CentOS version of OOo to corrupt the installed OOo.
One way to avoid this is to disable the auto update. Since it is a lab environment, I can easily delete and replace user1 account to remove previous configurations in OOo for user1.
Step 1. Create the 2 simple scripts to disable the auto update and reset the desktop for user1.
goreset.sh
#/bin/bash
echo "Resetting pc:"
chkconfig yum-updatesd off
tmpwatch 0 /tmp
echo "Creating user user1"
userdel -r user1
useradd -m user1
passwd oscc
echo "User created, going to reboot"
reboot
startscript.sh
#!/bin/bash
LOGFILE="./coombreset.log"
echo "Enter server name:"
read SERVER
if [ -e $SERVER ]
then
exit
fi
scp prepare-cooomb-test.sh root@"$SERVER":~
ssh root@"$SERVER" ./goreset.sh
echo $SERVER >> $LOGFILE
Step 2. execute (run) the script named startscript.sh
-end-
One way to avoid this is to disable the auto update. Since it is a lab environment, I can easily delete and replace user1 account to remove previous configurations in OOo for user1.
Step 1. Create the 2 simple scripts to disable the auto update and reset the desktop for user1.
goreset.sh
#/bin/bash
echo "Resetting pc:"
chkconfig yum-updatesd off
tmpwatch 0 /tmp
echo "Creating user user1"
userdel -r user1
useradd -m user1
passwd oscc
echo "User created, going to reboot"
reboot
startscript.sh
#!/bin/bash
LOGFILE="./coombreset.log"
echo "Enter server name:"
read SERVER
if [ -e $SERVER ]
then
exit
fi
scp prepare-cooomb-test.sh root@"$SERVER":~
ssh root@"$SERVER" ./goreset.sh
echo $SERVER >> $LOGFILE
Step 2. execute (run) the script named startscript.sh
-end-
Wednesday, September 15, 2010
Install Windows on Linux
To get MS Windows programs installed on Linux (Ubuntu this case), install Wine and other related files.
Step 1: Open a terminal. Or through the Kpackagekit, install packages below.
Step 2: Install packages by the command below;
sudo apt-get install libmpg123-0 libwbclient0 samba-common smbclient ttf-symbol-replacement winbind wine wine1.2 wine1.2-gecko pptview
MS PPTX and DOCX files can be viewed with OpenOffice.org 3, or the viewers from MS Office (I am yet to try these 2).
Step 1: Open a terminal. Or through the Kpackagekit, install packages below.
Step 2: Install packages by the command below;
sudo apt-get install libmpg123-0 libwbclient0 samba-common smbclient ttf-symbol-replacement winbind wine wine1.2 wine1.2-gecko pptview
MS PPTX and DOCX files can be viewed with OpenOffice.org 3, or the viewers from MS Office (I am yet to try these 2).
Friday, September 10, 2010
Disable Nautilus on KDE automount
After installing KDE on Ubuntu 10.04, there were some challenges. One of it is that the USB disk when plugged in, opens (mount) automatically and launches the Gnomes Nautilus. This is not a real problem but when you are used to KDE's environment, the preferred File browser is either Konqueror or Dolphin. In this case, I choose Dolphin.
The most likely cause is that Gnome's GVFS is running and opens the disk automatically. Doing a "ps aux" you will find the following processes running;
/usr/lib/gvfs/gvfsd-trash --spawner :1.39 /org/gtk/gvfs/exec_spaw/0 /usr/lib/gvfs/gvfs-gdu-volume-monitor /usr/lib/gvfs/gvfsd-burn --spawner :1.39 /org/gtk/gvfs/exec_spaw/1 /usr/lib/gvfs/gvfs-afc-volume-monitor /usr/lib/gvfs/gvfs-gphoto2-volume-monitor /usr/lib/gvfs/gvfsd-metadata /usr/lib/gvfs/gvfsd
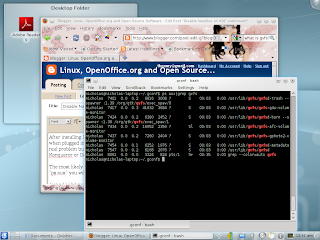
What is GVFS?
GVFS replaces Gnome's virtual file system (VFS). Programmes built with the library GIO or Gnome I/O will be invoke automatically and managed by the gvfsd service.
The gvfs-fuse module is used only when the application is not built with the GIO library. With GVFS, Nautilus takes over the automount/autorun responsibilities from gnome-volume-manager. A good read on GVFS is in this 2006 article.
Stopping processes
If I stop (kill) the gvfsd and gvfs-gdu-volume-monitor, Nautilus does not get open anymore. But instead of killing this process, I will approach this by assuming that gvfs reads from Gnome Desktop Manager configuration files.
Step 1:
Open a terminal (e.g. konsole) and type
gconf-editor
Step 2:
In the left window of Gconf-editor, choose /apps/nautilus/preferences and remove check mark for
1) media_automount
2) media_automount_open
Step 3:
Close the Gconf-editor and log out. After you log back in, no more Nautilus.

The most likely cause is that Gnome's GVFS is running and opens the disk automatically. Doing a "ps aux" you will find the following processes running;
/usr/lib/gvfs/gvfsd-trash --spawner :1.39 /org/gtk/gvfs/exec_spaw/0 /usr/lib/gvfs/gvfs-gdu-volume-monitor /usr/lib/gvfs/gvfsd-burn --spawner :1.39 /org/gtk/gvfs/exec_spaw/1 /usr/lib/gvfs/gvfs-afc-volume-monitor /usr/lib/gvfs/gvfs-gphoto2-volume-monitor /usr/lib/gvfs/gvfsd-metadata /usr/lib/gvfs/gvfsd


What is GVFS?
GVFS replaces Gnome's virtual file system (VFS). Programmes built with the library GIO or Gnome I/O will be invoke automatically and managed by the gvfsd service.
The gvfs-fuse module is used only when the application is not built with the GIO library. With GVFS, Nautilus takes over the automount/autorun responsibilities from gnome-volume-manager. A good read on GVFS is in this 2006 article.
Stopping processes
If I stop (kill) the gvfsd and gvfs-gdu-volume-monitor, Nautilus does not get open anymore. But instead of killing this process, I will approach this by assuming that gvfs reads from Gnome Desktop Manager configuration files.
Step 1:
Open a terminal (e.g. konsole) and type
gconf-editor
Step 2:
In the left window of Gconf-editor, choose /apps/nautilus/preferences and remove check mark for
1) media_automount
2) media_automount_open
Step 3:
Close the Gconf-editor and log out. After you log back in, no more Nautilus.
Tuesday, August 31, 2010
Installing ubuntu 10.04 and KDE
KDE 4.4 looks good on the Ubuntu 10.04. Yup, finally have the time to upgrade but I only had the Ubuntu CDROM, so later after the install had to manually install KDE4.
Using reference from my previous blog on Installing Kubuntu 9.10. Launch from KMenu the Synaptics or Kpackagekit to install additional applications and libraries. Below is a checklist of items to install.
note: to install via the terminal (CLI), e.g.
sudo apt-get install wvdial
A. Adding KDE desktop manager to Ubuntu
B. For the web experience to surf and email
D. Multimedia, Fonts and codecs
G. Software development, Eclipse and Android (refer to previous post)
G.1. Apache, PHP & mysql (see previous post)
Not everything can be done via the synaptics. Others that require downloading from the internet manually;
Using reference from my previous blog on Installing Kubuntu 9.10. Launch from KMenu the Synaptics or Kpackagekit to install additional applications and libraries. Below is a checklist of items to install.
note: to install via the terminal (CLI), e.g.
sudo apt-get install wvdial
A. Adding KDE desktop manager to Ubuntu
- kdebase-workspace
- kde-window-manager
B. For the web experience to surf and email
- openjdk-6-jre (using hotspot)
- thunderbird & enigmail
- icedtea6-plugin
- adobe-flashplugin
- See item D.
- gdecrypt
- password-gorilla
- ssh sshfs ksshaskpass
- khelpcenter4
- wvdial
- nmap
- wireshark
- ksnapshot
D. Multimedia, Fonts and codecs
- ttf-mscorefonts-installer & cabextract
- kubuntu-restricted-extras
- vlc videolan-doc mozilla-plugin-vlc vlc-plugin-sdl (include libvcdinfo0)
- k3b libk3b6-extracodecs
- gstreamer0.10-ffmpeg gstreamer0.10-plugins-bad
- gimp-help-en & gimp-data-extras
- kdenlive
- recorditnow
- tpb
- tp-smapi-dkms
- openoffice.org-ogltrans
- openoffice.org-report-builder
- openoffice.org-presentation-minimizer
- mozilla-openoffice.org
- openoffice.org-mysql-connector & mysql-server
- myspell-en-gb
- openoffice.org-kde
- libmysql-java
- mdbtools
G. Software development, Eclipse and Android (refer to previous post)
G.1. Apache, PHP & mysql (see previous post)
- apache2 & php5 & php-pear (after done check that modules are enabled, run command a2enmod php5 )
- mysql-server
- php5-mysql libapache2-mod-php5 libapache2-mod-auth-mysql
Not everything can be done via the synaptics. Others that require downloading from the internet manually;
- truecrypt-6.3a & libstdc++5_3.3.6-17ubuntu1_i386.deb
- Extract PCL_ZTEDCV.tar.gz and install (ZTE usb modem) & libqt3-mt_3.3.8-b-0ubuntu3_i386.deb
- Download AdobeReader (to view PDF files) from http://get.adobe.com/reader
Monday, August 30, 2010
Plasma widget error - "could not create a python scriptengine"
In Kubuntu 10.04, Adding widgets may give webkit and scriptengine errors. Here are some of the solutions.
"could not create a python scriptengine"
When installing Solar System widget to desktop, that error appears. Solution is to install plasma-scriptengine-python, e.g. at the terminal (CLI) type;
"could not create a python scriptengine"
When installing Solar System widget to desktop, that error appears. Solution is to install plasma-scriptengine-python, e.g. at the terminal (CLI) type;
sudo apt-get install plasma-scriptengine-python
"could not create a webkit scriptengine for the scripted image widget"
When installing Scripted Image widget to desktop, above error appears. Solution, install plasma-scriptengine-webkit. E.g. at CLI type;
-the end-
"could not create a webkit scriptengine for the scripted image widget"
When installing Scripted Image widget to desktop, above error appears. Solution, install plasma-scriptengine-webkit. E.g. at CLI type;
sudo apt-get install plasma-scriptengine-webkit
-the end-
Sunday, August 15, 2010
Android development on Eclipse
My notes on Android development
Install Eclipse and the java base (about 256Mb)
Install Java
Ubuntu 10.04 provides Java6 in the form of OpenJDK (openjdk-6-jdk). This is great for developers, but for those who wants to install Sun (Oracle) version of Java6, I will also provide the steps here
A) Install OpenJDK (check if its already installed before doing this!)
Step 1: open a terminal and type the following;
update-alternatives --query java
If you already have OpenJDK, then you do not need to install it anymore. If you do not have any Java JDK listed, then continue to step 2.
Step 2:
sudo apt-get install openjdk-6-jdk openjdk-6-jdk icedtea6-plugin
B) Install Sun (Oracle) Java JDK.
Step 1: Add the repository for Sun Java. Open a terminal and type the following;
sudo add-apt-repository "deb http://archive.canonical.com/ lucid partner"
sudo apt-get update
Step 2: Install the JDK along with the plugin
sudo apt-get install sun-java6-jdk sun-java6-plugin
Step 3: Make it your default
Sun Java is now installed, but you need to make it the default java to use:
sudo update-alternatives --config java
Install Eclipse
Open a terminal and type;
sudo apt-get install eclipse eclipse-pde eclipse-jdt eclipse-plugin-cvs
Install Android plugin for Eclipse
Refer for details at Android.com
Download and add the Eclipse plugin for Android by (update 15 Feb 2010)
wget http://dl.google.com/android/android-sdk_r09-linux_x86.tgz
wget http://dl.google.com/android/ADT_9.0.0.zip
previous post was;
$ wget http://dl.google.com/android/ADT-0.9.7.zip
The tgz is for the android SDK.
Install Eclipse and the java base (about 256Mb)
Install Java
Ubuntu 10.04 provides Java6 in the form of OpenJDK (openjdk-6-jdk). This is great for developers, but for those who wants to install Sun (Oracle) version of Java6, I will also provide the steps here
A) Install OpenJDK (check if its already installed before doing this!)
Step 1: open a terminal and type the following;
update-alternatives --query java
If you already have OpenJDK, then you do not need to install it anymore. If you do not have any Java JDK listed, then continue to step 2.
Step 2:
sudo apt-get install openjdk-6-jdk openjdk-6-jdk icedtea6-plugin
B) Install Sun (Oracle) Java JDK.
Step 1: Add the repository for Sun Java. Open a terminal and type the following;
sudo add-apt-repository "deb http://archive.canonical.com/ lucid partner"
sudo apt-get update
Step 2: Install the JDK along with the plugin
sudo apt-get install sun-java6-jdk sun-java6-plugin
Step 3: Make it your default
Sun Java is now installed, but you need to make it the default java to use:
sudo update-alternatives --config java
Install Eclipse
Open a terminal and type;
sudo apt-get install eclipse eclipse-pde eclipse-jdt eclipse-plugin-cvs
Install Android plugin for Eclipse
Refer for details at Android.com
Download and add the Eclipse plugin for Android by (update 15 Feb 2010)
wget http://dl.google.com/android/android-sdk_r09-linux_x86.tgz
wget http://dl.google.com/android/ADT_9.0.0.zip
previous post was;
$ wget http://dl.google.com/android/ADT-0.9.7.zip
The tgz is for the android SDK.
Friday, August 6, 2010
Sunday, July 25, 2010
Applications that need the .Net framework on Linux
The Genting web site gave some challenges to book their shows. It was directing Firefox to install Silverlight (a MS Windows based programme). On Linux, this is done via the Moonlight package. Here are things I tried on Kubuntu 9.10 using Firefox version 3.5.9
1. Installed via the terminal
sudo apt-get install moonlight-plugin-mozilla
Still cant work...maybe its Mono 1.0?
2. Installed the Mono 2.0 via URL http://go-mono.com/moonlight/download.aspx
Still cant work!
3. Installed the prerelease Mono version 3 via the URL http://go-mono.com/moonlight/prerelease.aspx
The size was 13.2Mb
Still cant work! Firefox keep closing (crash) each time I click on that page.
I am sending rwgenting a feedback.
Those websites who choose to use the .Net framework keeps most Linux users away from their services. Unless there are plans to get these fixed. If anyone have gone to rwgenting to do booking of shows on a Linux machine and it works, do let me know how it can be done.
1. Installed via the terminal
sudo apt-get install moonlight-plugin-mozilla
Still cant work...maybe its Mono 1.0?
2. Installed the Mono 2.0 via URL http://go-mono.com/moonlight/download.aspx
Still cant work!
3. Installed the prerelease Mono version 3 via the URL http://go-mono.com/moonlight/prerelease.aspx
The size was 13.2Mb
Still cant work! Firefox keep closing (crash) each time I click on that page.
I am sending rwgenting a feedback.
Those websites who choose to use the .Net framework keeps most Linux users away from their services. Unless there are plans to get these fixed. If anyone have gone to rwgenting to do booking of shows on a Linux machine and it works, do let me know how it can be done.
Wednesday, June 30, 2010
Android on Sony Ericsson
The Sony Ericsson X10 runs on Android operating system. This is an X window on linux kernel 2.6.29-rel. Its really responsive in my
opinion when I do the following;
1. Using the standard virtual keyboard.
2. Switching between application.
3. Using Timescape to read messages and mediascape for multimedia.
Among the 10 main apps I Installed and will keep;
1. Dolphin web browser.
2. MP3 download.
3. Ringtone Editor.
4. Task manager.
5. PasswdSafe.
6. Astro File Manager +smb module.
7. Connect Bot.
8. Android vnc viewer.
9. EASYNOTE.
10. Mytask.
But i still cant open OOo documents. PDF AND MS WORD WORKED!
Next, android will be on tablet PCs like the Cisco Cius.
The Android can be built with ecipse and the java development kit. See
http://www.alittlemadness.com/2010/06/07/understanding-the-android-build-process
opinion when I do the following;
1. Using the standard virtual keyboard.
2. Switching between application.
3. Using Timescape to read messages and mediascape for multimedia.
Among the 10 main apps I Installed and will keep;
1. Dolphin web browser.
2. MP3 download.
3. Ringtone Editor.
4. Task manager.
5. PasswdSafe.
6. Astro File Manager +smb module.
7. Connect Bot.
8. Android vnc viewer.
9. EASYNOTE.
10. Mytask.
But i still cant open OOo documents. PDF AND MS WORD WORKED!
Next, android will be on tablet PCs like the Cisco Cius.
The Android can be built with ecipse and the java development kit. See
http://www.alittlemadness.com/2010/06/07/understanding-the-android-build-process
Monday, May 24, 2010
Convert AVHCD to AVI and burn as VCD
Getting AVHCD from a video camera into a PC a making it into a VCD. This is a weekend project.
Next, AVIs are great for the PC, however, to distribute to people who do not use PCs to watch movies or just to have a larger screen, it is better to convert the AVI into a VCD.
Step 1: Copy the files from the AVHCD camera
CAMERA: /media/disk-1/PRIVATE/AVCHD/BDMV/STREAM
PC: ~/Documents
Step 2: Convert to AVI.
Future action can consider direct preparation for MPG. Here it is in AVI because there was a need for me to prepare in various format apart from MPG or VCD.
Start KDENLive
- File -> Save As ->
- Project -> Add clip
- In the Project Tree window, drag the clips into the timeslots (bottow window)
- Click Render button ->AVI DV
Step 3: Get the converter programme called vcdimager
$ sudo apt-get install vcdimager
Step 4: Convert to mpg and the cue / bin
ffmpeg -i inputfile.avi -target pal-vcd outfilename.mpg
# create the cue and bin files. The label did not allow for spaces.
vcdimager -t vcd2 -l"Martha-Swimming-May-2010" -c vcd2.cue -b vcd2.bin outfilename.mpg
Step 5: Using K3B, choose project for Burn Image
Insert a blank CDROM
Image to burn ->Select the .cue file.
Image type ->Cue/bin
Click "Start"
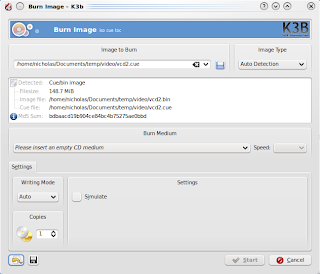
===========
Using:
K3B version 1.68.0
KDE 4.3.2
CDRDAO 1.2.2
VCDimager 0.7.23
Kubuntu 9.10
===========
Next, AVIs are great for the PC, however, to distribute to people who do not use PCs to watch movies or just to have a larger screen, it is better to convert the AVI into a VCD.
Step 1: Copy the files from the AVHCD camera
CAMERA: /media/disk-1/PRIVATE/AVCHD/BDMV/STREAM
PC: ~/Documents
Step 2: Convert to AVI.
Future action can consider direct preparation for MPG. Here it is in AVI because there was a need for me to prepare in various format apart from MPG or VCD.
Start KDENLive
- File -> Save As ->
- Project -> Add clip
- In the Project Tree window, drag the clips into the ti
- Click Render button ->AVI DV
Step 3: Get the converter programme called vcdimager
$ sudo apt-get install vcdimager
ffmpeg -i inputfile.avi -target pal-vcd outfilename.mpg
# create the cue and bin files. The label did not allow for spaces.
vcdimager -t vcd2 -l"Martha-Swimming-May-2010" -c vcd2.cue -b vcd2.bin outfilename.mpg
Step 5: Using K3B, choose project for Burn Image
Insert a blank CDROM
Image to burn ->Select the .cue file.
Click "Start"

Using:
K3B version 1.68.0
KDE 4.3.2
CDRDAO 1.2.2
VCDimager 0.7.23
Kubuntu 9.10
===========
Sunday, May 23, 2010
Add Screensavers in KDE4
Screensavers are graphics that replaces the normal desktop screen when it is idle too long (it depends on the user setting). This should reduce the burnout of the screen and also hides the desktop contents from passing eyes.
Default install of Kubuntu did not have any of the nice screensavers. Check the screensavers by choosing the KMenu ->system Settings
Choose the General tab ->Desktop ->Screen saver
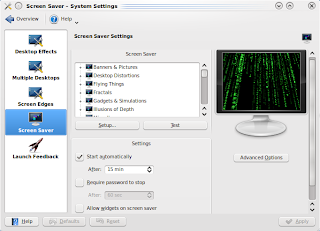
To install additional screensaver, use the Software Management such as KPackagekit or synaptic and install
kscreensaver-xsavers-extra
This can also be done at the terminal by typing
$ sudo apt-get install kscreensaver-xsavers-extra
This installs
kscreensaver
kscreensaver-xsavers
kscreensaver-xsavers-extra
libgle3
netpbm
xscreensaver
xscreensaver-data
xscreensaver-data-extra
xscreensaver-gl
xscreensaver-gl-extra
Install optional items;
$ sudo apt-get install xfishtank qcam streamer
Default install of Kubuntu did not have any of the nice screensavers. Check the screensavers by choosing the KMenu ->system Settings
Choose the General tab ->Desktop ->Screen saver

To install additional screensaver, use the Software Management such as KPackagekit or synaptic and install
kscreensaver-xsavers-extra
This can also be done at the terminal by typing
$ sudo apt-get install kscreensaver-xsavers-extra
This installs
kscreensaver
kscreensaver-xsavers
kscreensaver-xsavers-extra
libgle3
netpbm
xscreensaver
xscreensaver-data
xscreensaver-data-extra
xscreensaver-gl
xscreensaver-gl-extra
Install optional items;
$ sudo apt-get install xfishtank qcam streamer
Saturday, May 22, 2010
Start programming with QT4
If you ever are into open source software, eventually contribution of codes becomes part of the cycle. Trolltech from Oslo, Norway popularised the QT, which is a set of programming libraries that is used to develop graphical applications. In Linux, there is the KDE desktop manager that uses the QT libraries. Other popular applications that use QT are Opera,
Here is a guide to get started with QT programming (qt4 in this case) on Kubuntu 9.10. You will need the demo and the Graphical development tool
A. Setting up the environment
Step 1: Install the libraries and compilers. This include libraries such as "QLabel" and QLayout from the QtGui
$ sudo apt-get install build-essential kdelibs4-dev libqt4-qt3support libqt4-assistant
Step 2: Install the demos
$ sudo apt-get install qt4-demos
Step 3: Configure Linux to compile with qt4 instead of the default qt3
$ sudo update-alternatives --config qmake
Step 4: # install the Graphical development tool
$ sudo apt-get install kdevelop
Step 5: Read info on QT4 through the manuals at /usr/share/qt4/doc/html/index.html
$ assistant-qt4
B. General programming setup of project, compiling and execute
Step 1: Create the source files. E.g. .cpp, .h, etc.
Just copy from the demo files in /usr/lib/qt4/examples. I will use files from the example tabdialogs.
$ cp -r /usr/lib/qt4/examples/dialogs/tabdialog/ ~
$ cd ~/tabdialog
Step 2: Create the project file. The project file (.pro) define headers, sources, form and other files which the application consists of.
$ qmake -project
Step 3: Compile
$ qmake
$ make
Step 4: Run the programmes.
$ ./tabdialog
Alternatively, use the KDevelop to manage the project. Start KDevelop and open to .pro file.
$ kdevelop
C. References
Here is a guide to get started with QT programming (qt4 in this case) on Kubuntu 9.10. You will need the demo and the Graphical development tool
A. Setting up the environment
Step 1: Install the libraries and compilers. This include libraries such as "QLabel" and QLayout from the QtGui
$ sudo apt-get install build-essential kdelibs4-dev libqt4-qt3support libqt4-assistant
Step 2: Install the demos
$ sudo apt-get install qt4-demos
Step 3: Configure Linux to compile with qt4 instead of the default qt3
$ sudo update-alternatives --config qmake
Step 4: # install the Graphical development tool
$ sudo apt-get install kdevelop
Step 5: Read info on QT4 through the manuals at /usr/share/qt4/doc/html/index.html
$ assistant-qt4
B. General programming setup of project, compiling and execute
Step 1: Create the source files. E.g. .cpp, .h, etc.
Just copy from the demo files in /usr/lib/qt4/examples. I will use files from the example tabdialogs.
$ cp -r /usr/lib/qt4/examples/dialogs/tabdialog/ ~
$ cd ~/tabdialog
Step 2: Create the project file. The project file (.pro) define headers, sources, form and other files which the application consists of.
$ qmake -project
Step 3: Compile
$ qmake
$ make
Step 4: Run the programmes.
$ ./tabdialog
Alternatively, use the KDevelop to manage the project. Start KDevelop and open to .pro file.
$ kdevelop
C. References
- http://zetcode.com/tutorials/qt4tutorial/
- http://sector.ynet.sk/qt4-tutorial/my-first-qt-gui-application.html
- http://qt-apps.org/
Tuesday, May 4, 2010
Scanning the hard disk status
The hard disk performance effects how people perceive their Linux box. If you say a system is slow, what is causing this? There are many reasons, among them are;
too many programmes running, lower processing speed of hardware, insufficient resources, etc.
You can use basic linux tools to give readings on the hard disk for benchmark purpose. Here are among commands that anyone can use via a terminal;
Details on how to use the above commands can be found in the respective man pages.
Now you can tell someone, my disk is faster than yours.
too many programmes running, lower processing speed of hardware, insufficient resources, etc.
You can use basic linux tools to give readings on the hard disk for benchmark purpose. Here are among commands that anyone can use via a terminal;
- Get timing of cache and device reads on inactive systems. This means nothing else is running during the test.
hdparm -tT /dev/sda - Shows the files opened by processes.
lsof - Monitor balance between input/output load of physical disk using the sysstat package. iostat -x
- Space on mounted devices.
df -h - Monitor load on a Linux system, default every 10 second updated.
atop
Details on how to use the above commands can be found in the respective man pages.
Now you can tell someone, my disk is faster than yours.
Thursday, April 29, 2010
Impressive Impress and Converting Slides to AVI
Just completed an Impress slide and converted into AVI and MPEG. Final presentation was in AVI, the MPEG can be used for the web as its only half the AVI size.
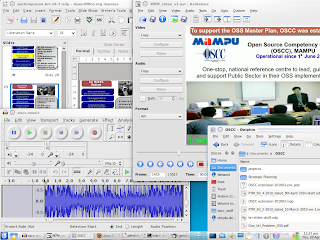
Tools useds;
The Impress extensions installed to improve the presentation was "Presentation Minimiser" to reduce the slide file size and "openoffice.org-ogltrans" to add slide transitions. Here are examples of how the additional slide transitions looked like.


Tools useds;
- Slides - OpenOffice.org 3.1 Impress
- Recording slides - recordmydesktop
- Video editing - Avidemux
- Graphics - GIMP
- Audio - Audacity
- OGV to AVI converter - mencoder
- AVI to MPEG converter - Download helper (extension for firefox) + mencoder
- Operating System - Ubuntu & Kubuntu (2 PCs)
The Impress extensions installed to improve the presentation was "Presentation Minimiser" to reduce the slide file size and "openoffice.org-ogltrans" to add slide transitions. Here are examples of how the additional slide transitions looked like.


Friday, April 23, 2010
Installing ZTE MF110 on Ubuntu Linux
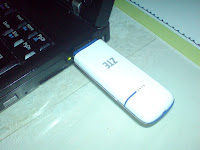
Maxis offered their broadband along with the ZTE's MF110 HSUPA modem. Thus far, I have not gotten a chance to get a Digi offer to try their broadband,....maybe some day.
The MF110 features
Network: HSUPA/HSDPA/UMTS 2100 MHz,EDGE/GPRS/GSM 850/900/1800/1900MHz
Data transmission speeds: 7.2Mbps DL 5.76Mbps UL
Weight: 21.5 gramme
Application: Join Air with SMS service, Data service, Applications management, Data concurrent. This allowed me to add other service providers (yet to be tested) with the same modem.
 Installation on Linux KUbuntu 9.10
Dial number: *99#
APN: static: maxisbb
username: maxis
password: wap
Connection has been pretty much inconsistent. Its fast at times, then no connection, then have to keep reloading the page. I like its thumbdrive size and the blinking lights. The Join Air application is also easy to read and use.
The MF110 features
Network: HSUPA/HSDPA/UMTS 2100 MHz,EDGE/GPRS/GSM 850/900/1800/1900MHz
Data transmission speeds: 7.2Mbps DL 5.76Mbps UL
Weight: 21.5 gramme
Application: Join Air with SMS service, Data service, Applications management, Data concurrent. This allowed me to add other service providers (yet to be tested) with the same modem.
 Installation on Linux KUbuntu 9.10
- Install wvdial from KPackageKit
- Plug the MF110 into the USB slot. Mount the MF110 and enter the directory "Linux"
- Extract "PCL_ZTEDCV.tar.gz" to your HOME directory.
- Open a terminal and type "sudo ./install.sh"
- Launch the application "Join Air" from the KMenu
- In Join Air, at the Internet menu (A globe icon), click "Connect". Minimise this window but do not close as its needed to maintain Internet connection.
- It connects directly with initial IP 121.121.X.X and tries to open the web page mylaunchpad.com.my
Dial number: *99#
APN: static: maxisbb
username: maxis
password: wap
Connection has been pretty much inconsistent. Its fast at times, then no connection, then have to keep reloading the page. I like its thumbdrive size and the blinking lights. The Join Air application is also easy to read and use.
Subscribe to:
Posts (Atom)