What are Screenlets?
These are mini applications written to provide what a real physical desk/table might have. The applications are eye candy that can be things like a clock, calendar, CPU, RAM and notes. For more details see screenlets (http://www.screenlets.org/index.php/Information) website.
Screenlets are written in Python and can be installed system wide (all users) or for specific user. I am writing this to show how to install the screenlets that come as default and from 3rd party.
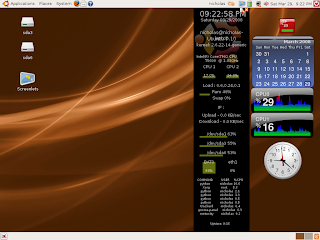
A. Installing screenlets (tested on Ubuntu 7.10 Gutsy)
I refer to http://www.screenlets.org/index.php/FAQ website for installation of the screenlets.
1. Add the launchpad repository for screenlets
vi /etc/apt/sources.list
deb http://ppa.launchpad.net/gilir/ubuntu gutsy main universe
2. Update the repository and install screenlets
sudo apt-get update
sudo apt-get install screenlets
sudo apt-get install python-dcop python-feedparser python-chardet
B. Starting screenlets
1. Launch Screenlet Manager
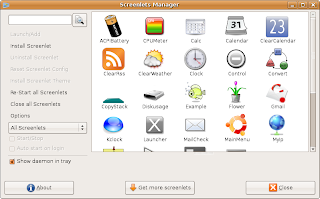
Open a terminal and issue the command
screenlets-manager
or from the Panel choose
Applications ->Accessories ->Screenlets
2. Click on one of the screenlets then click Launch/Add button.
When the screenlet appears, click and drag it to the position that you want. To edit its properties, right click on the screenlet and choose on of its configuration (Example Windows, Properties )
3. The Sreenlet Manager allows installation of new screenlets, restarting screenlets, to automatically start
C. Adding additional screenlets
Download and extract the screenlets to
~/.screenlets
or
/usr/share/screenlets
D. Installing additional screenlets not available with default Screenlets.
Here I am using the 3rd party screenlets to install CPU Meter Screenlet Vista'ish. It appears as two joined meter with several themes.
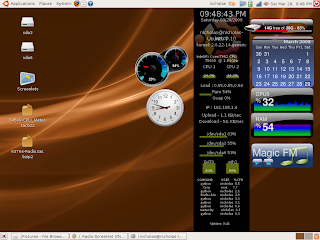
1. download from http://www.screenlets.org/index.php/CPU_Meter_Vista%27ish
2. Installation
Put it in your /usr/local/share/screenlets and run it from there
or
Install by extracting the contents of the screenlet's archive to the directory ~/.screenlets
3. Develop your own screenlets?
There are possibilities to create and install your own screenlets. Is it easy to create screenlets? see
http://www.screenlets.org/index.php/Documentation
Looking at alternative computer software solutions for a variety of reasons. This includes price, computer security, virus prevention and reliability. Here are my notes and great that if it helps you, otherwise please understand what you are doing and not follow blindly. All works expressed are my own and does not necessarily express the products or organisations mentioned here.
Saturday, March 29, 2008
Wednesday, March 26, 2008
gdesklets to enhance Linux
gdesklet to enhance Ubuntu. (Tested on Ubuntu 7.10)
For those who are looking at ways to add eye candy to the Ubuntu desktop, there is gdesklets. It is not installed by default and the universe repository must be enabled. Universe should be by default unless someone changed things. As of today it is version gDesklets 0.35.3-4ubuntu2.
1. Ensure universe repository is enabled
$ sudo gedit /etc/apt/sources.list
deb http://security.ubuntu.com/ubuntu gutsy-security universe
deb-src http://security.ubuntu.com/ubuntu gutsy-security universe
2. Install the gDesklet
sudo apt-get install gdesklets
sudo apt-get install lm-sensors
3. launch gDesklets
From GUI: Choose Applications->Accessories->gDesklets
From CLI: gdesklets start
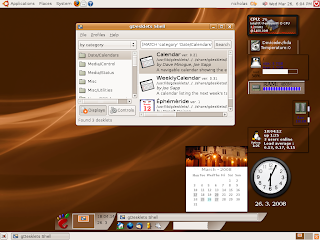
At the Applet bar right click the gdesklet and choose to configure.
This can also be done by typing
gdesklet shell
4. Add gdesklets to desktop
This example is to add the monthly calendar.
Click Date/Calendars -> Calendar
Choose File->Run Selected Desklet menu
5. To move the desklet
Move mouse over the desklet and right click. Choose Move Desklet. Another way is to press middle button (hold left+right mouse button) and drag.
6. Configure a desklet on desktop
Right click and select the Configure desklet
7. Raising Desklets to the Front of the Desktop
When you want to have the desktop applications appear behind the desklets (since desklet is so fun), press+. This is a default that can be changed later. To bring the desklets to background press same keys again.
8. Adding more desklets.
There are many more desklets around the Internet. However you can find most of them at
http://www.gdesklets.de
http://gdesklets.zencomputer.ca
Select any of the gdesklets, download and drag into a gdesklet shell.
For those who are looking at ways to add eye candy to the Ubuntu desktop, there is gdesklets. It is not installed by default and the universe repository must be enabled. Universe should be by default unless someone changed things. As of today it is version gDesklets 0.35.3-4ubuntu2.
1. Ensure universe repository is enabled
$ sudo gedit /etc/apt/sources.list
deb http://security.ubuntu.com/ubuntu gutsy-security universe
deb-src http://security.ubuntu.com/ubuntu gutsy-security universe
2. Install the gDesklet
sudo apt-get install gdesklets
sudo apt-get install lm-sensors
3. launch gDesklets
From GUI: Choose Applications->Accessories->gDesklets
From CLI: gdesklets start
At the Applet bar right click the gdesklet and choose to configure.
This can also be done by typing
gdesklet shell
4. Add gdesklets to desktop
This example is to add the monthly calendar.
Click Date/Calendars -> Calendar
Choose File->Run Selected Desklet menu
5. To move the desklet
Move mouse over the desklet and right click. Choose Move Desklet. Another way is to press middle button (hold left+right mouse button) and drag.
6. Configure a desklet on desktop
Right click and select the Configure desklet
7. Raising Desklets to the Front of the Desktop
When you want to have the desktop applications appear behind the desklets (since desklet is so fun), press
8. Adding more desklets.
There are many more desklets around the Internet. However you can find most of them at
http://www.gdesklets.de
http://gdesklets.zencomputer.ca
Select any of the gdesklets, download and drag into a gdesklet shell.
Monday, March 24, 2008
yum with RHEL 5.x and CentOS 5.x
CentOS and RHEL uses the yum tool to install and keep software updated. This manages and tracks the software installed and its dependencies as long as there is an Internet connection. Yum is a kind of front-end to the rpm tool to manage installation of software. The softwarename here refers to a package name. Here are some yum related information that requires root access.
General
1. RHEL needs to register with RHN before yum can access its resources. Use the command:
rhn_register
2. To display list of updated software
yum list updates
3. To download and install updates
yum update
yum update softwarename
4. Display installed software
yum list installed
yum list installed softwarename
5. Display available software and installed software
yum list all
yum list softwarename
yum list reposname
6. To install a software
yum install softwarename
7. Display which software a tool belongs under
yum whatprovides /sbin/iptables
Manage software groups.
1. Display available software groups
yum grouplist
2. To install software in a group
yum groupinstall "group name"
yum groupupdate "group name"
3. To remove all software in a group
yum groupremove
Saturday, March 22, 2008
R60 laptop and projector display
To have the R60 Laptop be able to display with the projector while being able to view the laptop screen I have some suggestions for Linux Ubuntu (Gutsy 7.10) and CentOS 5.1.
Firstly, Gutsy detected and is using an Intel experimental driver for the 945. CentOS detected the driver as Intel i810.
There are three methods that you may want to try out. Please do drop me a comment if it works on other distros or record here if you have problems.
1) Modify xorg.conf file
Modify the options for the graphical device in the /etc/X11/xorg.conf file. Make sure the file have a backup.
1.1) Linux Ubuntu
a) vi /etc/X11/xorg.conf
From:
Section "Device"
Identifier "Intel Corporation Mobile 945GM/GMS, 943/940GML Express Integrated Graphics Controller"
Driver "intel"
BusID "PCI:0:2:0"
EndSection
To:
Section "Device"
Identifier "Intel Corporation Mobile 945GM/GMS, 943/940GML Express Integrated Graphics Controller"
Driver "intel"
BusID "PCI:0:2:0"
Option "MonitorLayout" "NONE,LFP+CRT"
Option "DevicePresence" "true"
Option "CheckLid" "false"
EndSection
Save the file.
b) Plugin the projector and reboot.
1.2) Linux CentOS 5
a) vi /etc/X11/xorg.conf
Find the section "Device" and edit to include the BusID and the 3 options. They are self explainatory.
Section "Device"
Identifier "Videocard0"
Driver "i810"
BusID "PCI:0:2:0"
Option "MonitorLayout" "NONE,LFP+CRT"
Option "DevicePresence" "true"
Option "CheckLid" "false"
EndSection
Save the file.
b) Logout and plugin the projector. If you still cant see the displays, then reboot without the projector plugged in. Plug in when at the login screen.
2) Restarting X
Based on my postings to ubuntuforums titled "HOWTO GUTSY: Laptop dual display with projector/external screen" (Oct 20, 2007). Those who do not want to touch the xorg.conf file can do the following:
a) Start Gutsy and stay at the login screen or Press Ctrl+Alt+Backspace
b) Plug in the external display cable
c) Log-in and you can see the two screens. Play a movie and it appears on the external screen.
Next problem, You have watched the movie on the external screen now you want to remove the external screen and resume work as normal. This includes watching movies on the laptop.
a) Logout and remove the external screen cable.
b) At the login screen press Ctrl+Alt+Backspace
c) Login
d) Play a movie and it appears on the laptop screen.
3. Using command line.
For those who love to just make scripts or give command lines, I suggest using xrandr. However, if you have modified the xorg.conf file, the command may not always work.
a) Login as a normal user. Open a terminal to issue commands.
b) Plugin the external display cable (projector)
c) Type any of the following relevant lines:
xrandr --output VGA --auto
xrandr --output VGA --mode 800x600 --auto
xrandr --output VGA --mode 1024x768 --auto
d) To stop the projection, type
xrandr --output VGA --off
#end
Friday, March 21, 2008
Its Good Friday.
It is Good Friday today and a nice article in The New Straits Times, A celebration of new life today is a good reminder for us Christians of the celebration. It is a rainy day and the mass will be at 6pm today. Holy Thursday will be where the baptisted adults will have their ceremony. Easter Sunday 9am mass is where I will be.
Looking back at all this, what are the technology involvement of the church?
Discussions of ODF by CEPIS started in 2006. The Catholic Semantic Web list several efforts of the church to implement technology.
Theological XML (tXML)
Open Scriptural Information Standard (OSIS)
Open Source Bible Software
Linux distro Ubuntu CE for Christians is described in distrowatch.com
The ATLAS project provided digitisations of scholastic materials.
The Crosswire.org project provides the framework for software like Bibletime.info (for KDE)
Wednesday, March 19, 2008
The thin client for XDMCP
This is a continuation of the previous blog on XDMCP. Firstly we start off with the definition of an XMDCP client. The client is actually an xserver that collects information of the mouse, keyboard and other X matters from a XDMCP server. Well, atleast that is the easiest way to explain. An example of such a client is the multipurpose Xnest.
The Xnest software states the following:
Xnest is a client of the real server which manages windows and graphics requests on its behalf. Xnest is a server to its own clients. Xnest manages windows and graphics requests on their behalf. To these clients Xnest appears to be a conventional server.
The client environment I have tested is on Linux CentOs 5.1. On the XDMCP server is a user called username with the password as password. The example server IP used is 10.20.20.172.
1. Login to a graphical environment (I use GNOME) as a normal user. Choose Applications ->Accessories ->Terminal
2. At the terminal type the following:
$ ssh -X username@10.20.20.172
$ Xnest :1 -geometry 800x600 -query 10.20.20.172
3. Login with the given name and password.
Creating an XDMCP server
X Display Manager Control Protocol or better known as XDMCP is used to provide thin client service. Today we see how to quickly allow XDMCP server to do the following:
1. Centrally control user login
2. Provide software/application from a central source
3. Lower specs machine can use resources from the server
I am having CentOS 5.1 with Gnome Desktop, so this time I will explain based on the given environment.
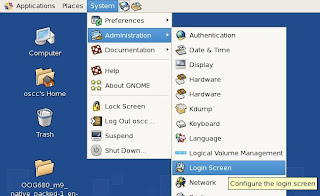
1) Login as normal user. From menu choose System ->Administration ->Login Screen
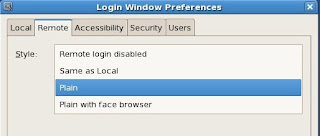
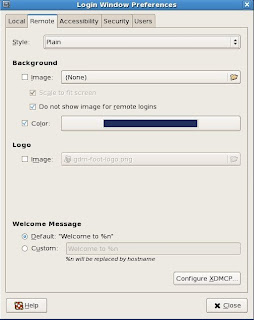
2) The Login Window Preference, we select the Remote tab and choose Plain. Then choose Configure XDMCP button and ensure it is selected.
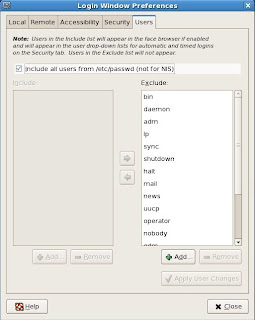
3) Select the Users tab and check the box "Include all users from /etc/passwd"
Another post from me will be on setting up the thin clients to connect to the XDMCP server.
Tuesday, March 11, 2008
OSS in Japan Public Sector
Sometimes, I think back and wondered why I didn't finish my Japanese class which ended abruptly after 2 months. The last FLOSS Japan survey in 2004 was called Free/Libre/Open Source Software Japanese Developers Online Survey. That time the survey concluded with a recommendation to improve on the students skills with regards to FLOSS. Japan now have a site iPedia on OSS utilisation by users and vendors.
Mozilla Labs, Chris Beard was in Tokyo for the Open Source Conference (OSC) 2008 Tokyo/Spring. The conference site is a http://www.ospn.jp/osc2008-spring where the following areas were covered:
GlassFish
Eclipse
Java
Linux
LDAP
Just was at a japan.internet.com where there was a survey result dated 12/12/07 of OSS usage in Japan, carried out by JR Tokai Express Research Inc. Lucky me I found a translated site with the title Japan’s public sector still not moving to Linux, OSS which mentions some results of 222 Public Sector employees from 330 survey participants.
The Linux distro used at the workplace included:
RedHat, Fedora Core, Debian, Turbo Linux, OpenSuse and CentOS.
Well, looks like if Malaysia did a similar survey what do you think would be the result?
Mozilla Labs, Chris Beard was in Tokyo for the Open Source Conference (OSC) 2008 Tokyo/Spring. The conference site is a http://www.ospn.jp/osc2008-spring where the following areas were covered:
GlassFish
Eclipse
Java
Linux
LDAP
Just was at a japan.internet.com where there was a survey result dated 12/12/07 of OSS usage in Japan, carried out by JR Tokai Express Research Inc. Lucky me I found a translated site with the title Japan’s public sector still not moving to Linux, OSS which mentions some results of 222 Public Sector employees from 330 survey participants.
Q1: At your workplace, what is the main operating system installed on desktop and portable computers? (Sample size=222)
Windows (93.2%), Macintosh (5.0%) and Linux (1.8%)Q2: At your workplace, what server operating systems are in use? (Sample size=126, multiple answer)
Windows(76.3%), Linux(22.2%), Unix(15.9%), Macintosh(3.2%) and Main frame(1.6%)The Linux distro used at the workplace included:
RedHat, Fedora Core, Debian, Turbo Linux, OpenSuse and CentOS.
Well, looks like if Malaysia did a similar survey what do you think would be the result?
OpenOffice.org in Malaysian Public Sector
OpenOffice.org (OOo) a desktop solution similiar to MS Office have been around Malaysia for many years. It is not new, however many organisations have failed to retain its adoption over the years for several reasons.
Lack of technical support. There are not many known paid-for support for organisations to rely on. As the number of IT staff who are graduates with OOo knowledge is relatively low, I didnt see many who is driven towards OOo.
OOo the software. As a solution on MS Windows environment, there are not many who find its excellent features. Instead its down side is always a highlight. This includes repetitive showing of document error screen, lagging, problems with refreshing the display and functions that are not available.
The society. Almost all desktops have MS Office and if you ask around about OOo usage, you'd hear the same thing.
"Whats that?"
Since users migrated to MS Office 2003, more document formating problems are prevalent when exchanging documents with OOo.
The Malaysian Open Source Software (OSS) initiative is in phase II. One rather visible activity is the pervasive use of OOo in the Public Sector. The motivation for the Public agencies it seems is that there is a directive when making new purchases to be prudent. This itself leads to OOo as the only solution similiar to MS Office. Where there is lesser cost in the form of licensing fees. The schools and education institutions who have the largest number of office users in the Public sector will definitely be going to OOo if they want to be prudent. With the Malaysian Administration, Modernisation and Planning Unit (MAMPU) making a move towards all desktop using OOo, I am sure that other agencies will be more confident in moving towards OOo. However, will other agencies be able to accept the changes that will be shown when MAMPU starts dealing with documents between agencies.
One concern will be the die hard MS Office users from other agencies. Can they or will they want to explore changes in their document interchange with those using OOo. Malaysia will definitely be seeing more OOo in the private sector if the government can make the transition period a short one. I am looking forward to seeing OpenOffice.org taking steps to ensure the Malaysian government succeeds in the OOo move.
Monday, March 10, 2008
Sending Linux Text to MS Windows
A README file was being prepared as part of a CDROM for OpenOffice.org installation on MS Windows. I used K3B to burn the CDROM. However, when the CDROM was open in MS Windows, the text appears in one continuous line. This is a common problem for text between Unix and DOS (or MS Windows). The DOS requires an additional return character and the Linux did not cater for this.
To resolve this, install unix2dos. In Ubuntu this is found in tofrodos package.
$ sudo apt-get install tofrodos
Convert using the command line.
$ unix2dos filename.txt
Gedit. Some text documents are created with Gedit. Gedit can be used to edit text and call the Unix2DOS command. This allows text that is nicely formatted when seen in MS Windows.
- On a Linux, open Gedit and choose Edit ->Preferences. Click Plugins tab and check the External Tools
- Click Configure Plugin, click New.
- Enter the name Unix2DOS. Fill the following values:
- Description: Tools to make text readable in MS Windows
- Command: unix2dos
- Input: Current Document
- Output: Replace Current Document
- Click Close. Close the Gedit
- Open the text document to be used in MS Windows. Choose Tools ->Unix2DOS
- Save the document. It is now in a format that can be read in MS Windows.
Sunday, March 9, 2008
Malaysia Polls for 2008
Mar 8 2008, Malaysia went for polling for the 12th time. The Chinese calendar is at Earth Rat. Results are still coming in but looks like some interesting events are as follows:
Shahrizat (BN) lost to Anuarss daughter (Nurul) in Pantai Dalam - PKR
Samy Vellu (BN) lost to Jeyakumar in Sg Siput - PKR
Anuar's Wife, Wan Azizah won a seat in Permatang Pauh, Penang.
Ng Yen Yen (BN) had a close win for Raub.
Penang lost lots of seat to oppositions and looks like it will now fall to the opposition government.
Prime Minister won back his seat in Kepala Batas, Penang.
No results yet for "Maimun Yusuf" of KT Parlimen seat. She is at 89 years of age.
Looks like Malaysia is experiencing a major revamp in its government for 2008.
What are the webservers using when I was browsing for the polls?
sky.com IBM web server
thestar.com.my MS IIS
malaysiakini.com Apache 2.2.4 (down after 10pm)
harakahdaily.net nginx 0.3.31
dap-elections.com Apache 2.0.52
rtm.net.my Apache 2.2.3
Friday, March 7, 2008
OpenOffice.org and MS Office 2003 - Indentation
I am having the chance to use MS Office 2003 today. Thought I'd write on some of the differences I can see. If I get the chance, there will definately be more of these comparisons.
The rectangle below the lower indent control is used to keep the left paragraph indentation. The lower triangle is the first line indentation.
First line indent - The upper triangle can move freely (Click+drag) and controls the left distance of the first line from the left.
Left indent - The lower triangle moves together with the upper triangle (Click+drag). The lower indent tab moves together with the upper indent control. It is used to keep the left indentation.
Hanging indent - The lower triangle move freely (Ctrl+Click+drag). This moves the 2nd paragraphs onwards away from the left indentation.
Templates
MS Office 2003 saves the templates to a specific folder that the users must know.
OpenOffice.org saves templates without users needing to worry about its location.
Found a site on more comparisons
Subscribe to:
Posts (Atom)
Blog Archive
-
▼
2008
(85)
-
▼
March
(12)
- Screenlets to enhance Linux
- gdesklets to enhance Linux
- yum with RHEL 5.x and CentOS 5.x
- R60 laptop and projector display
- Its Good Friday.
- The thin client for XDMCP
- Creating an XDMCP server
- OSS in Japan Public Sector
- OpenOffice.org in Malaysian Public Sector
- Sending Linux Text to MS Windows
- Malaysia Polls for 2008
- OpenOffice.org and MS Office 2003 - Indentation
-
▼
March
(12)