Reviewed back lessons over last few months.
"Notes on Udacity Developing Android Apps"
Biggest problem was not passing the correct object to the ViewList. It kept giving a null error upon running the application.
The logging system was truly helpful for errors at runtime.
Looking at alternative computer software solutions for a variety of reasons. This includes price, computer security, virus prevention and reliability. Here are my notes and great that if it helps you, otherwise please understand what you are doing and not follow blindly. All works expressed are my own and does not necessarily express the products or organisations mentioned here.
Friday, September 25, 2015
Upgrade to Android Studio 1.4 RC2
That was fast, RC1 was out in early September 2015 and shortly after that RC2 is released on 23 September. View the upgrade installation for Canary channel, RC1 at "Upgrade to Android Studio 1.4 RC1". Upgrade was smooth and without any problem recompiling target API 21 apk.
RC2 provide bug fixes and includes;
- Update to the Theme Editor (using style.xml files)
- In performance monitors it includes GPU and network profiler
- The Vector Asset Wizard creates Android XML vector drawables, icons, from SVG files
- Improved Android permission checks
It is stable in terms of use and will surely provide a good experience for first time Android developers. With Android Studio 1.4, education institutions will surely be able to introduce Android Programming to a more advanced level, similar to how C++ was widely used.
Here are steps to upgrade RC2 from RC1;
Step 1: Check for updates
Start Android Studio and in the menu choose Help-> Check for Updates...
Click "Update and Restart". Ensure you have administrator rights to update the application or accept the request to update if such a request window appears.
Step 2: Restart Android Studio
This would be automatic if all went well. Verify RC2 is installed in the About.
Done.
Monday, September 21, 2015
Upgrade to Android Studio 1.4 RC1
Just saw there is an update to Android Studio to version 1.4RC1.
In existing Android Studio 1.1, update can be done easily with these steps;
(Tested on MS Windows 8.1)
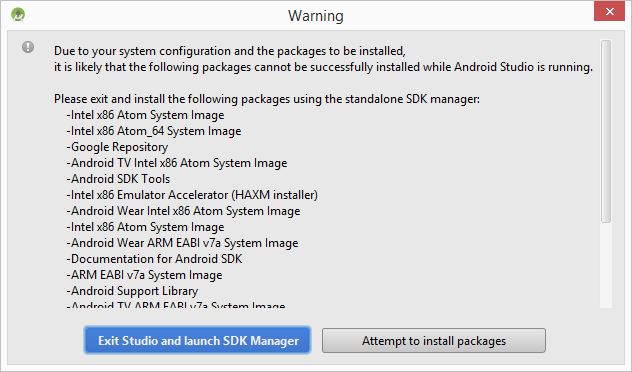
Click "Exit Studio and launch SDK Manager".
Choose "Install .. packages..." button. Choose ".
In Choose Packages to Install, choose "Accept License and click Install. My case above, it took 2.9GB of downloads.
Start Android Studio and complete rest of installation.
See an example of creating an Android Studio Project.
Warning:The project encoding (windows-1252) does not match the encoding specified in the Gradle build files (UTF-8). This can lead to serious bugs.
Solution: Upon new installation, the default IDE encoding uses Windows-1252 instead of UTF-8 as in project files. Change this from Android Studio menu File-> Settings-> Editor->File Encodings
Change the default encoding for project files to UTF-8. Click OK. Restart Android Studio and create a new project.
Problem 2: Rendering Problems.
Build the project.
Done.
In existing Android Studio 1.1, update can be done easily with these steps;
(Tested on MS Windows 8.1)
Step 1: Update Android Studio
Open existing Android Studio (in this case its version 1.1) and click "Check", which is at the bottom of the Android Studio start page.Step 2: Update configuration
After it searches for update on the Internet, click "Update and Restart"
After it has installed the update, choose to import my settings from a previous version (keep existing configuration).
Step 3: Update Plugin and other components
Platform and Plugin Updates, click "update". Click "Update now".
Click "Exit Studio and launch SDK Manager".
Choose "Install .. packages..." button. Choose ".
In Choose Packages to Install, choose "Accept License and click Install. My case above, it took 2.9GB of downloads.
Start Android Studio and complete rest of installation.
See an example of creating an Android Studio Project.
Troubleshooting:
Problem 1. After creating a new project, there is an Gradle sync error:Warning:The project encoding (windows-1252) does not match the encoding specified in the Gradle build files (UTF-8). This can lead to serious bugs.
Solution: Upon new installation, the default IDE encoding uses Windows-1252 instead of UTF-8 as in project files. Change this from Android Studio menu File-> Settings-> Editor->File Encodings
Change the default encoding for project files to UTF-8. Click OK. Restart Android Studio and create a new project.
Problem 2: Rendering Problems.
Build the project.
Done.
Sunday, September 20, 2015
Samsung S5 Wifi not connecting automatically
Samsung S5 is a powerful Android mobile phone. In May 2015, the S5 received an update to Android 5.0 but has since had a problem with the wifi.
The smart network switch automatically switches from wifi when it gets weak, to mobile data. Usually, to save on mobile data its a good idea to turn it off. This way, even if wifi is weak it still stays on until signal is lost.
It can connect to wifi. However even after choosing smart wifi, it does not automatically reconnect when returning to the most wifi access point (AP) that it has saved the password. I say most because it can connect to open public wifi like Starbucks.
Previously, before the upgrade it was able to connect without problem.
Even resetting to factory did not help. Probably had something to do with me restoring my backup.
Here is how I got it working, clearing the S5 phone cache.
Step 1: Power off the S5
Step 2: At same time hold down following keys;
Volume up, power on/off, Home.
When it vibrates or see the galaxy start screen, release the power on/off.
Step 3: clear cache and restart
Use the volume key to select clear cache. Press the power button.
Once it says cache cleared, use volume button to select restart of phone and press power button.
Done.
The smart network switch automatically switches from wifi when it gets weak, to mobile data. Usually, to save on mobile data its a good idea to turn it off. This way, even if wifi is weak it still stays on until signal is lost.
It can connect to wifi. However even after choosing smart wifi, it does not automatically reconnect when returning to the most wifi access point (AP) that it has saved the password. I say most because it can connect to open public wifi like Starbucks.
Previously, before the upgrade it was able to connect without problem.
Even resetting to factory did not help. Probably had something to do with me restoring my backup.
Here is how I got it working, clearing the S5 phone cache.
Step 1: Power off the S5
Step 2: At same time hold down following keys;
Volume up, power on/off, Home.
When it vibrates or see the galaxy start screen, release the power on/off.
Step 3: clear cache and restart
Use the volume key to select clear cache. Press the power button.
Once it says cache cleared, use volume button to select restart of phone and press power button.
Done.
Thursday, September 17, 2015
Howto Screenshot Desktop
The print screen key or "PrtSc" can be used to create a screenshot of the desktop and windows. This will activate gnome-screenshot from the gnome-utils package.
Gnome-utils contain;
By default on a server setup of Centos Linux 6, the screenshot is not installed. This can be done easily.
# yum install gnome-utils
Press the print screen key or "PrtSc"
Screenshot of active window
Hold "Alt" key and press the print screen key or "PrtSc"
Edit the graphics name and press Save.
Delayed screenshot
This is useful if the screenshot can only be taken without user intervention.
Done.
Gnome-utils contain;
- dictionary
- disk usage analyser
- screenshot tool
- search
By default on a server setup of Centos Linux 6, the screenshot is not installed. This can be done easily.
Step 1: Install gnome-screenshot
As a admin role (root) at the terminal, type# yum install gnome-utils
Step 2: Take screenshot of desktop or active windows
Screenshot of desktopPress the print screen key or "PrtSc"
Screenshot of active window
Hold "Alt" key and press the print screen key or "PrtSc"
Edit the graphics name and press Save.
Delayed screenshot
This is useful if the screenshot can only be taken without user intervention.
- On desktop menu click Applications-> Accessories-> Take Screenshot
- Choose which area of desktop to take screenshot and enter the number of seconds for "Grab after a delay of ___ seconds.
- Click "Take Screenshot"
Done.
Paint program on Centos
Linux comes with open source software (OSS) for graphics editing, such as XPaint, GIMP and Tuxpaint. Vector editing can be done with Inkscape and xfig.
XPaint is a light weight program to do simple graphics editing and carries the GPL license.
Currently maintained by Jean-Pierre Demailly, but as stated in the "About" message, not to send bug reports.
Installation of XPaint (currently version 2.9.9.4) on Centos Linux 6.2 64 bits is quite straight forward.
Dependencies;
# yum install xpaint
type y and press Enter
Click "Canvas" button and choose "New Canvas"
Open an image to edit
File-> Open image...
Drawing lines, rectangle, circles, polygon
Click the Tool icon and choose the drawing tool.
Done.
XPaint is a light weight program to do simple graphics editing and carries the GPL license.
Currently maintained by Jean-Pierre Demailly, but as stated in the "About" message, not to send bug reports.
Installation of XPaint (currently version 2.9.9.4) on Centos Linux 6.2 64 bits is quite straight forward.
Dependencies;
- Xawd3d 1.5
- gv 3.7.1
- linXaw3dXft 1.6.2b
- netpbm 10.47.05
- psutils 1.17
Step 1: Install XPaint
Login with admin role (root) and type# yum install xpaint
type y and press Enter
Step 2: Start XPaint
On the Centos Linux desktop, choose Applications-> Graphics ->XPaintClick "Canvas" button and choose "New Canvas"
Tips on initial use of XPaint
Open an image to edit
File-> Open image...
Drawing lines, rectangle, circles, polygon
Click the Tool icon and choose the drawing tool.
Done.
Tuesday, September 15, 2015
Howto Install WordPress 4 on Centos Linux 6
WordPress in a PHP based content management system licensed under GPL v2. Since it has been around for a long time, there are many forums, blogs and video to help users and developers.
Functions:
- Create web pages without needing to know HTML
- Provide blog tools
- Themes to quickly create different look and feel
- Plugins to extend its functionalities
- Mobile ready site
- Provide multiple authors to manage their own contents.
WordPress 4.3 has just been released and here is a guide to install on Centos 6.4
Pre-installation recommendation
PHP 5.4 (works on 5.3.3)
MySQL 5.5 (works on 5.1)
mod_rewrite in Apache module
Bind-utils (works on 9.8.2)
Step 1: Obtain WordPress
Open a terminal and download the WordPress installation file.$ wget --no-check-certificate https://wordpress.org/latest.tar.gz
$ tar xvzf latest.tar.gz
$ ls wordpress
Copy the whole folder to the web server directory. Example if the web server runs with permission for user apache.
$ mkdir /var/www/html/wp1
$ cp -r wordpress/* /var/www/html/wp1
$ chown -R apache.apache /var/www/html/wp1
Read the readme.html file with a web browser.
Step 2: Configure MySQL and create wp-config.php
Create the database wp1 in MySQL$ mysql -u root -p
> create database wp1;
> /q
Open a web browser with URL to the installed page of WordPress.
http://servername/wp/
or
http://servername/wp/wp-admin/install
Fill the fields and click Submit.
Click Run the Install.
Fill the 5-minutes WordPress Install information
- Site Title
- Username
- Password
- Confirm password
- Your E-mail
- Privacy
Click Install WordPress.
Click Log In.
Enter the admin username and password.
View the admin user's dashboard.
Restart apache web server.
$ sudo service httpd restart
Step 3: View the site
Enter in the web browser URL
http://servername/wp1
The default left panel list;
- Site name
- Search tool
- Recent post
- Recent comments
- Archives
- Categories
- Meta (Site Admin, Logout, Entries RSS, Comments RSS, WordPress.org)
Troubleshoot
Problem 1: When choosing to add a new theme, the following error is displayed."unexpected error occurred. Something may be wrong with WordPress.org or this server’s configuration. If you continue to have problems, please try the support forums."
Solution: Ensure the server can connect to https://downloads.wordpress.org site. Restart Apache web server.
Problem 2: Pages are blank, and there are no error or warning messages.
Solution: Turn on the debug by changing the value false to true in /var/www/html/wp1/wp-config.php
define('WP_DEBUG', true);
Done.
Wednesday, September 9, 2015
Tutorial on Linux Shell Fundamentals
Most Linux admin and developers on Linux will benefit from knowing some shell scripting skills.
In most Linux, the shell is run on BASH. There are a few other shells out there but the default is BASH which I will introduce the basics here.
Gain access to a Linux terminal or also known as the command line terminal (CLI) and follow along these topics.
Fundamentals 1 (START)
In most Linux, the shell is run on BASH. There are a few other shells out there but the default is BASH which I will introduce the basics here.
Gain access to a Linux terminal or also known as the command line terminal (CLI) and follow along these topics.
Fundamentals 1 (START)
- Getting started
- Creating a script
- Comments, printout and local strings
- Builtin variables
- Backup a folder
- Separate variable names and back slash
- Linux command in scripts
- Function basics
- Script arguments
- Accepting user input
- Simple if/else decision
- The while loop
- Array variables
- Read from a file
- The for loop
- The until loop
- Find plain text files
- Quick menu input with select
- The case to create a menu
- Formatted printing with printf
- Print a line full length of screen
--
Monday, September 7, 2015
Display Dnsmasq status on Nagios
This article is an example of adding a custom process status in Nagios here the server (10.10.2.1) is separate from the host (10.10.2.2). In Nagios reference there are lots of option for configurations.
Dnsmasq as a light weight alternative to named, will appear in the linux process. E.g. when issuing the command ps -C dnsmasq
Pre-configuration checklist:
Ensure NRPE is installed and working on the host.
Add the line
command[check_dnsmasq]=/usr/lib64/nagios/plugins/check_procs -C dnsmasq -w 5 -c 10
Save and test the new nrpe command;
# /usr/lib64/nagios/plugins/check_procs -C dnsmasq -w 5 -c 10
PROCS OK: 1 process with command name 'dnsmasq'
Restart nrpe
#service nrpe restart
define service{
use generic-service
host_name lbserver2
service_description Dnsmasq
check_command check_nrpe!check_dnsmasq
}
These 2 step works for any services that the linux ps command can detect.
Dnsmasq as a light weight alternative to named, will appear in the linux process. E.g. when issuing the command ps -C dnsmasq
Pre-configuration checklist:
Ensure NRPE is installed and working on the host.
Step 1: Update nrpe.cfg with following;
# vi /etc/nagios/nrpe.cfgAdd the line
command[check_dnsmasq]=/usr/lib64/nagios/plugins/check_procs -C dnsmasq -w 5 -c 10
Save and test the new nrpe command;
# /usr/lib64/nagios/plugins/check_procs -C dnsmasq -w 5 -c 10
PROCS OK: 1 process with command name 'dnsmasq'
#service nrpe restart
Step 2: Add this service to the Nagios host
# vi /etc/nagios/servers/server1.cfgdefine service{
use generic-service
host_name lbserver2
service_description Dnsmasq
check_command check_nrpe!check_dnsmasq
}
Save and restart Nagios
Install Nagiosgraph on Centos 6
This article is on how to install Nagiosgraph on Centos.
Nagiosgraph is a plugin to Nagios and it provides graphical display of information captured by Nagios.
Installation environment:
Centos 6.5 x86_64
Nagios version 3.5.1-1
Pre-requisite perl modules: rrd tool 1.4+, Nagios::Config, GD, Object
# tar xvzf nagiosgraph-1.5.2.tar.gz
# cd nagiosgraph-1.5.2
# less README
Install Perl module if havent installed.
# ./install.pl --check-prereq
# yum install perl-rrdtool perl-GD perl-Nagios-Plugin
# cpan Nagios::Config
If there are many modules not installed, just press Enter (Yes), unless you have other config.
Check all dependencies are met.
# ./install.pl --check-prereq
Nagiosgraph is a plugin to Nagios and it provides graphical display of information captured by Nagios.
Installation environment:
Centos 6.5 x86_64
Nagios version 3.5.1-1
Pre-requisite perl modules: rrd tool 1.4+, Nagios::Config, GD, Object
Step 1: Prepare Nagiosgraph 1.5 for installation
# wget http://downloads.sourceforge.net/project/nagiosgraph/nagiosgraph/1.5.2/nagiosgraph-1.5.2.tar.gz# tar xvzf nagiosgraph-1.5.2.tar.gz
# cd nagiosgraph-1.5.2
# less README
Install Perl module if havent installed.
# ./install.pl --check-prereq
# yum install perl-rrdtool perl-GD perl-Nagios-Plugin
# cpan Nagios::Config
If there are many modules not installed, just press Enter (Yes), unless you have other config.
Check all dependencies are met.
# ./install.pl --check-prereq
Step 2: Install Nagiosgraph source
# install.pl --prefix=/usr/share/nagiosgraph
Follow the instructions online. I choose the default values where nagios and httpd (apache) files were not updated automatically.
Step 3: Post configuration
If in step 2, it was chosen to not modify apache and nagios, then following must be configured. All instructions are printed at end of the installation of Step 3.
nagios.cfg
In the nagios configuration file (nagios.cfg),
add/change these lines:
# vi /etc/nagios/nagios.cfg
Edit value for
process_performance_data=1
Add following lines
# process nagios performance data using nagiosgraph
service_perfdata_file=/tmp/perfdata.log
service_perfdata_file_template=$LASTSERVICECHECK$||$HOSTNAME$||$SERVICEDESC$||$SERVICEOUTPUT$||$SERVICEPERFDATA$
service_perfdata_file_mode=a
service_perfdata_file_processing_interval=30
service_perfdata_file_processing_command=process-service-perfdata-for-nagiosgraph
template.cfg
# vi /etc/nagios/objects/templates.cfg
define service {
name graphed-service
action_url /nagiosgraph/cgi-bin/show.cgi?host=$HOSTNAME$&service=$SERVICEDESC$
register 0
}
command.cfg
# vi /etc/nagios/objects/commands.cfg
# command to process nagios performance data for nagiosgraph
define command {
command_name process-service-perfdata-for-nagiosgraph
command_line /usr/share/nagiosgraph/bin/insert.pl
}
Host service files. E.g. for servername server1, append to show the graph service
vi /etc/nagios/servers/server1.cfg
define service{
use generic-service,graphed-service
host_name applicationser1
service_description Current Load
check_command check_nrpe!check_load
}
* In the apache configuration file (httpd.conf),
add this line:
include /usr/share/nagiosgraph/etc/nagiosgraph-apache.conf
Restart nagios to start data collection:
# service nagios restart
Restart apache to enable display of graphs:
# service httpd restart
| Nagioschart: Chart icon in Nagios page |
| Nagioschart: Configuration page |
Troubleshoot
Check graphs are displaying data, open a web browser and enter the URL
http://serversite/nagiosgraph/cgi-bin/show.cgi
Check RRD is collecting data with the command
# ls /usr/share/nagiosgraph/var/rrd
Check the nagios configuration files for errors
# /usr/sbin/nagios -v /etc/nagios/nagios.cfg
To enable graph links and mouseovers, see README sections:
Displaying Per-Service and Per-Host Graph Icons and Links
Displaying Graphs in Nagios Mouseovers
Thursday, September 3, 2015
Howto add Dropbox as Backup to Kodi - OSMC on Raspberry Pi 2
This is generally for backup purpose.
Go to the URL https://www.dropbox.com/developers/apps
Click "Create"
Choose "Dropbox API app"
In Can you app be limited to its own folder, choose "Yes"
App Name: "Kodi backup"
Click check box for "I agree to...conditions"
Click "Create app"
Write down the values for
App key and App secret.
Choose "Backup"-> "Install"
Click "Configure", in tab "General", change Remote path type to "Dropbox".
Enter values for Dropbox key
and Dropbox Secret
Click "ok"
Click "Launch"
A popup window "XBMC Backup - Mode" will appear, choose "Backup"
DO NOT CLICK "OK"
Step 4: Locate dropbox authorization
AT THE SSH TERMINAL
Using SSH tool like Putty, login to the OSMC Raspberry Pi and look for the dropbox authorization key in the file kodi.log.
Type
$ grep dropbox /home/osmc/.kodi/temp/kodi.log
AT THE PC WEB BROWSER
Copy that URL to a web browser and when the API request appears, click "Allow"
Backup should begin.
Check dropbox for a new folder with the backup contents in
Apps/Kodi backup
Done.
Other stuff to do with Dropbox is to stream your home videos.
**To access files on dropbox**
Open the Kodi screen and click Programs ->Get more...
Choose Dbmc (Dropbox add-on)
Click "Install"
Once Dbmc has completed installation, click Dbmc (Dropbox add-on)
Click "Configure"
Step 1: Create API in dropbox
Login to dropbox.com or create an account if you haven't.Go to the URL https://www.dropbox.com/developers/apps
Click "Create"
Choose "Dropbox API app"
In Can you app be limited to its own folder, choose "Yes"
App Name: "Kodi backup"
Click check box for "I agree to...conditions"
Click "Create app"
Write down the values for
App key and App secret.
Step 2: Configure Dropbox in Kodi
Open the Kodi screen and click Programs ->Get more...Choose "Backup"-> "Install"
Click "Configure", in tab "General", change Remote path type to "Dropbox".
Enter values for Dropbox key
and Dropbox Secret
Click "ok"
Click "Launch"
Step 3: Start the backup
AT THE KODI SCREENA popup window "XBMC Backup - Mode" will appear, choose "Backup"
DO NOT CLICK "OK"
Step 4: Locate dropbox authorization
AT THE SSH TERMINAL
Using SSH tool like Putty, login to the OSMC Raspberry Pi and look for the dropbox authorization key in the file kodi.log.
Type
$ grep dropbox /home/osmc/.kodi/temp/kodi.log
AT THE PC WEB BROWSER
Copy that URL to a web browser and when the API request appears, click "Allow"
Step 4: Start backup
Return back to the screen in Step 3 and click "Ok"Backup should begin.
Check dropbox for a new folder with the backup contents in
Apps/Kodi backup
Done.
Other stuff to do with Dropbox is to stream your home videos.
**To access files on dropbox**
Open the Kodi screen and click Programs ->Get more...
Choose Dbmc (Dropbox add-on)
Click "Install"
Once Dbmc has completed installation, click Dbmc (Dropbox add-on)
Click "Configure"
Tuesday, September 1, 2015
Setup Centos as Nagios clients
Centos Linux servers can be monitored by Nagios remotely. This typically provides information of ping response, services running and system information.
The setup is fairly straight forward assuming Nagios server IP is 10.10.2.1 and uses port 5666.
Login to the nagios host, e.g. 10.10.2.2
# yum install -y nagios-plugins-all nrpe net-snmp
Edit /etc/nagios/nrpe.cfg with these 2 values
server_address=127.0.0.1
or the nagios IP
allowed_hosts=10.10.2.1
or the nagios IP
Example to enable monitoring of http is to have this line;
command[check_http]=/usr/lib64/nagios/plugins/check_http -I 10.10.2.2 -w 5 -c 10
# chkconfig nrpe on
Test with
/usr/lib64/nagios/plugins/check_nrpe -H 10.10.2.2 -c check_load
# iptables -I INPUT 2 -p tcp -m tcp --dport 5666 -j ACCEPT
# vi /etc/nagios/servers/server1.cfg
define service{
use generic-service,graphed-service
host_name server1
service_description Http
check_command check_nrpe!check_http!-w 5 -c 10
}
The setup is fairly straight forward assuming Nagios server IP is 10.10.2.1 and uses port 5666.
Step 1: Install Nagios plugins and NRPE.
Read the NRPE documentation.Login to the nagios host, e.g. 10.10.2.2
# yum install -y nagios-plugins-all nrpe net-snmp
Edit /etc/nagios/nrpe.cfg with these 2 values
server_address=127.0.0.1
or the nagios IP
allowed_hosts=10.10.2.1
or the nagios IP
Example to enable monitoring of http is to have this line;
command[check_http]=/usr/lib64/nagios/plugins/check_http -I 10.10.2.2 -w 5 -c 10
Step 2: Start NRPE
# service nrpe start# chkconfig nrpe on
Test with
/usr/lib64/nagios/plugins/check_nrpe -H 10.10.2.2 -c check_load
Step 3: Allow monitoring through firewall
E.g. if using IPTABLES, make it as a rule at the top# iptables -I INPUT 2 -p tcp -m tcp --dport 5666 -j ACCEPT
# iptables -L |grep 5666
ACCEPT tcp -- anywhere anywhere tcp dpt:5666
# service iptables save
Step 4: Configure Nagios server
Enable the services in the Nagios server, in this example 10.10.2.1# vi /etc/nagios/servers/server1.cfg
use generic-service,graphed-service
host_name server1
service_description Http
check_command check_nrpe!check_http!-w 5 -c 10
}
Post installation
Check the service is running
# netstat -anlp |grep nrpe
tcp 0 0 10.240.1.14:5666 0.0.0.0:* LISTEN 12467/nrpe
unix 2 [ ] DGRAM 14250318 12467/nrpe
From the nagios server, test with
/usr/lib64/nagios/plugins/check_nrpe -H 10.10.2.2
this should return the NRPE version.
/usr/lib64/nagios/plugins/check_nrpe -H 10.10.2.2 -c check_http
this should return the http check at the host.
Self reminder: TODO check_postgres source githubThursday, August 27, 2015
Raspberry Pi: Starting Kodi
Kodi is an application that provides the interface to manage video, music, pictures and liveTV. Its the default media centre on OSMC.
If you have not installed OSMC, see previous post on getting started.
Step 1: Adding source for video add-ons from tvaddons.ag
Start Kodi, choose System ->Setting ->File Manager
Click Add Source and enter location as
http://fusion.tvaddons.ag
Enter a name: Fusion
Click "OK"
Step 2: Install plugins for streaming movies and TV shows
Choose 1Channel and Genesis
Remainder of installation reference is from here.
If you have not installed OSMC, see previous post on getting started.
Step 1: Adding source for video add-ons from tvaddons.ag
Start Kodi, choose System ->Setting ->File Manager
Click Add Source and enter location as
http://fusion.tvaddons.ag
Enter a name: Fusion
Click "OK"
Step 2: Install plugins for streaming movies and TV shows
Choose 1Channel and Genesis
Remainder of installation reference is from here.
Tuesday, August 25, 2015
Access VirtualBox VM via SSH
A virtual machine provides lots of space for development, troubleshooting and learning. Sometimes its required to remotely access the virtual machine guest using SSH from the host. Virtualbox allow users to setup so many different type of virtual machines known as the guest.
The machine installed with VirtualBox is known as the host. In this example, the host is a MS Windows 7 computer with virtual machine guest OS being Centos Linux 6. SSH client such as Putty is run on the host computer and will attempt to connect to the virtual machine. This will also allow multiple guest OS to SSH between one another.
Choose one of the unused Adapter (example Adapter 2) and configure the settings:
The machine installed with VirtualBox is known as the host. In this example, the host is a MS Windows 7 computer with virtual machine guest OS being Centos Linux 6. SSH client such as Putty is run on the host computer and will attempt to connect to the virtual machine. This will also allow multiple guest OS to SSH between one another.
Step 1: Configure VirtualBox networking
Shutdown all guest virtual machines. Open VirtualBox Manager, click on the virtual machine to be configured and choose Settings ->Network. There should already be an existing network for access to the Internet. Nothing needs to be changed if you can already access the Internet from the guest OS.| Guest virtual machine default networking with access to Internet |
Choose one of the unused Adapter (example Adapter 2) and configure the settings:
Attached to: Host-only Adapter
Name: VirtualBox Host-Only Ethernet Adapter
On the MS Windows, VirtualBox has already setup its own network 192.168.56.1 as can be seen below. The other IP is the dynamic IP used by host computer to access the Internet.
Step 2: Configure a static IP on guest OS.
Start the guest OS and login. Open a terminal as root and the new network device has been identified but we need to configure the IP to match that of the VirtualBox network 192.168.56.x.
In the case above, VirtualBox has already configured network device eth0 to access Internet. Check eth1 with
# ethtool eth1
The default eth1 if we started that network, it would use DHCP but we want a static IP so that we know the IP for SSH. We now need to create/edit eth1
vi /etc/sysconfig/network-scripts/ifcfg-eth1
Add/modify following lines;
DEVICE="eth1"
BOOTPROTO=static
NM_CONTROLLED="yes"
ONBOOT="yes"
TYPE="Ethernet"
IPADDR=192.168.56.10
NETMASK=255.255.255.0
IPV6INIT=no
NAME="System eth1"
Start the networking for eth1 and check that eth1 is using the new IP.
Step 3: Restart the guest virtual machine.
Reboot the guest OS and test access to Internet and ability to SSH into the guest OSS from the host computer as can be seen below.
| Guest VM network for Internet and SSH |
The network routing is shown below.
| Guest virtual machine network routing |
Tuesday, August 18, 2015
Getting started with LibreOffice 5
There are quite a number of options for word processors, spreadsheets and slide presentation these days and many of it with the option for being online. LibreOffice 5 is available to users on popular platforms like Mac, Linux and MS Windows. This makes it easier for implementation across any type of systems for any organisation.
LibreOffice can help save lots within an organisation while having access to a top class application that is continuously being kept updated. The document formats will ensure it can be preserved for a long time. The installer file can be downloaded from libreoffice.org site and the offline help can also be downloaded separately.
The minimum installation system pre-requisites recommended is a Pentium III, 512MB RAM which should be fine for almost all computers. However, is does require a considerable 1.5GB disk space and display of 1024x768 resolution with 256 colours.
Java Runtime Environment (JRE) is needed if using some features in Base.
LibreOffice 5 provides the following;
Compatibility with MS Office
Improved import and export of MS Word, Excel and Powerpoint documents. This means, users can work with these docs without much hassle. More controls for compatibility is found in the Tools ->Option ->Load/Save
Improvements in import of annotated text ranges from Word documents. Better support for RTF document formats.
Entire row/column references
Ever wanted to specify an entire row/column? Now this can be done with "A:A" and "1:1".
LibreOffice can help save lots within an organisation while having access to a top class application that is continuously being kept updated. The document formats will ensure it can be preserved for a long time. The installer file can be downloaded from libreoffice.org site and the offline help can also be downloaded separately.
| LibreOffice 5 Installer |
The minimum installation system pre-requisites recommended is a Pentium III, 512MB RAM which should be fine for almost all computers. However, is does require a considerable 1.5GB disk space and display of 1024x768 resolution with 256 colours.
Java Runtime Environment (JRE) is needed if using some features in Base.
LibreOffice 5 provides the following;
- Writer document
- Calc spreadsheet
- Impress presentation
- Draw drawing
- Math formula
- Base database
| LibreOffice 5 Main Screen |
The 3 notable features (see release notes for more);
AutoCorrect
Default unicode 6 support which is included in its AutoCorrect. E.g. if you type :camera: it displays the camera. Here are a few more;
Compatibility with MS Office
Improved import and export of MS Word, Excel and Powerpoint documents. This means, users can work with these docs without much hassle. More controls for compatibility is found in the Tools ->Option ->Load/Save
Improvements in import of annotated text ranges from Word documents. Better support for RTF document formats.
Entire row/column references
Ever wanted to specify an entire row/column? Now this can be done with "A:A" and "1:1".
Monday, August 17, 2015
Howto Install PHP and Postgresql on Fedora Core
Fedore Core 22 came out in May 2015 with quite a number of changes that even the usual Linux guy had trouble getting around.
This included
For basic PHP web application development with Postgresql database it was pretty straight forward after learning these new commands. This will also server as an introduction to the new commands mentioned above. Apache was already installed.
$ sudo dnf install php php-xmlrpc php-xml php-mbstring
It installed the following;
php-common-5.6.11-2.fc22.x86_64
php-pgsql-5.6.11-2.fc22.x86_64
php-xmlrpc-5.6.11-2.fc22.x86_64
php-cli-5.6.11-2.fc22.x86_64
php-xml-5.6.11-2.fc22.x86_64
php-mbstring-5.6.11-2.fc22.x86_64
php-pdo-5.6.11-2.fc22.x86_64
php-pecl-jsonc-1.3.7-1.fc22.x86_64
php-5.6.11-2.fc22.x86_64
Restart web server
$ sudo systemctl restart httpd.service
If there are errors, open the log and inspect.
$sudo journalctl -xe
== Check that Apache is permitted through the Firewall==
firewall-cmd --permanent --zone=FedoraWorkstation --add-service=http
firewall-cmd --permanent --zone=FedoraWorstation --add-service=https
firewall-cmd --reload
In this case, my default-zone was "FedoraWorkstation" and not "public".
$ sudo dnf install postgresql-server postgresql
It installed the following;
postgresql-9.4.4-1.fc22.x86_64
postgresql-libs-9.4.4-1.fc22.x86_64
postgresql-server-9.4.4-1.fc22.x86_64
$ postgresql-setup --initdb
Edit /var/lib/pgsql/data/pg_hba_conf
local all all trust
host all all 127.0.0.1/32 trust
$ sudo -u postgres psql
postgres=> alter user postgres password 'password';
postgres=> create user tboxmy createdb createuser password
'somepassword';
postgres=> create database tboxmy owner tboxmy;
postgres=> \q
$ psql
tboxmy=# \dn
tboxmy=# \q
Then run some test with the PHP and database.
$ pg_dump -U username -h localhost -W databasename > output.text.sql
Restore the sql dump file to a database
$ psql --set ON_ERROR_STOP=on -U username -h localhost -W databasename < output.text.sql
This included
- The dfn package manager to replace Yum
- Gnome 3.16 to provide a new desktop look
- The firewall-cmd to replace iptables firewall
- Retreive systemd notices with journalctl
For basic PHP web application development with Postgresql database it was pretty straight forward after learning these new commands. This will also server as an introduction to the new commands mentioned above. Apache was already installed.
Step 1. Install PHP
Open a command terminal and type$ sudo dnf install php php-xmlrpc php-xml php-mbstring
It installed the following;
php-common-5.6.11-2.fc22.x86_64
php-pgsql-5.6.11-2.fc22.x86_64
php-xmlrpc-5.6.11-2.fc22.x86_64
php-cli-5.6.11-2.fc22.x86_64
php-xml-5.6.11-2.fc22.x86_64
php-mbstring-5.6.11-2.fc22.x86_64
php-pdo-5.6.11-2.fc22.x86_64
php-pecl-jsonc-1.3.7-1.fc22.x86_64
php-5.6.11-2.fc22.x86_64
Restart web server
$ sudo systemctl restart httpd.service
If there are errors, open the log and inspect.
$sudo journalctl -xe
== Check that Apache is permitted through the Firewall==
firewall-cmd --permanent --zone=FedoraWorkstation --add-service=http
firewall-cmd --permanent --zone=FedoraWorstation --add-service=https
firewall-cmd --reload
In this case, my default-zone was "FedoraWorkstation" and not "public".
Step 2: Install Postgresql database
$ sudo dnf install postgresql-server postgresql
It installed the following;
postgresql-9.4.4-1.fc22.x86_64
postgresql-libs-9.4.4-1.fc22.x86_64
postgresql-server-9.4.4-1.fc22.x86_64
$ postgresql-setup --initdb
Edit /var/lib/pgsql/data/pg_hba_conf
local all all trust
host all all 127.0.0.1/32 trust
$ sudo -u postgres psql
postgres=> alter user postgres password 'password';
postgres=> create user tboxmy createdb createuser password
'somepassword';
postgres=> create database tboxmy owner tboxmy;
postgres=> \q
$ psql
tboxmy=# \dn
tboxmy=# \q
Then run some test with the PHP and database.
Other useful tools.
Export database from existing Postgresql$ pg_dump -U username -h localhost -W databasename > output.text.sql
Restore the sql dump file to a database
$ psql --set ON_ERROR_STOP=on -U username -h localhost -W databasename < output.text.sql
Friday, August 7, 2015
What is OpenStack? Some Figures and statistics.
Cloud computing is still gaining some interest in public and private organisations. Many large organisations have shown interest and support for OpenStack as a software to deliver cloud platforms. With the source code to OpenStack freely accessible and welcomes community participation via the Foundation, it has also grown into an operating system of its own.
Recognition of the companies contributing to some parts of OpenStack include;
Those who are keen, should look up these developers to see how they contribute to the project.
There are some statistics that may be of interest at Openstack Activity Dashboard. Number are just numbers, but it makes lots of nice charts and puts some perspective of the project.
Some figures as of 6th Aug 2015;
Contribution by companies like HP, IBM and Red Hat;
There is a Malaysian OpenStack meetup on 13th Aug 2015 (Event), and its free.
Recognition of the companies contributing to some parts of OpenStack include;
Those who are keen, should look up these developers to see how they contribute to the project.
There are some statistics that may be of interest at Openstack Activity Dashboard. Number are just numbers, but it makes lots of nice charts and puts some perspective of the project.
Some figures as of 6th Aug 2015;
- Code developers; 3,971
- Code submitters; 4,171
- Launchpad participation; 8,881
- IRC participants; 20,302
- Ask participants; 4,035
Contribution by companies like HP, IBM and Red Hat;
There is a Malaysian OpenStack meetup on 13th Aug 2015 (Event), and its free.
Monday, June 22, 2015
Accessing password for D-Link provided by TM Unifi
As a note, if the admin password is lost or forgotten, there is a way to access the admin console for the D-Link routers (DIR-615) before 2015.
Some people say, better to just don't share it but, some may say that its public knowledge anyways.
Method 1: Brute force attack. Or in layman term, guess the admin password (Its either empty or admin).
Method 2: Use a feature within the router. Not sure if newer routers have the same feature. See below;
192.168.0.1
This should show the admin page of the router.
192.168.0.1/model/__show_info.php?REQUIRE_FILE=/var/etc/httpasswd
It will display the login password for admin.
Kid: OMG...you mean I can change the password as much as I like but anyone can view the password?
Tech support: Err... yeah.
Kid: Time to change the router?
Tech support: You could. We can arrange for the technician to come over.
Update:
TM unifi has updated their routers remotely. Please check, if you see your password displayed, contact them for a fix.
Some people say, better to just don't share it but, some may say that its public knowledge anyways.
Method 1: Brute force attack. Or in layman term, guess the admin password (Its either empty or admin).
Method 2: Use a feature within the router. Not sure if newer routers have the same feature. See below;
Step 1
Connect a PC to the router (LAN or wireless) and open a web browser URL at192.168.0.1
This should show the admin page of the router.
Step 2
Change the URL to192.168.0.1/model/__show_info.php?REQUIRE_FILE=/var/etc/httpasswd
It will display the login password for admin.
Kid: OMG...you mean I can change the password as much as I like but anyone can view the password?
Tech support: Err... yeah.
Kid: Time to change the router?
Tech support: You could. We can arrange for the technician to come over.
Update:
TM unifi has updated their routers remotely. Please check, if you see your password displayed, contact them for a fix.
Saturday, June 20, 2015
Raspberry Pi: Getting Started with OSMC
After getting the Raspberry Pi 2 (RPI), NOOB SDcard from Element14 started up without a network cable. Only 3 option for the OS is shown as it boot from the NOOB SDcard (yes, it has to be plugged in)
Plugged in the networking cable and restarted RPI. This time, it loaded the remaider of the OS like OSMC and OpenElect.
OSMC (Open source Media Center), is a Debian based Linux operating system. Fomerly known as Raspbmc. OSMC features an application store for TV use. Kodi is an application included for handling multimedia locally or online on OSMC.
Kodi or formerly known as XBMC, is an open source software (GPL) for handling of videos, music and pictures. Live TV can be viewed via Kodi and its add-ons expand its use. The support of UPnP allows streaming of Kodi to any other Kodi instances. Its like multi screen mirror display.
Here are steps to start off with the OSMC operating system.
Press "Esc" and it should start downloading OSMC and install. Once done, it reboots to OSMC.
Troubleshooting
After OSMC splash screen appeared, the Samsung TV displayed
"Mode not supported".
What does this mean? OSMC got the wrong resolution or the TV did not support multiple modes automatically.
username: osmc
password: osmc
At the command line type:
Identify which mode is being used that is causing the problem.
tvservice -s
Identify which modes are available in OSMC monitor service
tvservice -m DMT
Output that I got:
osmc@osmc:~$ tvservice -s
state 0x12001a [HDMI DMT (39) RGB full 16:9], 1360x768 @ 60.00Hz, progressive
osmc@osmc:~$ tvservice -m DMT
Group DMT has 4 modes:
mode 4: 640x480 @ 60Hz 4:3, clock:25MHz progressive
mode 9: 800x600 @ 60Hz 4:3, clock:40MHz progressive
mode 16: 1024x768 @ 60Hz 4:3, clock:65MHz progressive
(prefer) mode 39: 1360x768 @ 60Hz 16:9, clock:85MHz progressive
Changed the value to match below. E.g. to use alternative mode, change hdmi_mode from 16 to 4.
Click"OK", and press "Esc". Reboot as normal.
Keep changing the value of the mode until it works and display Kodi with default OSMC skin/template.
Plugged in the networking cable and restarted RPI. This time, it loaded the remaider of the OS like OSMC and OpenElect.
OSMC (Open source Media Center), is a Debian based Linux operating system. Fomerly known as Raspbmc. OSMC features an application store for TV use. Kodi is an application included for handling multimedia locally or online on OSMC.
Kodi or formerly known as XBMC, is an open source software (GPL) for handling of videos, music and pictures. Live TV can be viewed via Kodi and its add-ons expand its use. The support of UPnP allows streaming of Kodi to any other Kodi instances. Its like multi screen mirror display.
Here are steps to start off with the OSMC operating system.
Step 1: Boot to OSMC
Boot up the RPI. It goes into the RPI boot screen, press the "SHIFT" key to bring up the editing screen. Click on OSMC for PI2 and press "Enter" and an "x" will appear for the OSMC.Press "Esc" and it should start downloading OSMC and install. Once done, it reboots to OSMC.
Troubleshooting
After OSMC splash screen appeared, the Samsung TV displayed
"Mode not supported".
What does this mean? OSMC got the wrong resolution or the TV did not support multiple modes automatically.
Troubleshooting Step 1:
In the same network, open the SSH client (Putty) and connect to the RPI via IP address.username: osmc
password: osmc
At the command line type:
Identify which mode is being used that is causing the problem.
tvservice -s
Identify which modes are available in OSMC monitor service
tvservice -m DMT
Output that I got:
osmc@osmc:~$ tvservice -s
state 0x12001a [HDMI DMT (39) RGB full 16:9], 1360x768 @ 60.00Hz, progressive
osmc@osmc:~$ tvservice -m DMT
Group DMT has 4 modes:
mode 4: 640x480 @ 60Hz 4:3, clock:25MHz progressive
mode 9: 800x600 @ 60Hz 4:3, clock:40MHz progressive
mode 16: 1024x768 @ 60Hz 4:3, clock:65MHz progressive
(prefer) mode 39: 1360x768 @ 60Hz 16:9, clock:85MHz progressive
Troubleshooting Step 2:
Reboot RPI, and as it loads press "SHIFT" until the edit boot screen appears. Click on OSMC and choose "Edit config".
Click"OK", and press "Esc". Reboot as normal.
Keep changing the value of the mode until it works and display Kodi with default OSMC skin/template.
Tuesday, June 16, 2015
Raspberry Pi: Getting Started
Where can I find a tiny little computer that can be programmed and cost under RM300? Lots of tablets floating around but I finally settled with just a bare computer, the Raspberry Pi 2.
What can be done with Raspberry Pi? Here is a short list;
What is this?
Bare computer with NO monitor, keyboard or mouse.What can be done with Raspberry Pi? Here is a short list;
- Arcade machine: Play Minecraft
- Robots
- Media Centre
- Music over all rooms
- Fly Drone
- Personal File cloud
- Learn programming with Scratch, Programming,
- Remote Camera
- Stay anonymous online with Tor
- Network security/Penetration test
- Solar panel computer
- IoT from IBM, Toilet Flushed, ...
- SoC Broadcom BCM2836
- CPU: Quad-core ARM Cortex-A7 (~6x performance)
- GPU: Broadcom VideoCore IV
- Memory: 1GB LPDDR2 SDRAM (2x memory)
- Video outputs: HDMI and 4-pole 3.5 mm jack
- Audio outputs: 4-pole 3.5 mm jack, HDMI
- Onboard storage: microSD card slot
- 10/100 Ethernet RJ45 onboard network
- 5V micro USB power input jack
- 40 pin 2.54mm header expansion slot (The layout)
- 4 USB ports
How to get this done?
Read the Setting up instructions, and buy the components.![]() |
| What I bought. |
Try joining a Raspberry group like that in Googleplus.
To start off, an operating system needs to be selected from one of many;
- Raspbian (Debian Wheezy port)
- OpenElec
- RISC OS
- Arch Linux
- OSMC (Replacing RaspBMC)
- Pidora (Fedora Linux)
To be continued...
Thursday, June 4, 2015
Centos Linux Status Reporting with xsos
Centos linux status can be read from so many ways. Ryan Sawhill provides a nice layout of so many reporting formats in xsos. The source and documentation is fairly well prepared at https://github.com/ryran/xsos
Requirements: one of it is BASH 4
chmod +x /usr/local/bin/xsosa
1. Display the help commands
$ xsos -h
2. Display OS and memory information
$ xsos -om
3. Display CPU, LSPCI and Network devices
$ xsos -cln
4. Display sysctls info
$ xsos -sysctl
Requirements: one of it is BASH 4
Step 1: Download xsos and make it executable. Use root access.
wget -O /usr/local/bin/xsos bit.ly/xsos-directchmod +x /usr/local/bin/xsosa
Step 2: Run xsos
Example of some of the reports;1. Display the help commands
$ xsos -h
2. Display OS and memory information
$ xsos -om
3. Display CPU, LSPCI and Network devices
$ xsos -cln
4. Display sysctls info
$ xsos -sysctl
It is a really handy tool to prepare documentation and analyse status for troubleshooting.
Monday, April 20, 2015
Did you know there is a Windows Remix?
Just heard a pretty awesome tune but wait till you see the video.
How many of these screens have you seen?
Fake listings on Google Maps
Why would you want to create a fake listing on Google Map?
Nice write-up from Danny Sullivan of Search Engine Land on Bryan Seely who presented this weakness at TEDx Kirkland.
Advantages of being in the open source software is apparent here. If developers picked up on this, some form of followup or monitoring would have taken place.
Nice write-up from Danny Sullivan of Search Engine Land on Bryan Seely who presented this weakness at TEDx Kirkland.
Advantages of being in the open source software is apparent here. If developers picked up on this, some form of followup or monitoring would have taken place.
Wednesday, April 15, 2015
Read DVD with Avidemux
Avidemux cannot directly open a DVD file. Instead a readable VOB file is needed to provide a format to access the DVD.
Operating system: MS Windows 7
Open a command prompt.
To create VOB for title 1, chapter 1, or in the DVD file its called VTS_01_0.vob, type
"E:\mplayer-svn-37386\mplayer.exe" dvd://1 -chapter 1 -dumpstream -dumpfile rippeddvd1_1.vob
To create VOB for title 2, or in the DVD file its called VTS_01_1.vob, type
"E:\mplayer-svn-37386\mplayer.exe" dvd://2 -dumpstream -dumpfile rippeddvd1_2.vob
To create VOB for chapter 2, or in the DVD file its called VTS_01_1.vob, type
"E:\mplayer-svn-37386\mplayer.exe" dvd://1 -chapter 2 -dumpstream -dumpfile rippeddvd1_2.vob
Alternatively if above still fails, use another application and convert the DVD to a readable format. E.g. Handbrake software.
Read www.avidemux.org for further details
Operating system: MS Windows 7
Open a command prompt.
To create VOB for title 1, chapter 1, or in the DVD file its called VTS_01_0.vob, type
"E:\mplayer-svn-37386\mplayer.exe" dvd://1 -chapter 1 -dumpstream -dumpfile rippeddvd1_1.vob
To create VOB for title 2, or in the DVD file its called VTS_01_1.vob, type
"E:\mplayer-svn-37386\mplayer.exe" dvd://2 -dumpstream -dumpfile rippeddvd1_2.vob
To create VOB for chapter 2, or in the DVD file its called VTS_01_1.vob, type
"E:\mplayer-svn-37386\mplayer.exe" dvd://1 -chapter 2 -dumpstream -dumpfile rippeddvd1_2.vob
Alternatively if above still fails, use another application and convert the DVD to a readable format. E.g. Handbrake software.
Subscribe to:
Posts (Atom)